Bring the beauty of spring into your crochet collection with this Amigurumi Cherry Blossom Bonsai Tree pattern! Inspired by the delicate and fleeting charm of cherry blossoms, this miniature bonsai captures the essence of nature’s elegance in every stitch. With its soft pink blooms, sturdy trunk, and graceful branches, this crochet bonsai tree is a perfect blend of artistry and craftsmanship. Whether you’re crafting for plant lovers, adding a serene touch to your decor, or simply enjoy making unique amigurumi designs, this pattern lets you create a stunning piece bursting with personality! 🌸✨
Designed for customization, this pattern allows you to experiment with different shades of pink and brown, embroidered details, or even tiny accessories like miniature petals or decorative moss for extra charm. Craft a classic cherry blossom bonsai with its signature soft hues, create a whimsical version with pastel tones, or even stitch up a full set of nature-inspired amigurumi for a breathtaking display! Whether gifted as a cherished keepsake, displayed as a peaceful accent, or made simply for the joy of crafting, this Amigurumi Cherry Blossom Bonsai Tree is a fun and creative project—perfect for bringing a touch of handmade tranquility to every stitch! 🧶💖
🌸 Amigurumi Cherry Blossom Bonsai Tree Crochet Pattern
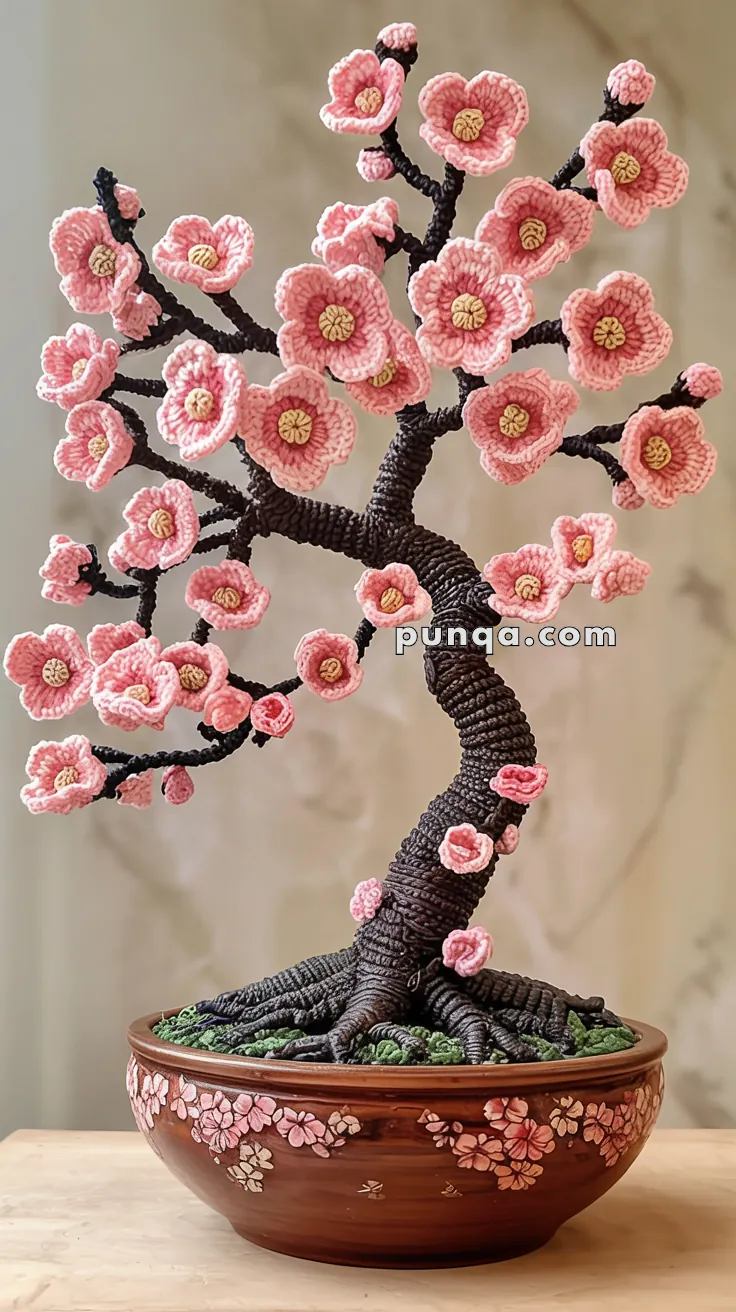
Capture the serene beauty of spring with this detailed Amigurumi Cherry Blossom Bonsai Tree. Its twisting trunk, sculpted bark texture, and clusters of layered pink blossoms recreate the natural grace of a real bonsai. Displayed in a floral pot with mossy soil, this handmade art piece makes a stunning centerpiece or a calming craft project. 🌿✨
✨ Skill Level
Advanced – includes structural shaping, wire wrapping, texturing, and detailed floral assembly.
📏 Finished Size
Approx. 12–14 inches (30–35 cm) tall using DK or light worsted yarn with a 2.5–3.0 mm hook.
🧶 Materials
Yarn (DK or Light Worsted):
Dark Brown – Trunk & Branches
Soft Pink – Outer Petals
Light Pink – Inner Petals (optional for layered look)
Light Yellow – Flower Centers
Green – Moss/Soil Base
Other Supplies:
Crochet Hook: 2.5–3.0 mm
Floral wire (various gauges: thick for trunk, medium for branches)
Wire cutters
Hot glue or craft glue
Polyfill (optional, for base)
Tapestry needle
Scissors
Decorative ceramic pot (5–6 in / 12–15 cm wide)
🧵 Abbreviations (US Terms)
MR – Magic Ring
sc – Single Crochet
inc – Increase (2 sc in same st)
dec – Decrease (sc2tog)
sl st – Slip Stitch
ch – Chain
hdc – Half Double Crochet
dc – Double Crochet
FO – Fasten Off
🌸 Blossoms
Outer Petals (Make 30–40)
With Soft Pink:
MR, 5 sc (5)
In each st: (ch 2, hdc, dc, hdc, ch 2, sl st in same st) × 5 to form 5 petals
FO, leaving long tail for sewing.
💡 To match photo:
- For more ruffled edges, add 1 extra dc per petal (ch 2, hdc, dc, dc, hdc, ch 2).
- Slightly pinch each petal inward and steam-set to curve forward like in the image.
Inner Layer (Optional for fullness)
With Light Pink:
MR, 5 sc (5)
In each st: (ch 1, hdc, dc, hdc, ch 1, sl st) × 5
FO and sew to center of a full-sized blossom.
Flower Centers (Make 30–40)
With Light Yellow:
MR, 6 sc, sl st to join (6)
Ch 1, sl st in next st, ch 3, sl st in next st × around for textured pistil effect.
FO and stitch securely to center of blossom.
💡 Texture Tip: The small chain loops mimic the photo’s raised yellow stamens.
🌳 Branches
With Dark Brown:
Cut several wires:
- 4 × 12 in (30 cm) for main branches
- 6 × 8 in (20 cm) for secondary branches
Attach yarn to one end and sc tightly around the wire. Continue until fully covered.
To shape realistic joints:
- Twist thinner branches around thicker ones.
- Add small amounts of glue between wire wraps if needed for firmness.
- Crochet additional sc over the joint to hide transitions.
🌲 Trunk
With Dark Brown:
Cut 3–5 thick wires (14–16 in) and twist together to form the trunk. Spread the lower ends into root shapes.
Crochet sc tightly around the twisted base, working upward.
Curve and bend slightly as you work to mimic bonsai flow.
💡 Bark Texture:
- Alternate BLO and FLO every few rows.
- Add surface slip stitches spiraling upward to replicate the photo’s coiled bark.
🌳 Roots
Crochet sc around each separated wire end and curve them outward.
Sew or twist together slightly at the base for a natural spread.
Shape them to flow into the ceramic pot like the photo.
🌿 Soil Base
With Green:
MR, 6 sc (6)
inc ×6 (12)
(1 sc, inc) ×6 (18)
Continue until base matches the pot diameter.
To match the mossy surface from the image:
Alternate 1 sc round with 1 bobble stitch round.
(Each bobble = 5 dc in one stitch, closed together.)
Stuff lightly, then glue or stitch into pot.
🌼 Assembly
- Insert and Secure Trunk:
Place trunk base into the pot and glue securely. - Attach Moss Base:
Fit green crocheted base tightly around roots. - Add Branches:
Twist or stitch branches to upper trunk, layering outward and upward. - Add Blossoms:
Sew blossoms to branch tips and along thicker trunk sections.
Mix single- and double-layer flowers for a natural look. - Adjust Shape:
Bend wire gently for curved bonsai silhouette.
💡 Finishing Touch:
Glue a few petals to the soil base and trunk as fallen blossoms for realism.
🎨 Pot Detailing
If using a plain ceramic pot:
Paint or embroider small cherry blossoms around the outer edge using acrylic paint or fine-tipped permanent marker to replicate the photo’s floral decoration.
💡 Customization Ideas
🌸 Use ombré pink yarn for gradient blossoms.
🌿 Add micro LED fairy lights spiraling around trunk.
🎋 Crochet tiny buds (MR, 3 sc, close) for new growth.
🏺 Add miniature stones or moss patches around roots.
🌺 Final Thoughts
Your Amigurumi Cherry Blossom Bonsai Tree is complete — a breathtaking handmade sculpture that celebrates nature’s balance and beauty. With its gently twisting trunk, lifelike bark, and abundant pink blossoms, it brings peace and artistry to any space. 🌸
Whether displayed as home décor, gifted to a loved one, or used as a meditative craft, this crochet bonsai will bloom forever — no watering required. 🧶🌿