Hey there! 😊 Have you ever stumbled across amigurumi and felt immediately enchanted by their adorable charm? If not, let me introduce you to the delightful world of crocheting these cute, cuddly creatures! One of my favorites to create is the chameleon amigurumi. There’s just something incredibly satisfying about crafting these tiny, colorful lizards. With their whimsical patterns and vibrant hues, they seem to bring a splash of joy wherever they go. The process of making an amigurumi chameleon is like embarking on a mini adventure where creativity knows no bounds, and every stitch is a step toward bringing your own little chameleon to life.
Creating an amigurumi chameleon involves a delightful mix of creativity and technique. 🧶 First, I gather my colorful yarns, as the chameleon’s vibrant skin is the star of the show. Choosing the perfect shades is half the fun! Once I’ve settled on my colors, I start crocheting with a basic magic circle, gradually building up its body, tail, and those all-important eyes. As the chameleon begins to take shape, it’s amazing to see personality emerge with each new detail I add. There’s something meditative about the repetitive motion of crocheting, and before I know it, I’m holding a charming, hand-crafted lizard that’s as unique and colorful as I imagined.
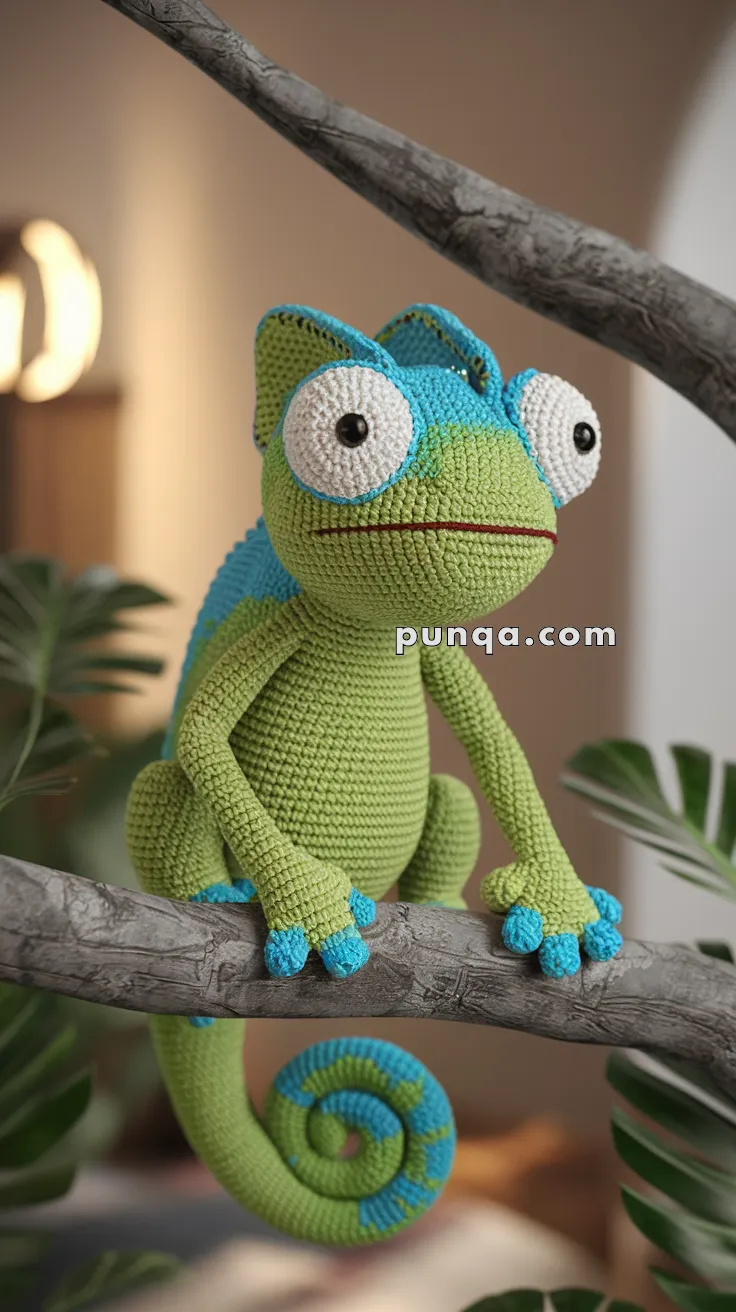
🦎 Amigurumi Chameleon – FREE Crochet Pattern
Bring a pop of color and personality to your amigurumi collection with this whimsical chameleon! With its bulging cartoon eyes, spiral tail, and sticky toes, this quirky reptile is sure to make anyone smile. Perfect for jungle-themed decor, reptile enthusiasts, or just for fun!
🧶 Materials
-
Yarn in light green, aqua blue, white, and dark red (mouth detail)
-
2.5 mm or 3.0 mm crochet hook
-
12 mm safety eyes
-
Fiberfill stuffing
-
Yarn needle
-
Stitch marker
-
Optional: wire for posable tail and limbs
✨ Abbreviations (US Terms)
-
MR – Magic Ring
-
sc – Single Crochet
-
inc – Increase (2 sc in same st)
-
dec – Decrease (sc two together)
-
ch – Chain
-
sl st – Slip Stitch
-
FO – Fasten Off
🧠 Skill Level
Intermediate – Includes shaping, color changes, spiral tail construction, and expressive facial embroidery.
✂️ Pattern Instructions
🔸 Head
-
With light green yarn:
-
MR, sc 6
-
Inc to 12, 18, 24, 30, and up to 42 sts
-
-
Work even for 5–7 rounds to elongate
-
Add increases at the top for eye bump foundations
-
Switch to aqua blue yarn midway for forehead color
-
Insert safety eyes on large white circles (crochet separately)
-
Embroider a red straight line for the mouth
-
Stuff firmly and FO
🔹 Body
-
Start with green yarn:
-
MR, sc 6
-
Inc evenly to 48 sts
-
-
Work even for 8–10 rounds
-
Slightly decrease at the waist
-
Increase again to give a strong base for limbs
-
Switch to aqua blue yarn halfway down the back
-
Stuff firmly and FO
🔸 Tail (Curled)
-
With green yarn:
-
MR, sc 6
-
Gradually increase to about 24 sts over rounds
-
-
Switch to aqua blue yarn in sections for stripes
-
As you crochet, curl the tail inward and stuff gradually
-
Crochet until tail reaches 20–25 cm and holds a spiral shape
-
Insert wire inside if you want a posable effect
-
FO
🔹 Arms (Make 2)
-
With green yarn:
-
MR, sc 6
-
Work even for ~20 rounds
-
-
Change to aqua blue for fingers
-
Toes: ch 4, sc back for each digit (3 per hand)
-
Stuff lightly and shape
-
FO
🔸 Legs (Make 2)
-
Start similar to arms but increase a few more sts for thigh width
-
Work ~25 rounds
-
Switch to blue for toes, make 3–4 per foot
-
Stuff lightly and FO
🔹 Eyes (Make 2)
-
With white yarn:
-
MR, sc 6
-
Inc evenly to ~18 sts
-
-
Work even for 2–3 rounds
-
Sew safety eyes at the center
-
Sew to top bumps on the head
🧵 Assembly
-
Sew head to top of body
-
Attach limbs close to the base with slightly forward angles
-
Sew curled tail securely to the back base
-
Attach eyes bulging out from head
-
Weave in all ends securely
🌿 Display Tip
Perch your chameleon on a wooden stick, tree branch, or plant for a jungle-style presentation. You can even create a crocheted fly or leaf for extra fun! 🍃🐛
✨ Finishing Touches
-
Embroider simple nose dots or brow lines for character
-
Lightly blush cheeks for a whimsical look
-
Add wire inside tail or arms for poseable display
-
Surface crochet on the back for texture details