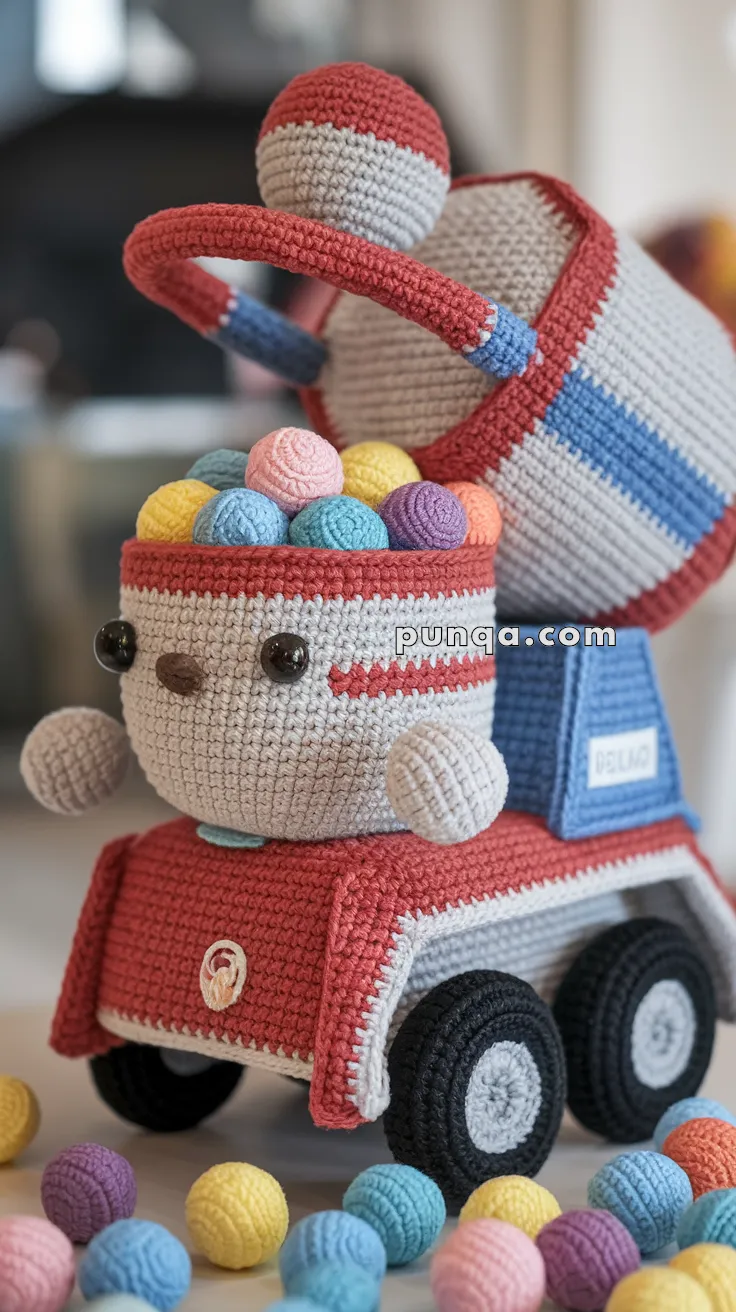
Mix up some crochet fun with this Amigurumi Cement Mixer pattern! Inspired by the hardworking construction vehicle, this playful design captures the sturdy shape, rolling wheels, and rotating drum in every stitch. With carefully crafted details that bring its industrial charm to life, this crochet cement mixer is perfect for adding a touch of creativity to your handmade collection. Whether you’re crafting for vehicle enthusiasts, creating a unique decor piece, or simply enjoy making quirky amigurumi designs, this pattern lets you stitch up a miniature cement mixer bursting with personality! 🚧✨
Designed for customization, this pattern allows you to experiment with different truck colors, embroidered details, or even tiny accessories like a miniature construction cone or worker figure for extra flair. Craft a classic cement mixer with its signature yellow or orange hues, create a whimsical version with pastel tones, or even stitch up a full set of construction-inspired amigurumi for a dynamic display! Whether gifted as a fun keepsake, displayed as a charming accent, or made simply for the joy of crafting, this Amigurumi Cement Mixer is a creative and entertaining project—perfect for bringing a touch of handmade construction magic to every stitch! 🧶💖🚜
🛻 Amigurumi Cement Mixer Truck Crochet Pattern
Get ready to roll with this super fun and colorful amigurumi cement mixer truck! Featuring a smiling front face, bold primary color panels, a spinning drum packed with colorful “cement” balls, and chunky wheels, this project is perfect for vehicle-loving kids or display-loving crafters.
✨ Skill Level
Intermediate – Includes shaping, color changes, and sewing multiple components.
📏 Finished Size
Approx. 10–12 inches (25–30 cm) long using worsted weight yarn and a 3.5 mm hook.
🧶 Materials
Yarn (Worsted weight):
-
Color A: Light Grey (truck body, face, drum)
-
Color B: Red (cab, trim, drum rim)
-
Color C: Blue (stripe, drum arms)
-
Color D: Black (tires)
-
Color E: White (tire center, trim)
-
Assorted pastel yarns for “cement balls”
-
Brown or black yarn for nose and embroidery
-
10 mm safety eyes
-
Crochet hook: 3.5 mm
-
Polyfill stuffing
-
Tapestry needle
-
Stitch marker
-
Scissors
🧵 Abbreviations (US Terms)
MR – Magic Ring
sc – Single Crochet
inc – Increase
dec – Decrease
sl st – Slip Stitch
ch – Chain
FO – Fasten Off
🚚 Front Cab (Face Section) – Color A
MR, 6 sc (6)
2. inc x6 (12)
3. (1 sc, inc) x6 (18)
4. (2 sc, inc) x6 (24)
5. (3 sc, inc) x6 (30)
6–13. sc around (30)
14. (4 sc, inc) x6 (36)
15–17. sc around (36)
Change to Color B (cab top trim)
18–20. sc around (36)
FO, stuff firmly. Insert safety eyes between rounds 7–8, ~6 stitches apart.
Embroider smile with brown yarn. Sew nose with a small oval in brown or black.
💪 Arms (Make 2) – Color A
MR, 6 sc
2–5. sc around (6)
Stuff lightly
Flatten and sew to either side of the face cab.
🚛 Truck Body (Main Chassis) – Red
Ch 20
Row 1–12: sc across, ch 1, turn (20)
Continue around the rectangle to build side walls:
Round 1: sc around entire base
Rounds 2–10: sc in each stitch around to form a 3D open-top box
Switch to Color A for interior lining if desired
Stuff firmly
FO
🔵 Wheels (Make 4) – Color D
MR, 6 sc
2. inc x6 (12)
3. (1 sc, inc) x6 (18)
4. (2 sc, inc) x6 (24)
5. BLO sc around (24)
6–7. sc around (24)
Switch to Color E for wheel hub
8. (2 sc, dec) x6 (18)
9. (1 sc, dec) x6 (12)
10. dec x6 (6), FO and close
Sew wheels to base of truck body
🌀 Cement Drum – Color A + Red + Blue
Main Drum Section:
MR, 6 sc
2. inc x6 (12)
3. (1 sc, inc) x6 (18)
4. (2 sc, inc) x6 (24)
5–11. sc around (24)
12. (2 sc, dec) x6 (18)
13. (1 sc, dec) x6 (12)
14. dec x6 (6), FO and close
Color Changes:
Add blue stripe around middle (Rows 6–7) and red trim on opening edge
Top Cap:
MR, 6 sc
2. (1 sc, inc) x3 (9)
3. sc around (9), FO
Sew to top of drum
Arms (Support Frame):
With Red:
Ch 25, sl st back
Wrap into a semicircle and attach sides to back of drum
Add a horizontal blue bar (ch 8, sew ends)
Stuff drum lightly and sew it tilted backward to truck bed
🌈 Cement Balls (Make 10–12) – Various Pastels
MR, 6 sc
2. inc x6 (12)
3. sc around (12)
4. dec x6 (6)
FO, close and weave in
Toss into the top of the drum
✂️ Finishing Touches
-
Embroider vehicle details like side stripes or logos
-
Add label plates with “DELUX” or “CEMENT” in surface crochet
-
Stitch wheels tightly to support balance
-
Sew cab and drum securely to the chassis
💡 Customization Ideas
-
Use a rotating button or spinner disc to make the drum spin
-
Add a yarn “pouring chute” in back
-
Make multiple trucks in different construction colors (orange, yellow, etc.)
This cheerful cement mixer is bursting with color, personality, and play value. Perfect as a gift for truck-loving kiddos or as a standout addition to your handmade vehicle collection! 🚧🧱🛻