Welcome to the hardworking and skillful world of amigurumi! 🛠️✨ Today, I’m excited to share my free crochet pattern for an Amigurumi Carpenter—a charming and detailed creation perfect for craft lovers, DIY enthusiasts, or anyone who enjoys stitching up expressive and character-driven plush designs! 🧶 Whether you love crafting figures with personality, creating textured and lifelike details, or simply want to add a skilled artisan to your handmade lineup, this pattern will guide you through making a beautifully sculpted plush with a mini tool belt, tiny hammer, and a touch of craftsmanship! 🔨
This design embraces earthy tones, intricate shaping, and thoughtful details to bring a hardworking and inspiring presence to your crochet projects! 🧶✨ I’ve carefully outlined each step to ensure your Amigurumi Carpenter turns out just right—ready to brighten up your space or become a treasured handmade gift! 🎁 So grab your hooks, pick out denim blues, warm browns, or classic workwear shades, and let’s stitch up a dedicated carpenter! 🛠️
👷♂️ Amigurumi Carpenter – Crochet Pattern
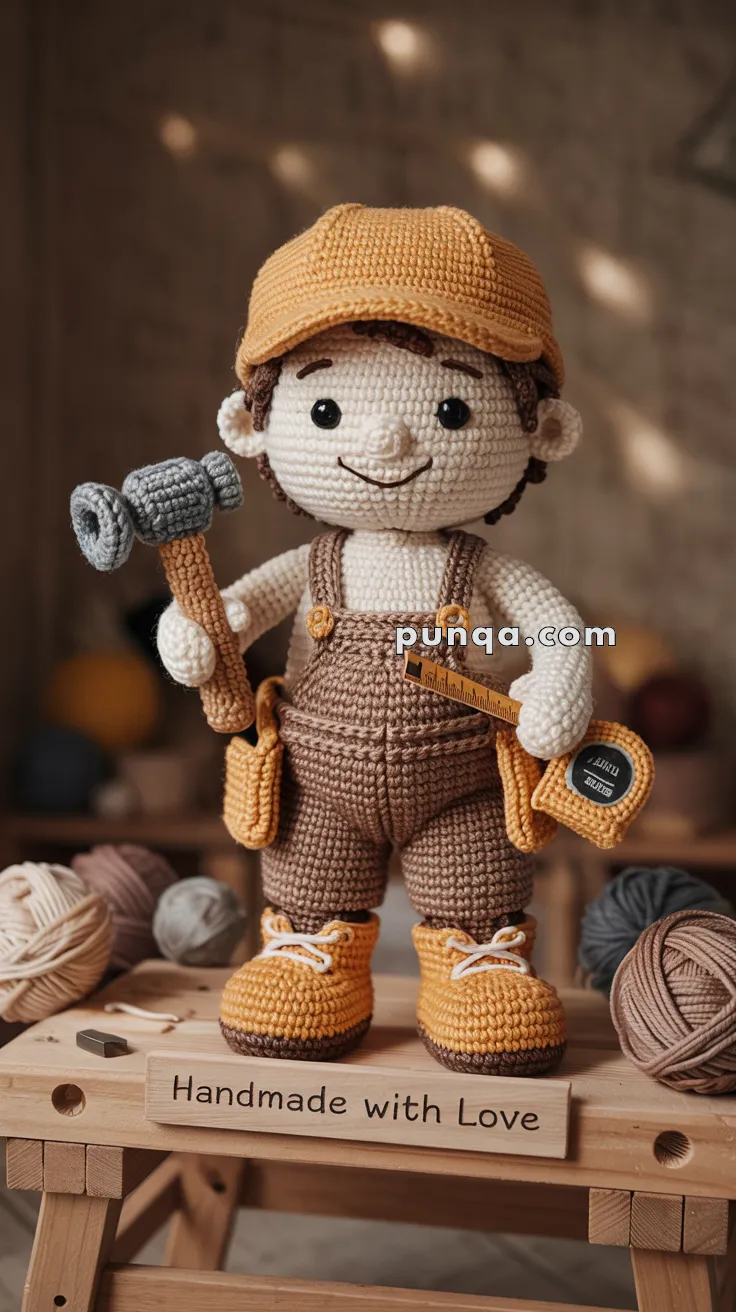
Bring your crafts to life with this hardworking amigurumi carpenter!
He’s dressed in short brown overalls, a yellow cap, bright work boots with white laces, and carries realistic tools — a hammer, measuring tape, and tool pouches. His friendly face and fine details make him a perfect handmade gift or display piece for any maker’s shelf.
✨ Skill Level
Intermediate – includes shaping, color changes, and 3D accessories.
📏 Finished Size
Approx. 12 in (30 cm) tall when using DK yarn and a 2.5–3.0 mm hook.
🧶 Materials & Yarn Amounts
Yarn (DK Weight):
- Beige / Cream (skin) – 40 g
- Brown (hair, shorts, straps) – 60 g
- Yellow (cap, tool belt, boots) – 50 g
- Mustard or golden yellow (boot soles and accents) – 20 g
- White (laces, eye glint, tool details) – small amount
- Gray (hammer head) – 25 g
- Orange (measuring tape) – 15 g
- Black (tape label, embroidery) – small amount
Other Supplies:
- Crochet hook 2.5–3.0 mm
- Safety eyes 8 mm
- Fiberfill stuffing
- Yarn needle
- Stitch markers
- Optional: blush or soft pastel for cheeks
🧵 Abbreviations (US Terms)
MR – Magic Ring
sc – Single Crochet
inc – Increase (2 sc in same stitch)
dec – Decrease (sc2tog)
ch – Chain
sl st – Slip Stitch
BLO – Back Loop Only
FLO – Front Loop Only
hdc – Half Double Crochet
FO – Fasten Off
🧍 Body (Worked from Legs Up)
Legs (Make 2)
With yellow (boots):
- MR, 6 sc [6]
- inc ×6 [12]
- (sc, inc) ×6 [18]
4–5. sc around [18]
Switch to mustard yellow (boot soles): - BLO sc around [18]
Switch to brown for shorts:
7–12. sc around [18]
Stuff legs lightly. FO first leg only.
Join Legs
After finishing the second leg, ch 3 and join the first leg.
13. sc around both legs and chs [42]
14–21. sc around [42]
22. (5 sc, dec) ×6 [36]
23. (4 sc, dec) ×6 [30]
24. (3 sc, dec) ×6 [24]
25. Switch to skin tone, sc around [24]
26. (2 sc, dec) ×6 [18]
27–29. sc around [18]
Stuff firmly. FO.
👕 Overalls & Straps
With brown yarn:
- Work small rectangle front panel: ch 18, sc 6 rows, FO.
- Sew to front waistline for the bib.
- Straps: ch 26, sc back across; attach ends from front bib to back waist.
- Embroider two yellow circles where straps attach as overall “buttons.”
- Waist seam: surface crochet a faint horizontal line to mimic a waistband.
👞 Boots
With yellow (top) and mustard yellow (sole):
Tongue:
ch 5, sc across (4), sc 3 rows, FO. Sew above boot front.
Laces:
Use white yarn and embroider an “X” crisscross from ankle to tongue top.
Optional: add an extra surface row of sc in mustard across sole for a defined boot edge.
👒 Head
With skin tone yarn:
- MR, 6 sc [6]
- inc ×6 [12]
- (sc, inc) ×6 [18]
- (2 sc, inc) ×6 [24]
- (3 sc, inc) ×6 [30]
- (4 sc, inc) ×6 [36]
7–15. sc around [36]
Insert 8 mm safety eyes between rounds 10–11, 6 sts apart. - (4 sc, dec) ×6 [30]
- (3 sc, dec) ×6 [24]
- (2 sc, dec) ×6 [18]
- (sc, dec) ×6 [12]
- dec ×6 [6]
FO and close. Stuff firmly.
Ears (make 2):
MR, 5 sc. FO, flatten slightly, and sew between R10–R11 aligned with eyes.
💇 Hair
With brown yarn:
- MR, 6 sc
- inc ×6 [12]
- (sc, inc) ×6 [18]
- (2 sc, inc) ×6 [24]
- (3 sc, inc) ×6 [30]
- sc around [30]
FO and sew to top of head.
Add 6–8 small looped strands or chain pieces around sides and back for curly texture.
🧢 Cap
With yellow yarn:
- MR, 6 sc [6]
- inc ×6 [12]
- (sc, inc) ×6 [18]
- (2 sc, inc) ×6 [24]
- (3 sc, inc) ×6 [30]
- (4 sc, inc) ×6 [36]
7–10. sc around [36]
Brim:
ch 9, sc back (8).
Next row: sl st 1, sc 6, sl st 1. Turn and sc in BLO for 3 more rows to curve.
FO and sew securely around front edge of hat, shaping downward.
Cap should cover most of the hairline with small curls peeking out.
💪 Arms (Make 2)
With skin tone yarn:
- MR, 6 sc [6]
- inc ×6 [12]
3–5. sc around [12] - (2 sc, dec) ×3 [9]
7–10. sc around [9]
Switch to light yellow (shirt cuffs):
11–13. sc around [9]
FO and stuff lightly. Attach to body sides at shoulder height.
🧰 Tool Belt & Pouches
With yellow yarn:
ch 35, sc across for 2 rows, FO. Wrap around waist and sew ends slightly overlapping.
Pouches:
ch 8, sc across 3 rows, fold and whip stitch sides. Make 2 pouches and sew to belt front and side.
For extra detail, topstitch brown yarn across pocket openings for contrast.
🔨 Hammer
Handle (brown):
MR, 6 sc, work 10 rounds. FO and stuff lightly.
Head (gray):
MR, 6 sc [6]
R2: inc ×6 [12]
R3–5: sc around [12]
R6: (sc, dec) ×4 [8]
FO, stuff lightly, sew horizontally across handle top.
Add a small gray circle to one end to mimic the hammer’s striking surface.
📏 Measuring Tape
Body (yellow):
MR, 6 sc → inc ×6 [12] → sc around for 2 more rounds [12].
Stuff lightly.
Label (black):
Embroider white letters (e.g. “TAPE”) or use a small black felt circle.
Tape Strip (orange):
ch 14, sc across, FO.
Embroider short black dash lines for measurements.
Sew one end into yellow tape body; let it curl outward naturally.
🪡 Final Assembly
- Sew head securely to body.
- Attach arms on each side just below neck.
- Place hat slightly tilted forward and stitch in place.
- Wrap and sew tool belt with pouches evenly spaced.
- Insert hammer in right hand and measuring tape in left or pocket.
- Embroider a small curved smile and short dark-brown eyebrows.
- Optionally, dab soft pink blush on cheeks.
- Stand doll on a wooden base or crochet disc for balance.
🌟 Finishing Touch
Your carpenter is now ready for work! 🧰
With his soft yellow boots, cheerful face, and realistic tools, he’s a heartwarming symbol of craftsmanship and creativity — a true “Handmade with Love” project from head to toe.