Welcome to the festive and musical world of amigurumi! 🎶✨ Today, I’m excited to share my free crochet pattern for an Amigurumi Caroling Elf—a cheerful and heartwarming creation perfect for holiday lovers, winter décor enthusiasts, or anyone who enjoys crafting expressive and joyful plush designs! 🧶 Whether you love stitching up whimsical characters, experimenting with cozy winter accessories, or simply want to add a singing elf to your handmade lineup, this pattern will guide you through crafting a beautifully sculpted plush with a bright red hat, rosy cheeks, and a tiny music sheet rolled in its hands! 🎄
This design embraces vibrant greens, warm reds, and intricate shaping to bring a merry and enchanting presence to your crochet projects! 🧶✨ I’ve carefully outlined each step to ensure your Amigurumi Caroling Elf turns out just right—ready to spread holiday cheer in your collection or become a treasured handmade gift! 🎁 So grab your hooks, pick out festive hues, and let’s stitch up a delightful caroling elf! 🎶
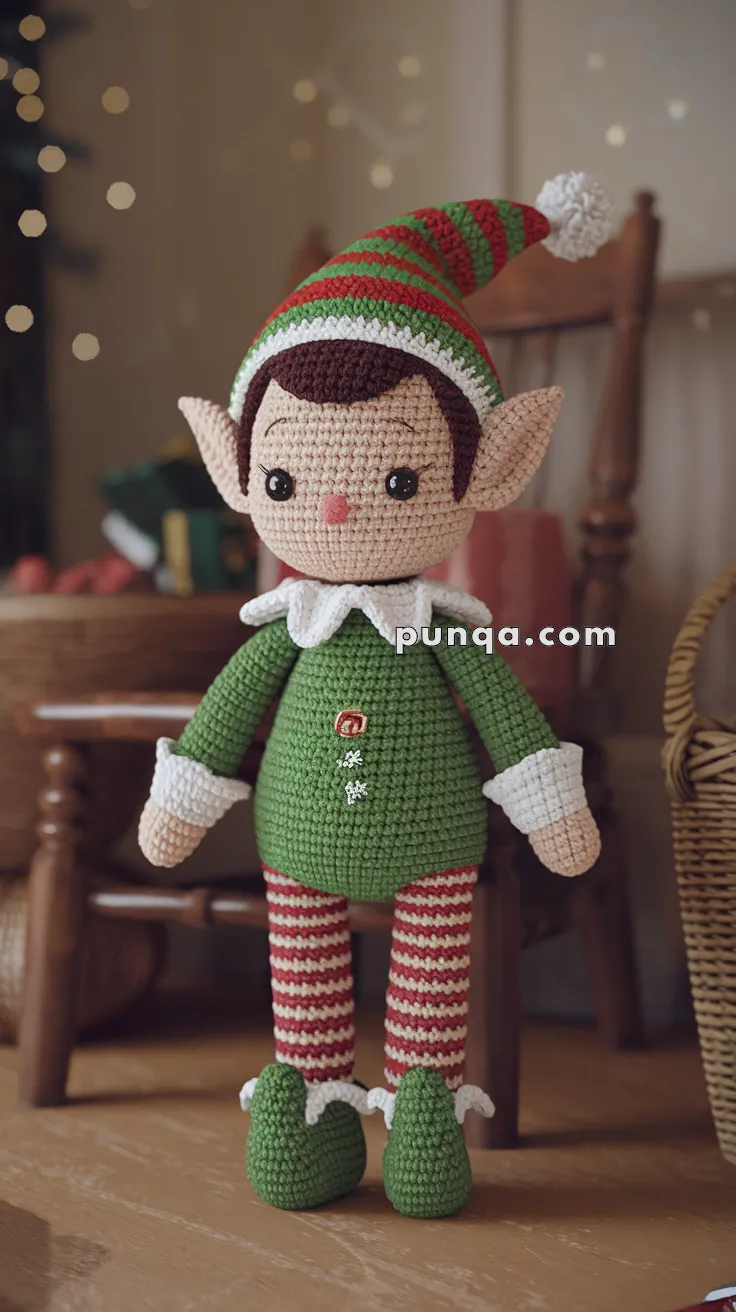
🎄 Amigurumi Christmas Caroling Elf Crochet Pattern
This festive little elf captures the charm of the holiday season with his striped leggings, curved green shoes, pointed hat, and friendly smile. Designed with a classic Christmas palette and soft shaping, he’s perfect as a display piece or handmade gift.
✨ Skill Level
Intermediate – requires color changes, shaping, and detailed assembly.
📏 Finished Size
Approximately 12–13 inches (30–33 cm) tall when made with DK-weight cotton yarn and a 2.75–3 mm crochet hook.
🧶 Materials
-
DK cotton yarn:
• Skin tone – 30 g
• Dark brown – 25 g (hair)
• Green – 60 g (tunic, sleeves, shoes, hat stripes)
• Red – 35 g (leggings, hat stripes)
• White – 30 g (collar, cuffs, hat brim, pom-pom)
• Pink – small amount (nose) -
10 mm black safety eyes
-
Fiberfill stuffing
-
2.75–3.0 mm crochet hook
-
Yarn needle and scissors
-
Stitch marker
-
Embroidery thread (brown or black for eyelashes and brows; white for snowflake detail)
🧵 Abbreviations (US Terms)
MR – Magic Ring
sc – Single Crochet
inc – Increase (2 sc in same stitch)
dec – Decrease (sc2tog)
sl st – Slip Stitch
ch – Chain
BLO – Back Loop Only
FLO – Front Loop Only
FO – Fasten Off
👦 Head (Skin Tone)
R1: MR, 6 sc (6)
R2: inc x6 (12)
R3: (1 sc, inc) x6 (18)
R4: (2 sc, inc) x6 (24)
R5: (3 sc, inc) x6 (30)
R6: (4 sc, inc) x6 (36)
R7–14: sc around (36)
→ Place safety eyes between R10–11, about 7 stitches apart.
R15: (4 sc, dec) x6 (30)
R16: (3 sc, dec) x6 (24)
R17: (2 sc, dec) x6 (18)
R18: (1 sc, dec) x6 (12)
R19: dec x6 (6)
FO and close. Stuff firmly.
💇 Hair Cap (Dark Brown)
Work the same as the head until R12 (36).
R13: sc around (36).
Work short rows at the front for a pointed hairline:
Row 1: sc 10, turn
Row 2: dec, sc 6, dec, turn
Row 3: dec, sc 4, dec
FO and sew to head so the front point dips in a “V” shape.
This creates the clean side hairline and top coverage shown in the photo.
👃 Nose (Pink)
R1: MR, 6 sc (6)
R2–3: sc around (6)
FO and stuff lightly.
Sew between eyes, slightly below centerline.
👂 Ears (Make 2, Skin Tone)
R1: MR, 4 sc (4)
R2: (sc, inc) x2 (6)
R3: (2 sc, inc) x2 (8)
R4: sc around (8)
Flatten, fold base slightly, and sew to sides of head between R9–10 angled upward.
🎽 Body (Green)
R1: MR, 6 sc (6)
R2: inc x6 (12)
R3: (1 sc, inc) x6 (18)
R4: (2 sc, inc) x6 (24)
R5: (3 sc, inc) x6 (30)
R6: (4 sc, inc) x6 (36)
R7–20: sc around (36)
R21: (4 sc, dec) x6 (30)
R22: (3 sc, dec) x6 (24)
R23–25: sc around (24)
FO and stuff firmly.
💪 Arms (Make 2)
Start with skin tone:
R1: MR, 6 sc (6)
R2: inc x6 (12)
R3–5: sc around (12)
Change to white (cuffs):
R6–7: sc around (12)
Change to green (sleeves):
R8–17: sc around (12)
Stuff lightly. FO and sew to sides of body.
🦵 Legs (Make 2, Red & White Stripes)
Alternate 1 round red, 1 round white.
R1: MR, 6 sc (6)
R2: inc x6 (12)
R3–26: sc around (12)
FO, stuff, and sew beneath body.
Legs should be thin and even, reaching below the tunic.
👞 Shoes (Green)
R1: MR, 6 sc (6)
R2: inc x6 (12)
R3: (1 sc, inc) x6 (18)
R4–5: sc around (18)
R6: sc 12, dec x3, sc 3 (15)
R7: sc around (15)
FO, stuff, and shape toe into a slight curl using a few hidden stitches.
Trim:
Attach white yarn at ankle.
R1: sc around evenly (no ruffles).
FO. Add small curved white cord detail on outer sides of each shoe.
🤍 Collar (White Pointed)
Ch 36.
R1: sc across (35).
R2: (ch 4, sl st in same st, sc 5) repeat to form small pointed sections.
FO and sew around neckline, points facing outward.
🎩 Hat (Red & Green Narrow Stripes)
Alternate 1 round red / 1 round green throughout.
R1: MR, 6 sc (6)
R2–3: sc around (6)
R4: (2 sc, inc) x2 (8)
R5–6: sc around (8)
R7: (3 sc, inc) x2 (10)
Continue increasing by 2 every few rounds until reaching 44 sts total (≈ 32 rounds).
R33–38: sc around (44).
Switch to white for brim:
R39–40: sc around (44).
FO. Lightly stuff the base, let the tip drape naturally to one side.
Pom-pom:
Use white yarn, 2.5–3 cm wide. Sew firmly to hat tip.
✨ Details & Embroidery
-
Embroider a small red button and a white snowflake button on the tunic front.
-
Add eyebrows and lashes using brown thread.
-
Stitch a tiny curved mouth with pink thread.
-
Optional: lightly blush cheeks.
🧵 Assembly Order
1️⃣ Sew head securely to body.
2️⃣ Attach arms slightly below the collar edge.
3️⃣ Attach legs evenly at the base of the body.
4️⃣ Sew on shoes and secure curled tips.
5️⃣ Attach the white collar around the neckline.
6️⃣ Position hat at an angle and stitch in place.
7️⃣ Add ears under the hat edge.
8️⃣ Embroider all facial and tunic details last.
🌟 Finishing Notes
-
The head should have a slightly larger proportion than the body for the classic elf look.
-
The hat’s narrow color stripes and long shape give it a soft, whimsical bend.
-
The collar points should rest outward on the shoulders.
-
The curled shoes and red-and-white striped leggings add playful contrast to the deep green tunic.
Your elf is now complete — a cheerful little companion full of Christmas charm! 🎁