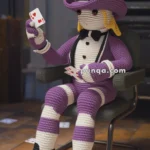
Step into the whimsical world of Alice in Wonderland with this Amigurumi Card Soldier crochet pattern! Inspired by the loyal guards of the Queen of Hearts, this charming design captures the flat card shape, tiny heart details, and playful personality in every stitch. Whether you’re crafting for fairy tale lovers, adding a touch of Wonderland magic to your decor, or simply enjoy making character-inspired amigurumi designs, this pattern lets you stitch up a miniature Card Soldier bursting with charm! Perfect for brightening up any space, this crochet piece brings a touch of handmade storytelling to your collection. 🃏✨
Designed for customization, this pattern allows you to experiment with different card suits, embroidered details, or even tiny accessories like a miniature spear or crown for extra flair. Craft a classic Card Soldier with bold red and white hues, create a whimsical version with pastel tones, or even stitch up a full set of Wonderland-inspired amigurumi for an enchanting display! Whether gifted as a cherished keepsake, displayed as a nostalgic accent, or made simply for the joy of crafting, this Amigurumi Card Soldier is a fun and creative project—perfect for bringing a touch of handmade fairy tale magic to every stitch! 🧶💖✨
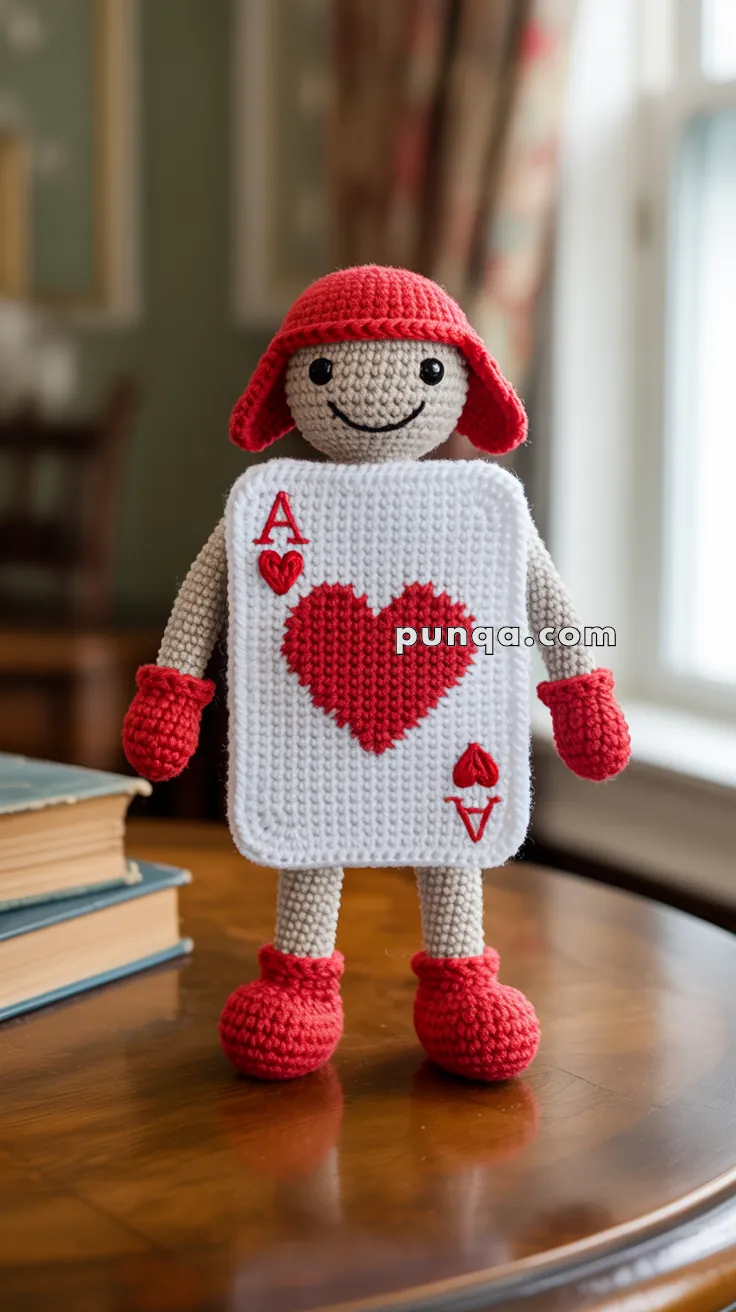
🃏 Amigurumi Card Soldier (Ace of Hearts) Crochet Pattern
Bring a classic deck of cards to life with this adorable amigurumi card soldier! Inspired by the Ace of Hearts, this whimsical doll features a detailed card body, a smiling face, bright red accessories, and a cute character charm. Perfect for Wonderland-themed displays, gifts, or imaginative play.
✨ Skill Level
Intermediate — includes flat panel construction, appliqué, shaping, and assembly.
📏 Finished Size
Approx. 26–28 cm (10–11 inches) tall using worsted yarn and a 3–3.5 mm hook.
🧶 Materials
Yarn (Worsted Weight)
- White – card body
- Red – helmet, mittens, boots, heart, symbols
- Beige / skin tone – head, arms, legs
Supplies
- 3–3.5 mm crochet hook
- 8–10 mm safety eyes
- Polyester fiberfill
- Yarn needle
- Stitch marker
- Scissors
- Optional thin plastic canvas or cardboard insert for card stiffness
🧵 Abbreviations (US Terms)
MR – Magic Ring
sc – Single Crochet
inc – Increase
dec – Decrease
ch – Chain
sl st – Slip Stitch
FO – Fasten Off
🧍 Head (Beige)
R1: MR 6 (6)
R2: inc ×6 (12)
R3: (1 sc, inc) ×6 (18)
R4: (2 sc, inc) ×6 (24)
R5: (3 sc, inc) ×6 (30)
R6–11: sc around (30)
Insert safety eyes between R7–8, about 7 stitches apart.
R12: (3 sc, dec) ×6 (24)
R13: (2 sc, dec) ×6 (18)
R14: (1 sc, dec) ×6 (12)
Stuff firmly
R15: dec ×6 (6)
FO and close.
Embroider a curved smile with black thread.
🪖 Helmet with Ear Flaps (Red)
R1: MR 6 (6)
R2: inc ×6 (12)
R3: (1 sc, inc) ×6 (18)
R4: (2 sc, inc) ×6 (24)
R5: (3 sc, inc) ×6 (30)
R6: (4 sc, inc) ×6 (36)
R7–10: sc around (36)
Ear Flaps (make 2 directly on helmet)
Row 11: Attach yarn, sc 10, turn
Row 12–15: ch 1, sc 10, turn
FO.
Sew helmet onto head so flaps hang down at the sides.
🧤 Arms (Make 2)
Start with red (mittens):
R1: MR 6 (6)
R2: inc ×6 (12)
R3–4: sc around (12)
R5: (2 sc, dec) ×3 (9)
Switch to beige:
R6–13: sc around (9)
Stuff lightly (hands rounded, arms soft).
FO, leave tail for sewing.
👢 Legs (Make 2)
Start with red (boots):
R1: MR 6 (6)
R2: inc ×6 (12)
R3–4: sc around (12)
R5: (2 sc, dec) ×3 (9)
Switch to beige:
R6–12: sc around (9)
Stuff firmly so boots are chunky and stable.
FO, leave tail.
🃏 Card Body (White)
Make 2 identical flat panels.
Ch 21
Row 1: sc in 2nd ch from hook and across (20)
Row 2–26: ch 1, turn, sc across (20)
FO on both.
Place panels together. Insert thin plastic canvas or cardboard if desired.
Sew around edges, leaving bottom open.
Lightly stuff. Close bottom.
The body should remain flat and square, not rounded.
❤️ Heart Appliqué
With red yarn:
R1: MR 6
R2: inc ×6 (12)
R3: (1 sc, inc) ×6 (18)
R4: (2 sc, inc) ×6 (24)
Shape the heart top by stitching a center dip.
Sew to center of card.
🔠 Ace Symbols
Using red yarn, embroider:
- “A” in upper left corner
- Small heart under it
- Upside-down “A” and heart in lower right
Keep symbols small and neat like a real playing card.
🪡 Assembly
- Sew legs to bottom back of card body so doll stands upright
- Attach arms to sides of card
- Sew head to top center of card
- Attach helmet
- Adjust stance so boots sit flat
✂️ Finishing Touches
- Shape boots with fingers for balance
- Bend arms slightly forward
- Steam lightly for clean edges
- Make sure card body stays flat
🌟 Final Result
Your Card Soldier now stands tall just like the photo — with his square playing-card body, bright red boots and mittens, cozy ear-flap helmet, friendly smile, and bold heart proudly displayed. He’s perfectly balanced, properly proportioned, and full of personality.
A true Wonderland classic brought to life in yarn 🃏❤️🧶