Bring the strength and charm of a Bull to life with this Amigurumi Bull crochet pattern! 🐂✨ With its sturdy frame, curved horns, and expressive features, this design captures the essence of this powerful animal in yarn form. Whether you’re crafting for a farm-themed décor piece, a unique gift, or simply love animal-inspired amigurumi, this FREE pattern is a fantastic addition to your collection.
Designed for beginner to intermediate crocheters, this pattern allows for customization in body textures, facial details, and even tiny accessories like a miniature bell or a playful stance to enhance its personality. Choose classic browns and blacks for a realistic look or experiment with bold hues for a creative twist! Whether displayed as part of a rustic setup or gifted to a fellow crochet enthusiast, this amigurumi bull is sure to impress. Grab your hook, select your favorite yarn, and let’s bring this mighty creature to life—one stitch at a time! 🧶✨
🐮 Amigurumi Bull Crochet Pattern
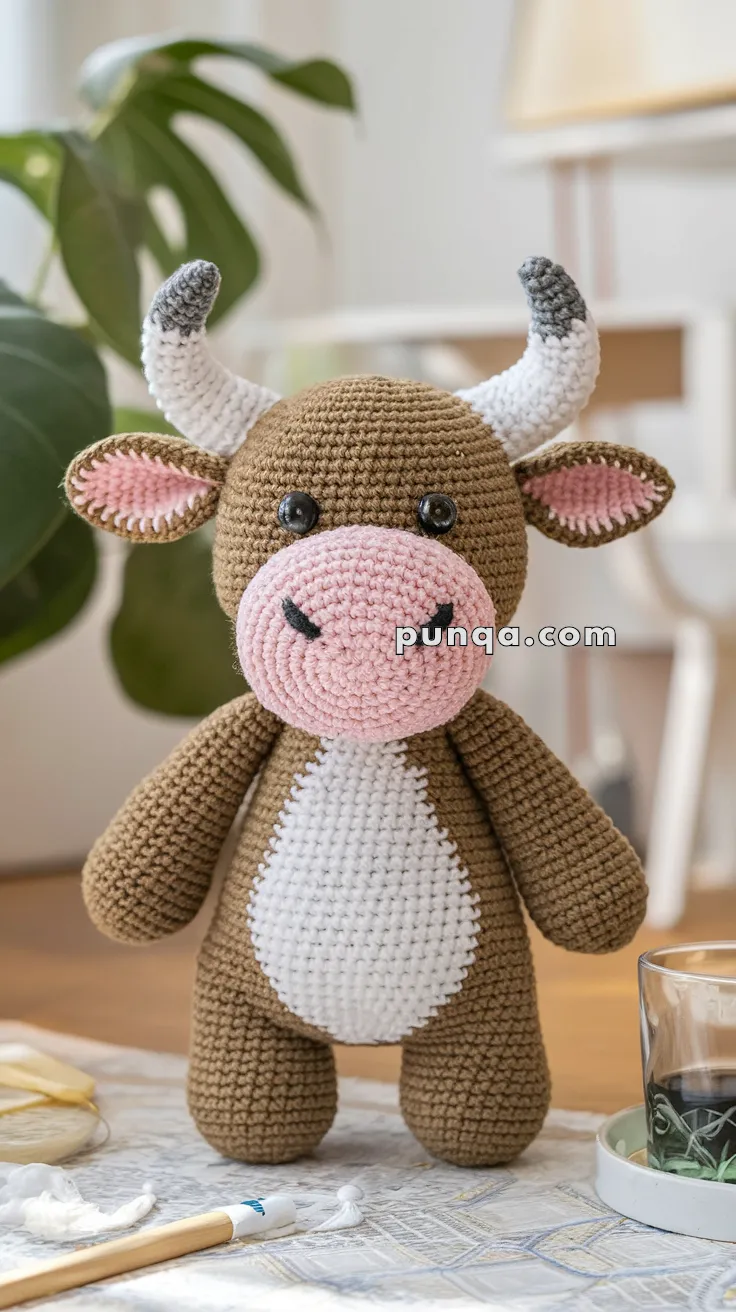
Meet your new farmyard favorite — a soft, cuddly bull with a round belly, curved gray-tipped horns, and the sweetest pink snout. This adorable friend is full of personality and perfect for gifting or adding to your amigurumi collection.
✨ Skill Level
Beginner to Intermediate — basic shaping, simple color changes, and minimal sewing.
📏 Finished Size
Approx. 8–9 inches (20–23 cm) tall when made with DK weight yarn and a 2.5–3 mm hook.
🧶 Materials
-
Brown yarn (main body, head, limbs, outer ears) – about 60 g
-
Pink yarn (snout, ear interiors) – about 10 g
-
White yarn (belly patch, horn base) – about 15 g
-
Gray yarn (horn tips) – about 5 g
-
Black embroidery thread – for nostrils, mouth, and eyebrows
-
10 mm safety eyes (shiny black or dark brown)
-
Crochet hook (2.5–3.0 mm)
-
Tapestry needle
-
Polyfill stuffing
-
Scissors
-
Stitch marker
🔤 Abbreviations (US Terms)
MR – Magic Ring
sc – Single Crochet
inc – Increase (2 sc in one stitch)
dec – Decrease (sc2tog)
ch – Chain
sl st – Slip Stitch
FO – Fasten Off
🧠 Head (Brown)
-
MR, 6 sc (6)
-
inc ×6 (12)
-
(1 sc, inc) ×6 (18)
-
(2 sc, inc) ×6 (24)
-
(3 sc, inc) ×6 (30)
-
(4 sc, inc) ×6 (36)
7–14. sc around (36) -
(4 sc, dec) ×6 (30)
-
(3 sc, dec) ×6 (24)
Insert 10 mm safety eyes between rounds 9–10, spaced about 8 stitches apart.
-
(2 sc, dec) ×6 (18)
Stuff firmly. -
(1 sc, dec) ×6 (12)
-
dec ×6 (6), FO and close.
🐽 Snout (Pink)
-
MR, 6 sc (6)
-
inc ×6 (12)
-
(1 sc, inc) ×6 (18)
4–6. sc around (18)
Stuff lightly and FO, leaving a long tail for sewing.
Sew the snout centered low on the face, about 3 rounds below the eyes.
Embroider two small nostrils and a subtle smile curve using black yarn.
👂 Ears (Make 2 – Brown Outer / Pink Inner)
Outer (Brown):
-
MR, 6 sc (6)
-
(1 sc, inc) ×3 (9)
3–5. sc around (9), FO and flatten.
Inner (Pink):
Repeat rounds 1–4 only, FO and flatten.
Sew the pink inner onto the brown outer. Fold the base slightly and attach to each side of the head, just below the horns.
To match the curved ear edge in the photo, finish the outer edge with one round of sl st in brown.
🐮 Horns (Make 2 – Gray to White Gradient)
Start with gray yarn:
-
MR, 4 sc (4)
-
(1 sc, inc) ×2 (6)
-
sc around (6)
Switch to white yarn:
4–9. sc around (6)
Stuff lightly and FO.
Sew horns to the top of the head, angling slightly backward and outward. Ensure they curve naturally for balance.
🧍 Body (Brown with White Belly Patch)
-
MR, 6 sc (6)
-
inc ×6 (12)
-
(1 sc, inc) ×6 (18)
-
(2 sc, inc) ×6 (24)
-
(3 sc, inc) ×6 (30)
6–15. sc around (30) -
(3 sc, dec) ×6 (24)
-
(2 sc, dec) ×6 (18)
-
sc around (18)
Stuff well. -
(1 sc, dec) ×6 (12)
-
dec ×6 (6), FO and close.
🐄 Belly Patch (White)
-
ch 5
-
sc in 2nd ch from hook, sc 2, 3 sc in last ch. Rotate to work along the other side, sc 2, inc in last st (10)
-
inc, sc 2, inc ×3, sc 2, inc ×2 (16)
-
sc around (16), FO.
Sew the belly patch centered on the front, extending slightly from chest to tummy. Use white yarn for invisible stitches.
💪 Arms (Make 2 – Brown)
-
MR, 6 sc (6)
-
inc ×6 (12)
3–8. sc around (12) -
(1 sc, dec) ×4 (8)
10–11. sc around (8)
Stuff lightly and FO.
Sew the arms evenly just below the head.
🐾 Legs (Make 2 – Brown)
-
MR, 6 sc (6)
-
inc ×6 (12)
3–7. sc around (12) -
(2 sc, dec) ×3 (9)
9–10. sc around (9)
Stuff firmly and FO.
Sew to the bottom of the body, angled slightly outward for natural standing balance.
🐂 Tail (Brown with White Tip – Optional but Recommended)
-
MR, 5 sc (5)
2–4. sc around (5)
Switch to white:
5–6. sc around (5)
FO and sew to the lower back.
Brush the white end gently to create a small tuft effect.
🪡 Assembly & Finishing
-
Sew the head firmly to the body, keeping the seam smooth.
-
Attach arms and legs securely, ensuring symmetry.
-
Add horns first, then sew ears slightly beneath them.
-
Embroider short, curved eyebrows above each eye.
-
Lightly blush the cheeks with pastel or fabric paint for a soft look.
-
Adjust stuffing so the bull stands independently.
💡 Tips
-
Keep tension consistent for a neat, firm texture.
-
Place safety eyes before closing the head completely.
-
If you prefer movable arms, use thread jointing instead of sewing.
-
For a “baby bull” look, shorten the horns by one round each.
🎉 Final Touch
Your handmade bull is now complete — with a gentle pink snout, soft brown coat, curved gray-tipped horns, and a friendly smile that brings warmth to any room. Add a small bow, scarf, or bell for extra personality, and enjoy your sweet new crochet friend! 🐮💖