What’s up, doc? Bring a dose of classic cartoon charm to your crochet hook with this playful Amigurumi Bugs Bunny pattern! With his long ears, cheeky grin, and signature carrot in hand, this mischievous rabbit is ready to hop into your handmade collection. Whether you’re a lifelong Looney Tunes fan or just love crafting animated icons, Bugs Bunny makes a fun and nostalgic project that’s sure to delight both kids and grown-ups alike.
This free pattern is great for intermediate to advanced crafters who enjoy character detailing and playful designs. You can personalize your Bugs with different facial expressions, accessories, or even a mini scene to show off his clever personality. Perfect for gifting, displaying, or keeping as a treasured piece of cartoon history, this amigurumi Bugs Bunny brings laughter, charm, and timeless fun—one stitch at a time! 🎬🧶🐰
🐰 Amigurumi Cartoon Bunny Crochet Pattern
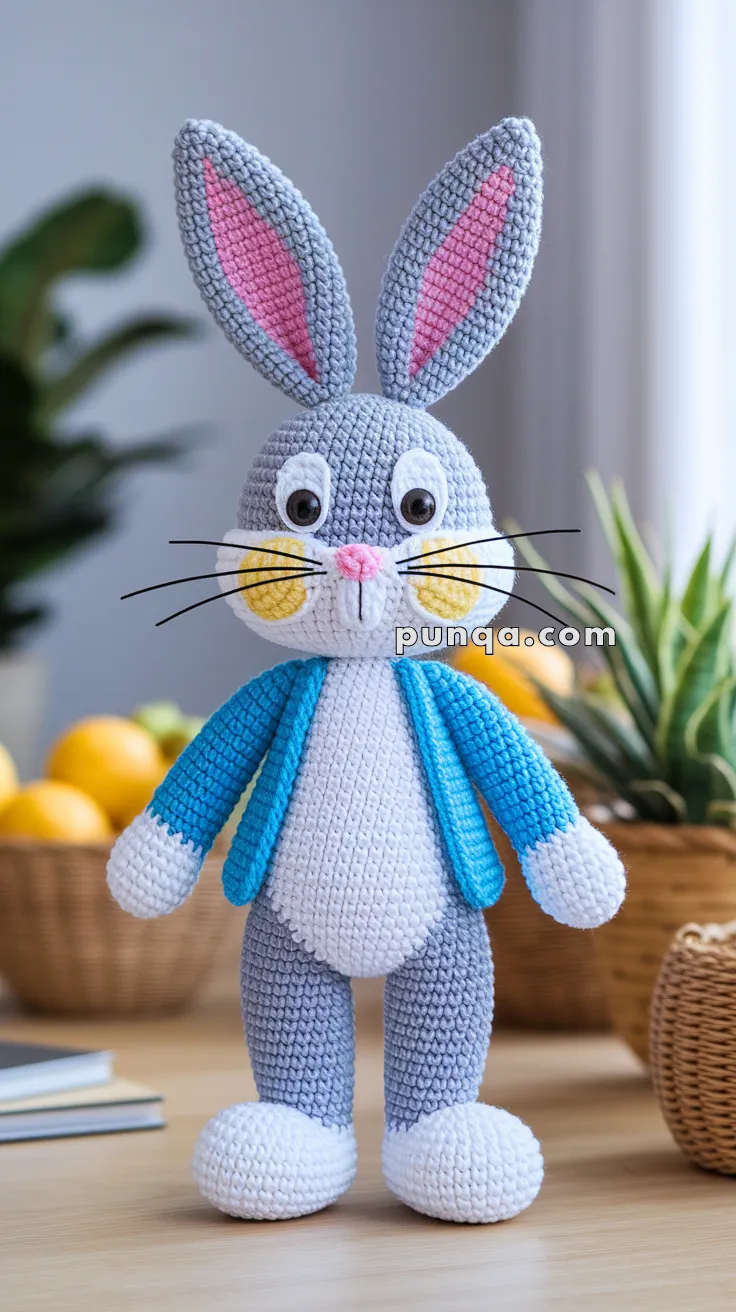
This delightful crochet bunny features a large rounded head, tall upright ears with pink inner panels, oversized oval eyes, a soft white muzzle, round yellow cheek patches, delicate whiskers, and a slim upright body. The bunny wears a neat blue open-front jacket and stands securely on flat white feet, creating a balanced, expressive, and polished finished doll.
✨ Skill Level
Intermediate
You should be comfortable with:
-
Crocheting in continuous rounds
-
Flat and oval crochet shaping
-
Color changes
-
Sewing parts neatly
-
Facial placement and shaping
📏 Finished Size
Using DK cotton yarn and 2.5–3.0 mm hook:
-
Height: 28–30 cm (11–12 in)
-
Head width: 7.5–8.5 cm
-
Ear height: 11–13 cm
🧶 Materials
Yarn (DK cotton recommended)
-
Grey — head, upper body, legs, outer ears
-
White — muzzle, belly, feet, tail, eye whites
-
Pink — inner ears, nose
-
Yellow — cheek circles
-
Blue — jacket
-
Black embroidery thread or nylon filament — whiskers, mouth
Tools
-
2.5–3 mm crochet hook
-
10–12 mm safety eyes
-
Fiberfill stuffing
-
Yarn needle
-
Stitch marker
-
Scissors
🧵 Abbreviations (US Terms)
MR – magic ring
sc – single crochet
inc – increase
dec – invisible decrease
sl st – slip stitch
ch – chain
st – stitch
FO – fasten off
🪶 Head (Grey)
The head is large, smooth, and spherical with slightly fuller cheeks.
Round 1: MR, 6 sc (6)
Round 2: inc x6 (12)
Round 3: (1 sc, inc) x6 (18)
Round 4: (2 sc, inc) x6 (24)
Round 5: (3 sc, inc) x6 (30)
Round 6: (4 sc, inc) x6 (36)
Round 7: (5 sc, inc) x6 (42)
Rounds 8–15: sc around (42)
Insert safety eyes between Rounds 10–11, spaced 9 stitches apart.
Round 16: (5 sc, dec) x6 (36)
Round 17: (4 sc, dec) x6 (30)
Round 18: (3 sc, dec) x6 (24)
Stuff firmly, shaping cheeks slightly outward.
Round 19: (2 sc, dec) x6 (18)
Round 20: (1 sc, dec) x6 (12)
Round 21: dec x6 (6)
FO and close.
👀 Eye Whites (Make 2, White)
These pieces create the large oval cartoon eye shape.
Ch 7
Round 1: sc in 2nd ch, sc 4, 3 sc in last ch
Continue opposite side: sc 4, inc (14)
Round 2: inc, sc 4, inc x3, sc 4, inc x2 (20)
FO leaving long tail.
Sew onto head surrounding safety eyes.
🐻 Muzzle (White)
Ch 6
Round 1: sc 4, 3 sc in last st, sc 4, inc (12)
Round 2: inc, sc 4, inc x3, sc 4, inc x2 (18)
Round 3: sc around (18)
Lightly stuff and sew centered below eyes.
🟡 Cheeks (Make 2, Yellow)
Round 1: MR, 6 sc (6)
Round 2: inc x6 (12)
Round 3: (1 sc, inc) x6 (18)
FO leaving long tail.
Sew to sides of muzzle, overlapping slightly.
🩷 Nose (Pink)
Round 1: MR, 5 sc
sl st next st
FO leaving tail.
Sew centered at top of muzzle.
🧵 Whiskers
Cut 6 strands of black nylon thread.
Insert 3 strands into each cheek.
Secure firmly inside head.
🐇 Ears (Make 2)
The ears are tall, narrow, and slightly curved inward.
Inner Ear (Pink)
Ch 16
Round 1: sc in 2nd ch, sc 13, 3 sc in last st
Continue opposite side: sc 13, inc (30)
Rounds 2–3: sc around (30)
FO.
Outer Ear (Grey, Make 4 panels total)
Repeat same pattern as inner ear for all grey panels.
Assembly per ear:
Place pink inner ear centered on one grey panel.
Place second grey panel behind.
Crochet sc around through both grey layers only, leaving pink layer visible on front.
At tip, place 3 sc for smooth rounding.
Do not stuff.
Pinch ear base slightly and sew firmly to head crown.
Angle ears slightly inward.
🩶 Body (Grey with White Belly)
Start with grey.
Round 1: MR, 6 sc (6)
Round 2: inc x6 (12)
Round 3: (1 sc, inc) x6 (18)
Round 4: (2 sc, inc) x6 (24)
Round 5: (3 sc, inc) x6 (30)
Rounds 6–9: sc around (30)
Switch to white front belly section only:
Rounds 10–16: sc around (30)
Switch back to grey.
Round 17: (3 sc, dec) x6 (24)
Round 18: (2 sc, dec) x6 (18)
Round 19: (1 sc, dec) x6 (12)
Stuff firmly.
FO leaving long tail.
💪 Arms (Make 2)
Start with white hands.
Round 1: MR, 6 sc
Round 2: inc x6 (12)
Rounds 3–5: sc around (12)
Switch to grey.
Rounds 6–16: sc around (12)
Stuff lightly.
FO leaving tail.
🦶 Legs and Feet (Make 2)
The feet are integrated into the legs and form flat, oval bases for stable standing. They are not separate shoes.
Foot Base (White)
Round 1: MR, 6 sc (6)
Round 2: inc x6 (12)
Round 3: (1 sc, inc) x6 (18)
Round 4: (2 sc, inc) x6 (24)
Round 5: sc around (24)
Round 6: sc around (24)
These rounds create the wide, flat base seen in the finished doll.
Round 7: (2 sc, dec) x6 (18)
Round 8: (1 sc, dec) x6 (12)
Stuff firmly, shaping the bottom flat.
Leg Extension (Grey)
Switch to grey yarn.
Rounds 9–20: sc around (12)
Stuff firmly but do not overfill to preserve slim leg shape.
FO leaving long tail.
Foot Shaping Tip
Before closing the leg opening, gently press the bottom so it forms a flat oval surface. This ensures stable standing and matches the clean silhouette.
🐾 Tail (White)
Round 1: MR, 6 sc
Round 2: inc x6 (12)
Rounds 3–4: sc around (12)
Stuff lightly.
Round 5: dec x6 (6)
FO and close.
🧥 Jacket (Blue, Open Front)
Ch 28
Row 1: sc across (27)
Row 2: ch 1, turn, sc across
Continue rows until reaching underarm height.
Divide for sleeves:
Skip stitches for armholes and continue back and front panels separately.
Join yarn at armholes and crochet sleeves downward for 10 rounds.
FO.
Jacket remains open at front.
🧵 Assembly
Sew muzzle to head.
Attach cheeks beside muzzle.
Attach nose.
Insert whiskers.
Sew ears close together at top center.
Attach head securely to body.
Sew arms at shoulder level.
Attach legs evenly for stable standing.
Attach tail at back.
Dress bunny with jacket and secure lightly.
✨ Final Shaping
Ensure ears curve slightly inward.
Shape cheeks evenly.
Adjust whiskers symmetrically.
Ensure feet sit flat.
Confirm upright balance.
🐰 Finished Result
The finished bunny stands tall with expressive oversized eyes, sculpted ears, rounded cheeks, and a fitted jacket. Its balanced proportions, upright stance, and refined facial shaping give it a lively and charming personality.
This crochet bunny makes a beautiful handmade display piece, treasured gift, or collectible amigurumi companion.