Hold on tight—this Amigurumi Bucking Bronco is ready to gallop into your heart with wild charm and handmade flair! 🐴💨 With its spirited pose, flowing mane, and stitched saddle details, this crochet creation captures all the energy of a rodeo ride in a cuddly, compact form. Whether you’re a fan of western themes or just love crafting dynamic characters, this bronco brings a burst of adventure to your amigurumi collection.
Perfect for crocheters who enjoy expressive shapes and playful movement, this pattern lets you customize your bronco with bold colors, embroidered accents, or even a tiny cowboy rider for extra fun. Whether it’s displayed on a shelf, gifted to a horse-loving friend, or added to a themed set, the Bucking Bronco is a joyful way to stitch up some high-spirited fun—one loop at a time! 🧶🤠
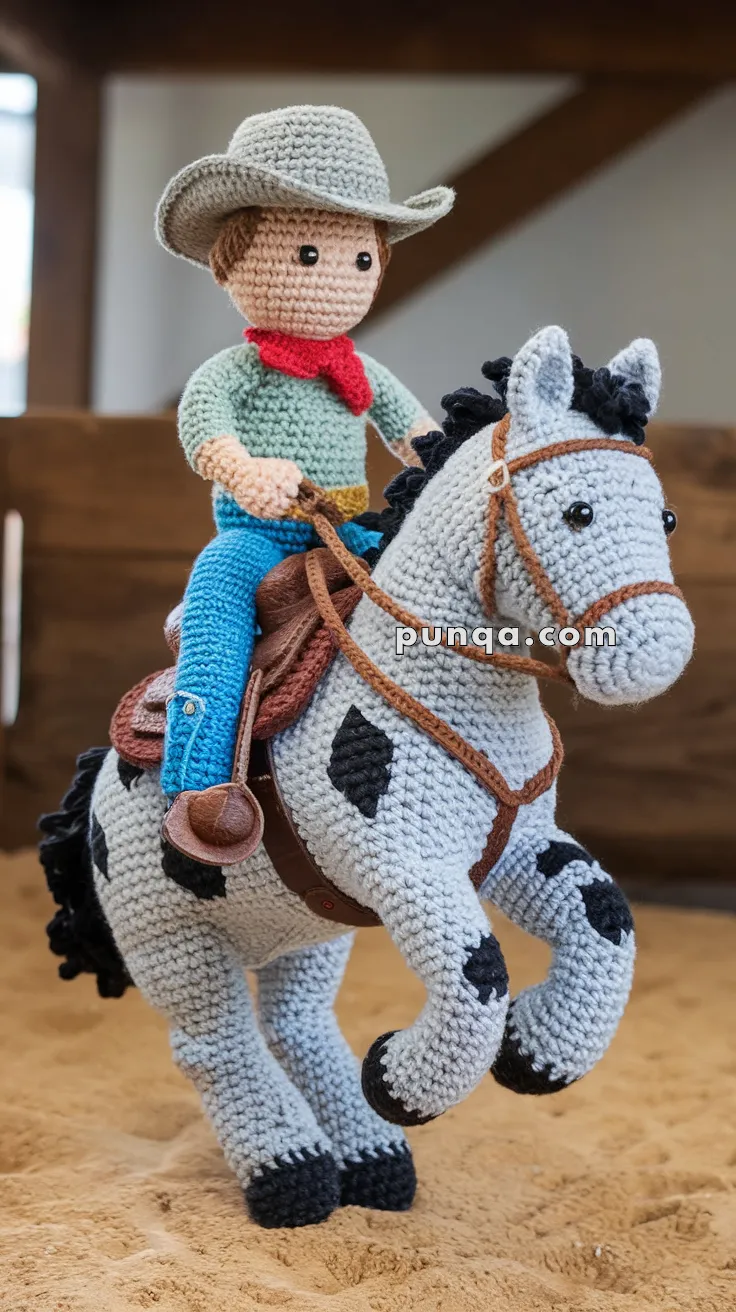
🐴🤠 Amigurumi Bucking Bronco Cowboy & Horse Crochet Pattern
Bring the Wild West to life with this Bucking Bronco Amigurumi Set! This project features a rearing horse with black spots, saddle and bridle details, and a cowboy complete with his hat, scarf, boots, and reins in hand. With the help of wire armature, your horse will hold its dramatic pose, making this duo a show-stopping centerpiece.
✨ Skill Level
Intermediate to Advanced – requires shaping, sewing, color changes, and optional wire armature for horse stability.
📏 Finished Size
- Horse: ~28 cm (11 in) tall in rearing pose
- Cowboy: ~20 cm (8 in) seated
🧶 Materials
- Yarn (DK or Worsted cotton/acrylic):
- Grey – horse body
- Black – mane, tail, hooves, spots, cowboy eyes
- Brown – saddle, bridle, cowboy hair, boots
- Beige – cowboy skin & hands
- Light green – cowboy shirt
- Blue – pants
- Red – scarf
- Yellow – belt
- Light grey – cowboy hat
- Hooks: 2.5–3.0 mm
- Stuffing: Fiberfill
- Wire: 2.5–3 mm aluminum + floral tape (horse armature)
- Eyes: 12 mm safety eyes for horse, 8 mm for cowboy
- Optional: small beads/pellets for horse belly weight
- Notions: Yarn needle, stitch markers, scissors, glue (for stiffening hat brim if desired)
🧵 Abbreviations (US terms)
- MR – Magic Ring
- sc – Single Crochet
- inc – Increase (2 sc in same st)
- dec – Decrease (sc2tog)
- hdc – Half Double Crochet
- dc – Double Crochet
- sl st – Slip Stitch
- ch – Chain
- FLO/BLO – Front/Back Loop Only
- FO – Fasten Off
🐎 Horse Pattern
Body
With grey:
- MR 6
- inc × 6 = (12)
- (sc, inc) × 6 = (18)
- (2 sc, inc) × 6 = (24)
- (3 sc, inc) × 6 = (30)
- (4 sc, inc) × 6 = (36)
- (5 sc, inc) × 6 = (42)
8–20. sc around (42) – stuff firmly; insert weighted pouch at belly for balance. - (5 sc, dec) × 6 = (36)
- (4 sc, dec) × 6 = (30)
- (3 sc, dec) × 6 = (24)
- (2 sc, dec) × 6 = (18)
FO, close.
Head & Muzzle
With grey:
- MR 6
- inc × 6 = (12)
- (sc, inc) × 6 = (18)
- (2 sc, inc) × 6 = (24)
5–10. sc around (24) – long muzzle. - (3 sc, inc) × 6 = (30)
12–18. sc around (30) - (3 sc, dec) × 6 = (24)
- (2 sc, dec) × 6 = (18)
Stuff firmly. Insert 12 mm safety eyes between rounds 13–14.
FO, leave long tail to sew to body.
Ears (Make 2)
With grey:
- MR 4
- sc around (4)
- (sc, inc) × 2 = (6)
4–6. sc around (6)
Pinch base flat, sew to head.
Legs (Make 4)
Start with black (hooves):
- MR 6
- inc × 6 = (12)
3–4. sc around (12)
Switch to grey: - (dec, 4 sc) × 2 = (10)
6–18. sc around (10)
- Front legs: keep straight.
- Back legs: bend at round 12 (sc 5, turn, sc 5, continue).
Stuff lightly and insert wire armature through each leg.
Mane
With black: ch 20, sc across. Sew along horse’s neck. Trim short to match photo.
Tail
Attach 20 strands of black yarn at rear with lark’s head knots. Brush out.
Spots
With black: crochet ovals in random sizes.
- Small: ch 5, sc around.
- Large: ch 8, hdc around.
Sew onto horse body.
🪢 Saddle & Bridle
Saddle
With brown:
- Saddle pad: ch 12, sc back and forth for 10 rows. Stuff lightly.
- Flaps: ch 8, 6 rows sc. Sew to pad sides.
- Stirrups: ch 12, join to form oval, sc around. Make 2, attach with straps.
Bridle & Reins
With brown:
- Crochet thin i-cords or long chains.
- Loop around muzzle and behind ears.
- Attach 2 reins (double-strand chain for thickness).
🤠 Cowboy Pattern
Head
With beige:
- MR 6
- inc × 6 = (12)
- (sc, inc) × 6 = (18)
- (2 sc, inc) × 6 = (24)
5–12. sc around (24)
Insert 8 mm safety eyes between rounds 8–9.
Hair
With brown: sc small cap to fit head. Sew on. Embroider a short hairline at front and sides.
Body
With light green (shirt):
- MR 6
- inc × 6 = (12)
- (sc, inc) × 6 = (18)
4–10. sc around (18)
Switch to blue (pants):
11–18. sc around (18) - (dec) × 9 = (9) – close.
Arms (Make 2)
With beige (hands):
- MR 6
2–4. sc around (6)
Switch to light green (sleeves):
5–10. sc around (6)
FO, sew to body.
Legs (Make 2)
With blue:
- MR 6
- inc × 6 = (12)
3–10. sc around (12)
Switch to brown (boots):
11–14. sc around (12)
Round 15: BLO sc around (12) – ridge for boot heel.
FO, stuff, sew to body.
Add side straps/buttons with small circles for photo accuracy.
Hands
Optional detail: embroider fingers with backstitch on beige yarn.
Accessories
- Scarf: With red, ch 20, sc back. Tie around neck.
- Belt: With yellow, ch 25, sc back. Wrap at waist.
- Hat: With light grey:
- MR 6
- inc × 6 = (12)
- (sc, inc) × 6 = (18)
- (2 sc, inc) × 6 = (24)
5–8. sc around (24) – crown.
FLO: (3 sc, inc) × 6 = (30)
Next: (4 sc, inc) × 6 = (36)
Next: (5 sc, inc) × 6 = (42)
Stiffen brim with diluted glue or wire.
🧵 Assembly & Finishing
- Insert wire armature: one central rod through body, 4 extensions into legs. Bend front legs upward for rearing pose.
- Add weighted pouch in belly to stabilize.
- Attach head, ears, mane, tail, and spots.
- Sew saddle and bridle in place. Add reins.
- Seat cowboy on horse: sew legs around saddle, secure stirrups to boots.
- Place hat on head — glue lightly if needed.
- Embroider horse nostrils and cowboy’s smile.
- Adjust reins into cowboy’s hands.
🌟 Final Touches
Your Bucking Bronco Cowboy & Horse Amigurumi Set is complete! With dynamic motion, lifelike details, and sturdy structure, this duo makes a perfect display piece, gift, or showstopper in your handmade collection. 🤠🐎✨