Welcome to the delightful world of amigurumi bubbles! 🎈 I’m absolutely thrilled to dive into the whimsical charm of these little crochet creations with you. There’s something irresistibly joyful about crafting amigurumi bubbles, these adorable spheres of yarn that seem to bounce with personality. Whether you’re a seasoned crochet enthusiast or just starting your crafty journey, the process of creating amigurumi bubbles is like embarking on a playful adventure. The beauty of these crochet wonders lies not just in their squishy, tactile appeal, but also in the meditative rhythm of stitching them together. Each bubble is a tiny masterpiece, just waiting to bring a smile to anyone who sees it.
Creating an amigurumi bubble pattern feels like painting with yarn, one stitch at a time. It all starts with selecting vibrant colors that spark joy and letting your imagination shape the character of each bubble. ✨ I love experimenting with different combinations and sizes, leading to a kaleidoscope of colors and textures. The basic structure is simple—just a magical ring and a series of increases and decreases—but there’s endless room for creativity. Adding little embellishments like tiny faces or even joining them to form a cheerful garland opens up a world of possibilities. It’s a delightful process, crafting each bubble with love and a touch of magic, transforming a ball of yarn into something truly special.

💗 Amigurumi Bubbles Crochet Doll Pattern
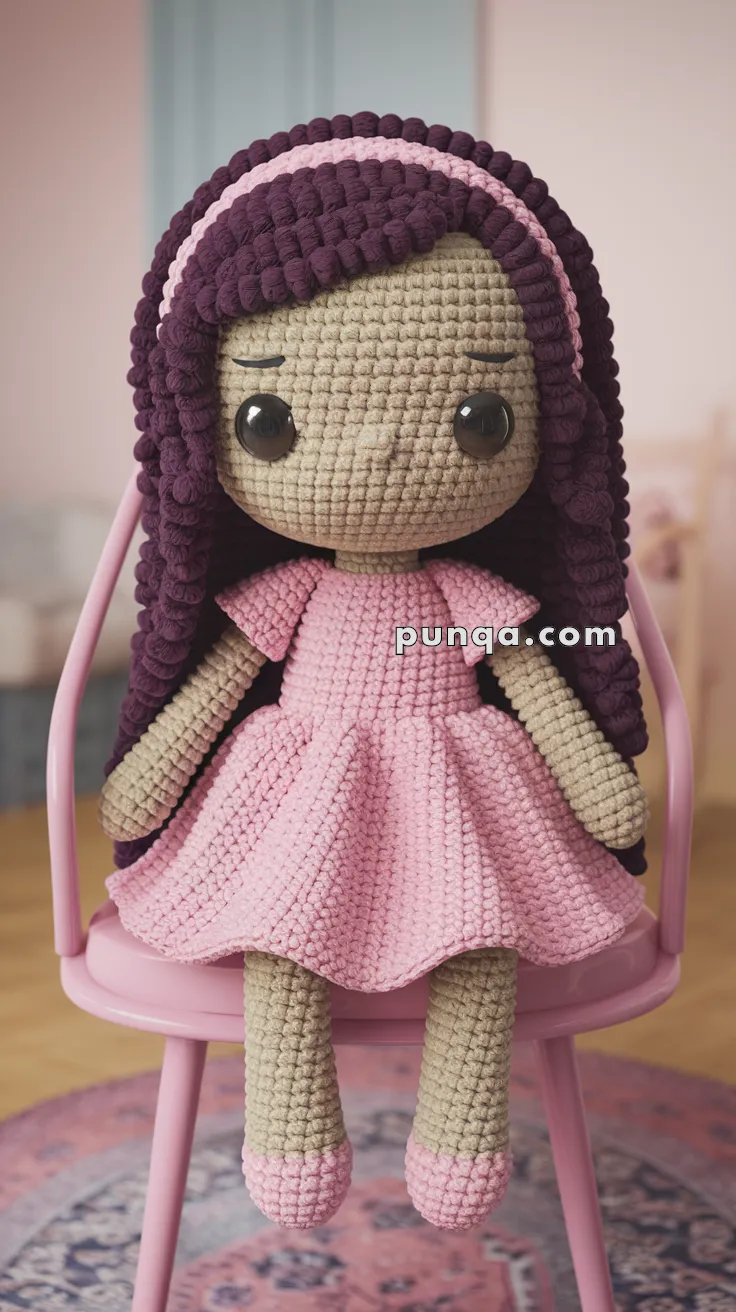
This soft and sweet amigurumi doll named Bubbles is perfect for cuddles and display alike! With her flowing spiral hair, pastel pink dress, and charming headband, she makes a delightful gift or decoration for any doll lover.
🧵 Skill Level
Intermediate
📏 Finished Size
Approximately 14–16 inches (35–40 cm) tall
🧶 Materials
-
Yarn (velvet or chenille recommended):
-
Beige (skin)
-
Pink (dress & shoes)
-
Dark purple (hair)
-
Light pink (headband)
-
-
Crochet hook: 3.5–4 mm
-
Safety eyes: 14–16 mm
-
Stitch markers
-
Fiberfill stuffing
-
Yarn needle
-
Scissors
-
Hot glue or pins for styling hair
✨ Abbreviations (US Terms)
-
MR – Magic ring
-
sc – Single crochet
-
inc – Increase
-
dec – Decrease
-
sl st – Slip stitch
-
ch – Chain
-
FLO/BLO – Front/Back Loop Only
-
FO – Fasten Off
🧑🎨 Head (Beige)
-
MR, 6 sc
-
inc x6 (12)
-
(1 sc, inc) x6 (18)
-
(2 sc, inc) x6 (24)
-
(3 sc, inc) x6 (30)
-
(4 sc, inc) x6 (36)
-
(5 sc, inc) x6 (42)
8–17. sc around (42) -
(5 sc, dec) x6 (36)
-
(4 sc, dec) x6 (30)
-
(3 sc, dec) x6 (24)
– Insert safety eyes between rounds 12–13, 7 sts apart
– Embroider eyebrows and smile
– Stuff firmly -
(2 sc, dec) x6 (18)
-
(1 sc, dec) x6 (12)
-
dec x6 (6), FO, weave shut
💇 Hair Cap (Purple)
-
MR, 6 sc
-
inc x6 (12)
-
(1 sc, inc) x6 (18)
-
(2 sc, inc) x6 (24)
-
(3 sc, inc) x6 (30)
-
(4 sc, inc) x6 (36)
-
(5 sc, inc) x6 (42)
8–12. sc around (42), FO
💈 Hair Strands (Make 24–30)
ch 45, sc in 2nd ch from hook, 2 sc in each chain across
– This will spiral naturally
– FO and sew to hair cap, spacing evenly
– Attach entire hair cap to head
🎀 Headband (Light Pink)
ch 70, FO
– Tie ends or sew to secure in place over hair cap
🧍 Body (Start with beige)
-
MR, 6 sc
-
inc x6 (12)
-
(1 sc, inc) x6 (18)
-
(2 sc, inc) x6 (24)
-
(3 sc, inc) x6 (30)
6–10. sc around (30) -
Switch to pink (dress), BLO, sc around
12–20. sc around (30)
– Stuff body -
(3 sc, dec) x6 (24)
-
(2 sc, dec) x6 (18)
– FO and leave long tail to attach to head
💃 Skirt (Work into round 11 FLO)
Join pink yarn in FLO of round 11
-
(ch 2, 2 dc in each st) around
2–4. dc around (increase 1–2 stitches at sides if needed for flare)
– FO and weave in ends
✋ Arms (Make 2 – Beige)
-
MR, 6 sc
-
inc x6 (12)
3–4. sc around -
(2 sc, dec) x3 (9)
6–12. sc around
– Stuff lightly
– FO and sew to body below neck
🦵 Legs & Shoes (Make 2)
Start with pink (shoes):
-
MR, 6 sc
-
inc x6 (12)
-
(1 sc, inc) x6 (18)
4–5. sc around -
Switch to beige, sc around
7–20. sc around
– Stuff as you go
– FO and sew evenly spaced at base of body
🧷 Assembly
-
Sew head to body securely
-
Attach arms below neckline
-
Attach legs, ensure even alignment
-
Stitch on hair cap and arrange curls
-
Add headband and facial details
✨ Final Touches
-
Add optional blush with fabric paint or soft pink yarn
-
Sew tiny bows or buttons on the dress
-
Add socks or stripes on legs for a cute variation!


