Oh, the joy of creating an amigurumi bread loaf! 🍞 Imagine the soft, squishy delight of a plush bread loaf that you can hold in your hands—a miniature version of your favorite bakery treat. The appeal of making amigurumi bread loaf patterns lies in their simplicity and the endless charm they bring to any collection. Whether you’re a seasoned crocheter or just starting, there’s something magical about transforming yarn into a cozy, huggable creation. Plus, these delightful pieces make for adorable gifts or whimsical decorations for your kitchen shelf. They never fail to bring smiles, adding a sprinkle of handmade love to any space.
Diving into the process of crafting an amigurumi bread loaf is like embarking on a tiny adventure. First, you gather your materials: soft yarn in toasted shades, a trusty crochet hook, and a sprinkle of stuffing to give your loaf that perfect, poofy shape. From there, it’s all about stitching with love, as you work your way through the simple patterns, watching your loaf come to life one stitch at a time. Adding little details like embroidered seeds or a browned crust can make your creation truly unique. And the best part? As you crochet, you can almost smell the delicious, imaginary aroma of freshly baked bread wafting through the air! 🍞✨
🍞 Amigurumi Bread Loaf – FREE Crochet Pattern
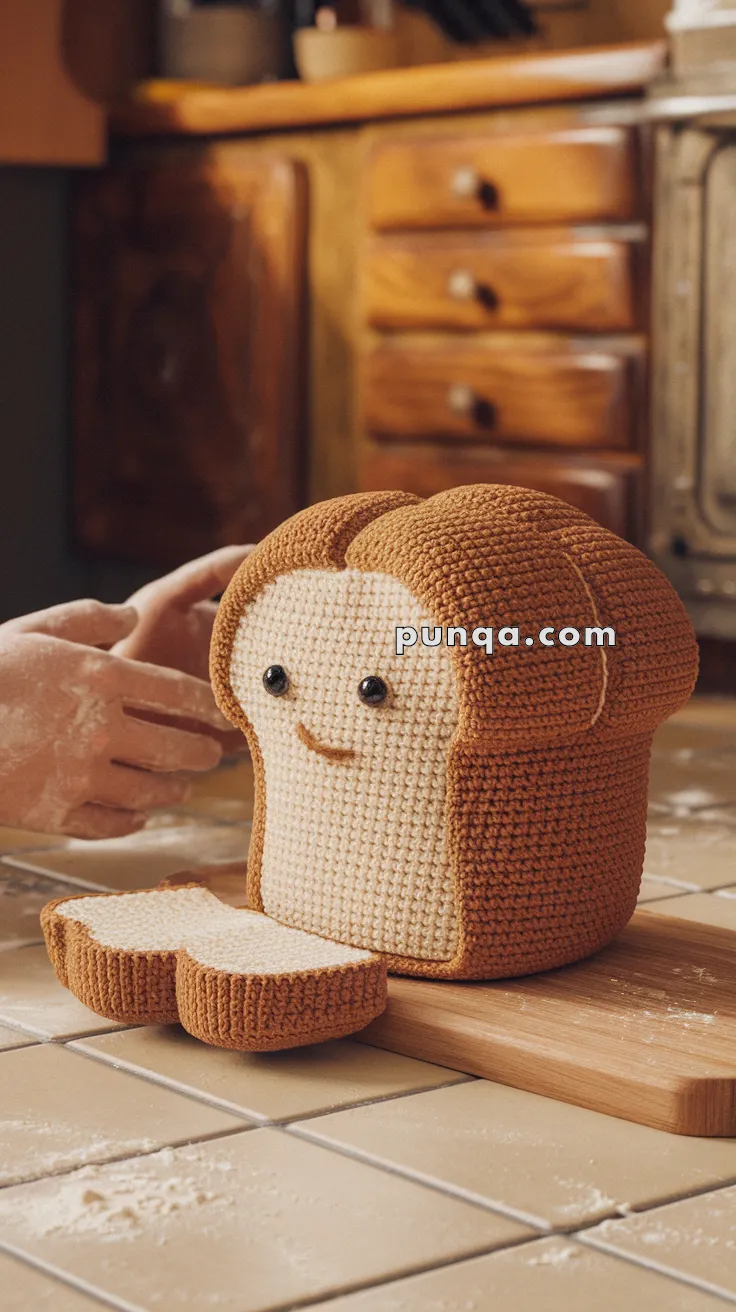
Get ready to bake up some smiles with this squishy and charming Amigurumi Bread Loaf! With a golden crust, soft white center, and a sliceable design, this plush bread buddy is perfect for your kitchen shelf, play food basket, or cozy gift list. Add a cute face for extra toasty personality!
✨ Skill Level
Beginner to Intermediate – Simple shapes and color changes with minimal sewing.
📏 Finished Size
Approx. 6 inches (15 cm) tall and 4 inches (10 cm) wide using worsted weight yarn and a 3.5 mm hook.
🧶 Materials
Yarn (Worsted weight):
-
Color A: Toasty Brown (crust)
-
Color B: Cream or Beige (bread center)
Other Supplies:
-
Crochet hook: 3.5 mm
-
10–12 mm safety eyes
-
Tapestry needle
-
Stitch marker
-
Polyfill stuffing
-
Optional: brown embroidery floss for the smile
🧵 Abbreviations (US Terms)
MR – Magic Ring
sc – Single Crochet
inc – Increase
dec – Decrease
sl st – Slip Stitch
ch – Chain
FO – Fasten Off
BLO – Back Loop Only
🍞 Front and Back Faces (Make 2 – Use Color B)
Shape as a slice:
Row 1: Ch 16
Row 2: sc in 2nd ch and across (15)
Rows 3–10: ch 1, turn, sc across (15)
Start shaping top of slice:
Row 11: ch 1, dec, sc 11, dec (13)
Row 12: ch 1, dec, sc 9, dec (11)
Row 13: ch 1, dec, sc 7, dec (9)
Row 14: ch 1, dec, sc 5, dec (7)
Row 15: ch 1, dec, sc 3, dec (5)
Row 16: ch 1, dec, sc 1, dec (3)
Row 17: ch 1, sc across (3)
FO, weave in ends.
🟤 Crust Side Panel (Color A)
Ch enough to match the edge of the slice (around 55–60 stitches depending on your gauge)
Work 6 rows of single crochet to form the crust “ribbon”
FO, leave a long tail.
Sew this crust panel around the edge of one slice. Repeat for the second slice, then stitch the two slices together through the edge of the crust to form the loaf. Stuff firmly before closing fully.
🍞 Top Loaf Dome (Color A)
Round 1: MR, 6 sc
Round 2: inc x6 (12)
Round 3: (1 sc, inc) x6 (18)
Round 4: (2 sc, inc) x6 (24)
Round 5: (3 sc, inc) x6 (30)
Round 6: (4 sc, inc) x6 (36)
Round 7: (5 sc, inc) x6 (42)
Rounds 8–10: sc around (42)
FO, flatten slightly and sew to the top of the loaf. This gives the characteristic domed top look of a rising bread loaf.
🧡 Face
Eyes:
Insert 10–12 mm safety eyes between Rows 5–6 of the front slice, spaced approx. 8–10 stitches apart.
Smile:
Use brown or black yarn to backstitch or embroider a simple smile between the eyes.
🍞 Optional Sliced Piece (Make 1–2 – Color B + A edging)
Repeat face panel instructions for a slice, then sc around the edge with Color A for crust.
Stuff lightly and attach to side of loaf with a couple stitches, or leave detachable for play.
✂️ Finishing Touches
-
Shape the loaf body firmly while sewing
-
Add blush with yarn or paint if desired
-
Use a hidden stitch to anchor the slice if attaching
💡 Customization Ideas
-
Add butter pats or jelly swirls with felt or yarn
-
Turn it into cinnamon swirl bread by embroidering a spiral
-
Add a “punny” tag like “Loaf you forever” for gifting
This Amigurumi Bread Loaf is a delightful and dough-lightful softie—perfect for squishes, smiles, and shelf decor alike! 🍞😊