Strike up some crochet fun with this Amigurumi Bowling Bowl pattern! Inspired by the excitement of bowling nights, this playful design captures the smooth, round shape and classic finger holes of a bowling ball in every stitch. With its sporty charm and bold details, this crochet bowling ball is perfect for adding a dynamic touch to your handmade collection. Whether you’re crafting for bowling enthusiasts, creating a quirky decor piece, or simply enjoy making themed amigurumi designs, this pattern lets you stitch up a miniature bowling ball bursting with personality! 🎳✨
Designed for customization, this pattern allows you to experiment with different colors, embroidered details, or even tiny accessories like a miniature bowling pin or scorecard for extra flair. Craft a classic bowling ball with its signature dark hues, create a vibrant version with neon tones, or even stitch up a full set of bowling-inspired amigurumi for a lively display! Whether gifted as a fun keepsake, displayed as a sporty accent, or made simply for the joy of crafting, this Amigurumi Bowling Bowl is a creative and entertaining project—perfect for bringing a touch of handmade bowling magic to every stitch! 🧶💖
🎳 Amigurumi Bowling Ball – Free Crochet Pattern
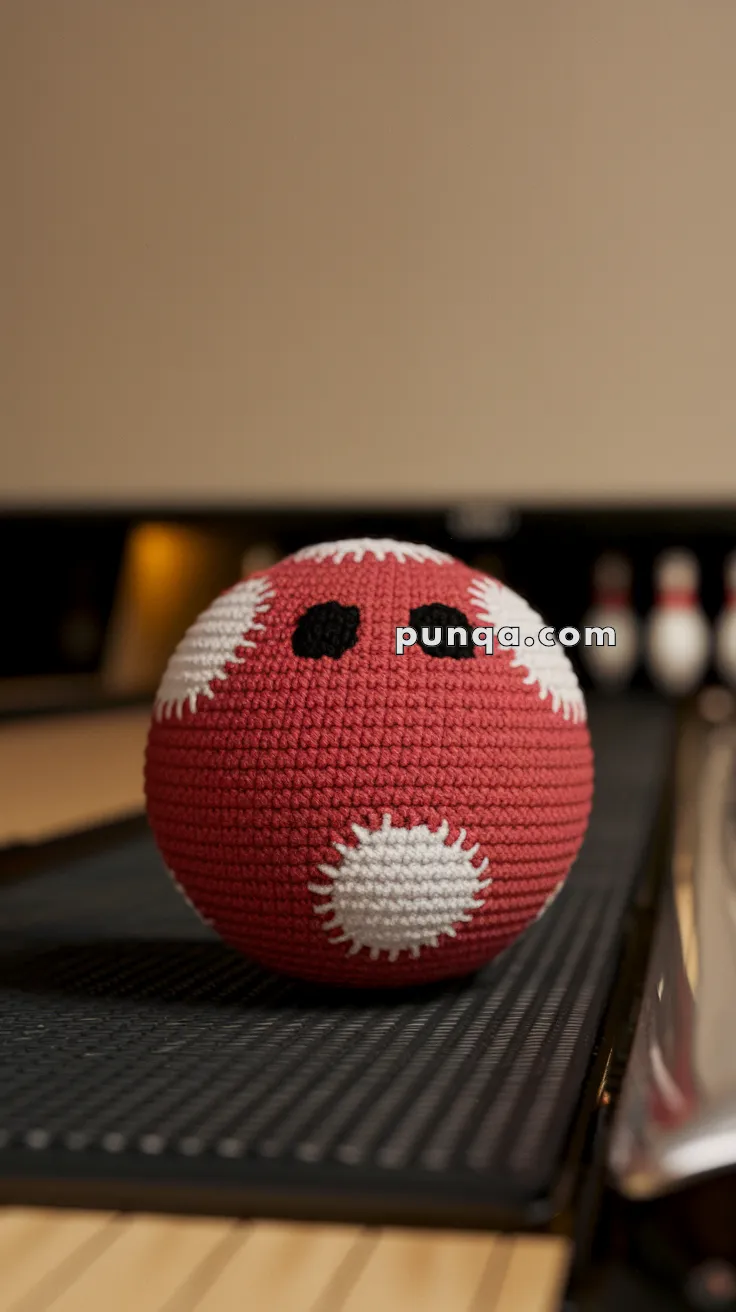
Bring some fun to your yarn collection with this playful amigurumi bowling ball! Featuring a classic red color, white textured grip spots, and black finger holes, it’s perfect as a toy, decoration, or sports-themed gift for a bowling fan.
✨ Skill Level
Beginner to Intermediate – Basic color changes and simple shaping.
📏 Finished Size
Approx. 5–6 inches (12–15 cm) in diameter using DK or worsted yarn and a 2.5–3.5 mm hook.
🧶 Materials
-
Yarn (DK or Worsted weight):
-
Color A – Red (main body)
-
Color B – White (grip patches)
-
Color C – Black (finger holes)
-
-
Other Supplies:
-
Crochet hook: 2.5–3.5 mm
-
Tapestry needle
-
Polyfill stuffing
-
Stitch marker
-
🧵 Abbreviations (US Terms)
MR – Magic Ring
sc – Single Crochet
inc – Increase
dec – Decrease
sl st – Slip Stitch
FO – Fasten Off
🔴 Bowling Ball (Main Body)
With Color A (Red):
-
MR, 6 sc (6)
-
inc x6 (12)
-
(1 sc, inc) x6 (18)
-
(2 sc, inc) x6 (24)
-
(3 sc, inc) x6 (30)
-
(4 sc, inc) x6 (36)
-
(5 sc, inc) x6 (42)
-
(6 sc, inc) x6 (48)
-
(7 sc, inc) x6 (54)
-
(8 sc, inc) x6 (60)
11–18. sc around (60)
Start decreasing:
-
(8 sc, dec) x6 (54)
-
(7 sc, dec) x6 (48)
-
(6 sc, dec) x6 (42)
-
(5 sc, dec) x6 (36)
-
(4 sc, dec) x6 (30)
-
(3 sc, dec) x6 (24)
Stuff firmly with polyfill -
(2 sc, dec) x6 (18)
-
(1 sc, dec) x6 (12)
-
dec x6 (6)
FO and close.
⚪ Grip Patches (Make 3–4)
With Color B (White):
-
MR, 6 sc (6)
-
inc x6 (12)
-
(1 sc, inc) x6 (18)
-
sl st around to finish
FO, leave long tail for sewing.
Optional Texture:
You can embroider radial lines around the patch or work in BLO on Round 3 for a slightly raised look.
Sew patches evenly spaced on the surface of the red ball.
⚫ Finger Holes (Make 2–3)
With Color C (Black):
-
MR, 6 sc (6)
-
(1 sc, inc) x3 (9)
-
sl st around, FO and leave a tail.
Sew the black holes together in a triangle formation to mimic a real bowling ball grip.
✂️ Finishing Touches
-
Weave in all ends securely
-
Shape the ball gently between your hands for even roundness
-
Optional: embroider red thread lines to simulate stitching or brand design
💡 Customization Ideas
-
Add a crocheted bowling pin to complete the set
-
Embroider initials or a team name on one side
-
Use variegated yarn for a marbled or cosmic bowling ball effect!
This amigurumi bowling ball is a strike of fun for sports lovers and crochet fans alike. Whether displayed on a shelf or tossed in play, it’s a crafty way to roll! 🎳🧶