Brighten up your space with this Amigurumi Bloom with Joy Wall Hanging crochet pattern! Inspired by the beauty of blooming flowers, this delightful design captures the essence of nature with its intricate petals, flowing leaves, and cheerful charm. Whether you’re crafting for home decor, creating a thoughtful gift, or simply enjoy making floral-inspired amigurumi designs, this pattern lets you stitch up a stunning wall hanging bursting with joy! Perfect for adding a touch of handmade elegance to any room, this crochet piece brings warmth and positivity to your surroundings. 🌸✨
Designed for customization, this pattern allows you to experiment with different colors, embroidered details, or even tiny accessories like a miniature butterfly or decorative beads for extra flair. Craft a classic floral wall hanging with soft pastels, create a vibrant version with bold hues, or even stitch up a full set of nature-inspired amigurumi for a breathtaking display! Whether gifted as a heartfelt keepsake, displayed as a charming accent, or made simply for the joy of crafting, this Amigurumi Bloom with Joy Wall Hanging is a fun and creative project—perfect for bringing a touch of handmade beauty to every stitch! 🧶💖✨
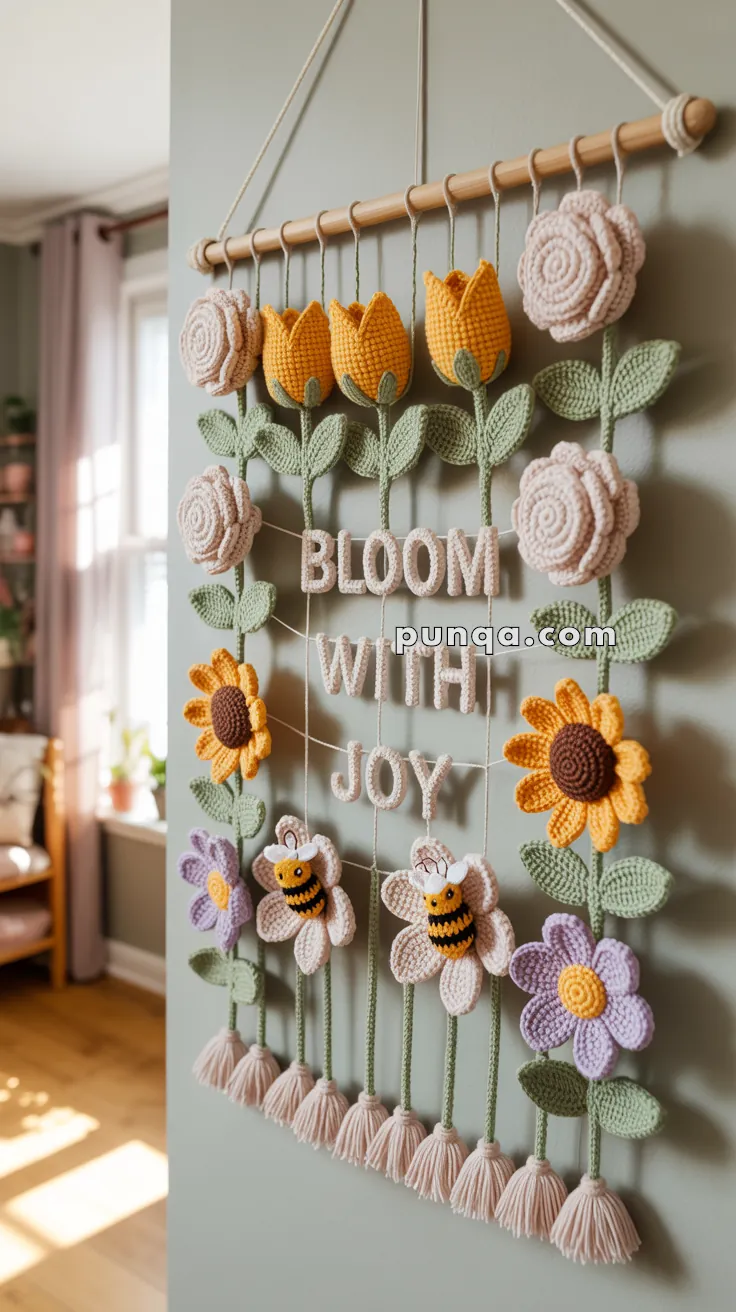
🌺 “Bloom with Joy” Amigurumi Wall Hanging Crochet Pattern
Bring a cheerful burst of springtime joy into your home with this stunning amigurumi wall hanging! Featuring adorable tulips, roses, sunflowers, playful bees, and soft crochet letters, this decorative project is perfect for a nursery, playroom, or craft space. In this pattern, we’ll walk you through how to crochet each part, assemble it securely, and achieve the whimsical look you see in the image.
✨ Skill Level
Intermediate – Combines amigurumi techniques, shaping, color changes, and assembling on a dowel.
📏 Finished Size
Approximately 16 x 24 inches (40 x 60 cm), but this may vary depending on yarn and hook size.
🧦 Materials
- DK or Worsted weight yarn:
- Green (stems and leaves)
- Yellow, orange, lavender, pink, white (flowers)
- Brown (sunflower centers)
- Black (bee stripes and eyes)
- Cream (letters and tassels)
- Crochet hook: 2.5–3.5 mm
- Fiberfill stuffing
- Tapestry needle
- Scissors
- Wooden dowel (16–18 inches / 40–45 cm)
- String or yarn for hanging
- Optional: hot glue gun for extra security
🧵 Abbreviations (US Terms)
MR – Magic Ring
sc – Single Crochet
inc – Increase (2 sc in same stitch)
dec – Decrease (sc 2 stitches together)
sl st – Slip Stitch
ch – Chain
hdc – Half Double Crochet
dc – Double Crochet
FO – Fasten Off
🌼 Pattern Sections
🌺 1. Flowers
Rolled Rose (Make 4)
- Ch 31
- In 2nd ch from hook: (sc, hdc, dc) in same ch, skip next ch – repeat to end
- FO, leave a long tail. Roll from one end and sew the base in place to form the rose.
Tulips (Make 3)
- MR, 6 sc
- inc x6 (12)
- (1 sc, inc) x6 (18)
- (2 sc, inc) x6 (24)
5–8. sc around (24) - ch 3, sl st in next st around to form 5 petals.
- FO, stuff lightly, sew onto stem.
Sunflowers (Make 2)
Center (Brown):
- MR, 6 sc
- inc x6 (12)
- (1 sc, inc) x6 (18)
- (2 sc, inc) x6 (24)
- FO and set aside.
Petals (Yellow):
- Ch 6, turn
- sc in 2nd ch, hdc, dc, hdc, sc – FO
- Make 10–12 petals, sew or glue evenly around the center circle.
Accent Daisies (Make 4–6)
- MR, ch 2, (2 dc, ch 2, sl st) x5 – FO
- Stitch yellow center in the middle.
🌿 2. Leaves & Vines
Leaves (Make 20+)
- Ch 6
- sc in 2nd ch from hook, hdc, dc, hdc, sc
- Rotate to other side, repeat mirror pattern
- FO, leave tail to sew
Vines (Make 10–12)
- Ch 30–50 depending on position
- Attach leaves every 6 chs by sewing or joining directly
- Sew flowers and bees to these vines after completing all motifs
🐝 3. Bees
Body
- MR, 6 sc (Yellow)
- inc x6 (12)
- (1 sc, inc) x6 (18)
4–6. sc around (color change every round: yellow/black/yellow) - (1 sc, dec) x6 (12)
- dec x6 (6)
- FO, stuff, sew closed
Wings (Make 4)
- Ch 5
- sc, hdc, dc, sl st – FO
- Attach two wings per bee
Face
- Embroider or use safety eyes
- Sew bees onto flowers or vines
📗 4. Crochet Letters “BLOOM WITH JOY”
Use tight single crochet to form block letters:
- For each letter, chain base row (e.g., ch 7 for “L”)
- Work sc back and forth, shaping with sl st or inc/dec where needed
- For round letters (O, B), crochet in a ring and stuff lightly
- Whip stitch letters closed
- Use pipe cleaners inside if you need structure
- Sew letters directly onto vertical yarn strands
🪨 5. Assembly Instructions
- Tie 12 equal-length strands of yarn to the dowel.
- Space strands evenly and secure with a knot + glue.
- Arrange flowers, bees, and letters evenly, using tapestry needle to attach or hot glue.
- Use green yarn to create overlapping leaves and stems.
💜 6. Bottom Fringe Tassels
- Wrap cream yarn around fingers ~15 times
- Tie top with knot, cut ends
- Attach 1 tassel to the bottom of each vine
- Trim evenly for a neat finish
💡 Customization Ideas
- Add butterflies or clouds to top strands
- Change lettering to a child’s name or seasonal greeting
- Use glitter yarn for extra sparkle
This charming wall hanging is perfect for adding personality and happiness to your space. Whether you’re gifting it or keeping it, your wall will definitely bloom with joy!
🌿🐝🌺 Happy Crocheting!