Oh, the joy of crafting a bird of paradise amigurumi! 🌺 If you’ve ever been enchanted by the vibrant colors and exotic allure of the bird of paradise flower, you’ll understand why replicating it in the art of amigurumi is so appealing. This little crochet project brings together the satisfaction of crafting with the beauty of nature, transforming a bundle of yarn into something truly spectacular. The process itself is a delightful journey of creativity, where one can play with color combinations that mimic the flower’s striking palette. Think of it as painting a masterpiece, but with yarn and a crochet hook. 🎨
Creating an amigurumi bird of paradise pattern isn’t as daunting as it might seem. It all starts with choosing the right yarn, typically vibrant shades of orange, blue, and green. Then comes the fun part: crocheting each petal and leaf, often starting with a magic ring and working outwards. Stitch by stitch, the flower takes form, with each loop on the hook bringing you closer to your own little woolly wonder. As someone who loves both crochet and gardening, blending these passions into a single craft is both rewarding and delightfully meditative. 🌿 By the time you assemble the final piece, you’ll have not just a crochet project, but a miniature work of art to cherish or gift to fellow nature lovers.
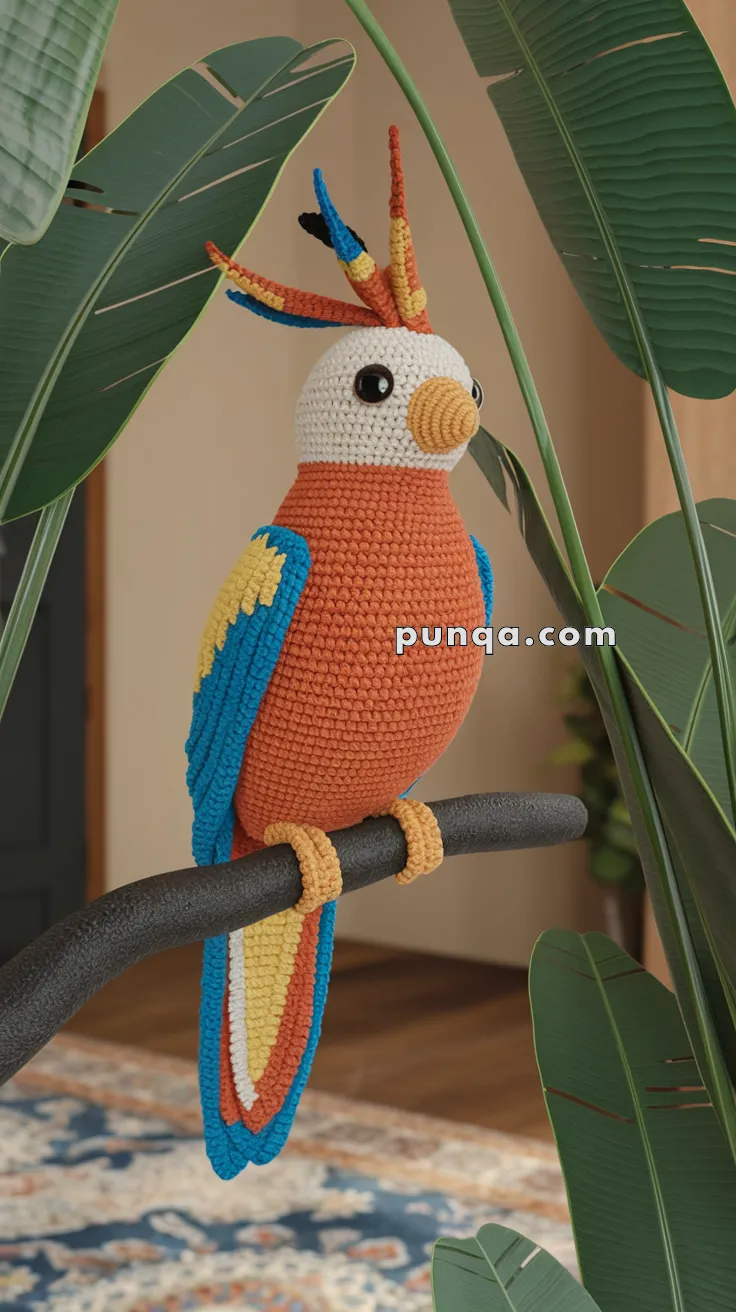
🦜 Amigurumi Bird of Paradise Crochet Pattern
Bring the tropics into your home with this vibrant Bird of Paradise crochet project! With its bright crest, layered wings, and elegant long tail, this show-stopping bird will be the centerpiece of your handmade collection. Perfect for intermediate crocheters who enjoy colorful, nature-inspired designs.
✨ Skill Level
Intermediate – includes color changes, flat panels, and layered assembly.
📏 Finished Size
Approx. 30 cm (12 in) tall when perched.
🧶 Materials
-
DK or light worsted cotton yarn in:
-
White (head)
-
Orange (body, crest, tail, inner wings)
-
Blue (wing edges, outer tail feathers)
-
Yellow (wing patches, tail stripe, crest accents, toes)
-
Black (crest tips, claws)
-
-
2.5 mm or 3.0 mm crochet hook
-
10 mm safety eyes
-
Yarn needle
-
Polyester stuffing
-
Stitch marker
-
Optional: Floral wire or pipe cleaners for shaping tail and crest
🧵 Abbreviations (US Terms)
MR – magic ring
sc – single crochet
inc – increase (2 sc in 1 st)
dec – decrease (sc2tog)
sl st – slip stitch
ch – chain
BLO – back loops only
FO – fasten off
🐦 Head (White)
-
MR, 6 sc [6]
-
inc ×6 [12]
-
(sc, inc) ×6 [18]
-
(2 sc, inc) ×6 [24]
-
(3 sc, inc) ×6 [30]
6–12. sc around [30] -
(3 sc, dec) ×6 [24]
-
(2 sc, dec) ×6 [18]
👉 Insert 10 mm safety eyes between rounds 7–8, about 7 sts apart. -
(sc, dec) ×6 [12]
-
dec ×6 [6]
FO and stuff firmly.
🧡 Body (Orange)
-
MR, 6 sc [6]
-
inc ×6 [12]
-
(sc, inc) ×6 [18]
-
(2 sc, inc) ×6 [24]
-
(3 sc, inc) ×6 [30]
6–20. sc around [30] -
(3 sc, dec) ×6 [24]
-
(2 sc, dec) ×6 [18]
-
(sc, dec) ×6 [12]
-
dec ×6 [6]
FO. Stuff well so the body holds its oval shape.
🐣 Beak (Yellow)
-
MR, 4 sc [4]
-
(sc, inc) ×2 [6]
3–5. sc around [6]
Stuff lightly. FO and sew centered to face.
👑 Crest Feathers (Make 5–6)
-
Use orange, yellow, blue, and black for tips.
-
Ch 15. Starting in 2nd ch from hook: sl st, sc, hdc, dc ×7, hdc, sc, sl st.
-
FO.
Make some longer (ch 17–18) for variety. Arrange and sew to top of head in a fan shape.
🪽 Wings (Make 2, Blue + Yellow)
Base Panel (Blue):
-
Ch 16.
-
sc across [15].
3–12. sc across, inc at row ends every other row to slightly widen.
FO.
Patch (Yellow):
-
Ch 10.
-
sc across [9].
3–5. sc across.
FO.
👉 Sew yellow patch on top of blue wing panel. Then sew entire wing to each side of body.
🪶 Tail Feathers (Layered, 3 Colors)
Bottom Layer (Blue, Longest):
-
Ch 35.
-
sc across, dec at ends for taper. FO.
Middle Layer (Yellow):
-
Ch 30.
-
sc across, dec at ends. FO.
Top Layer (Orange, Shortest):
-
Ch 28.
-
sc across, dec at ends. FO.
👉 Stack layers (blue → yellow → orange). Sew securely to back base of body. Optionally insert floral wire for structure.
🦶 Feet (Make 2, Yellow)
Toes (Make 3 per foot):
-
MR, 5 sc [5]
2–10. sc around [5]
FO, leave long tail.
👉 Sew 3 toes per foot, curling them to wrap around a perch. Optionally add black claws with embroidery or by making tiny black tips.
Leg:
Ch 12, sc back across. Sew leg behind toes, attach to underside of body.
🪡 Assembly
-
Sew head onto body.
-
Attach beak and embroider nostrils if desired.
-
Sew wings flat against each side of body.
-
Position tail layers at back and secure.
-
Attach crest feathers on top of head in fan.
-
Sew legs and wrap toes around a stick or perch.
✨ Finishing Touches
-
Add embroidery under the eyes for expression.
-
Use blush or pastel for cheek detail if desired.
-
Perch bird on a wooden dowel, stick, or crochet-covered branch for display.
🌴 Final Notes
This Bird of Paradise crochet project captures the beauty of tropical wildlife with vivid colors and graceful details. With its tall crest, layered wings, and elegant tail, it’s a statement piece that brings handmade art to life. Perfect for display in your craft room or as a gift for bird lovers!