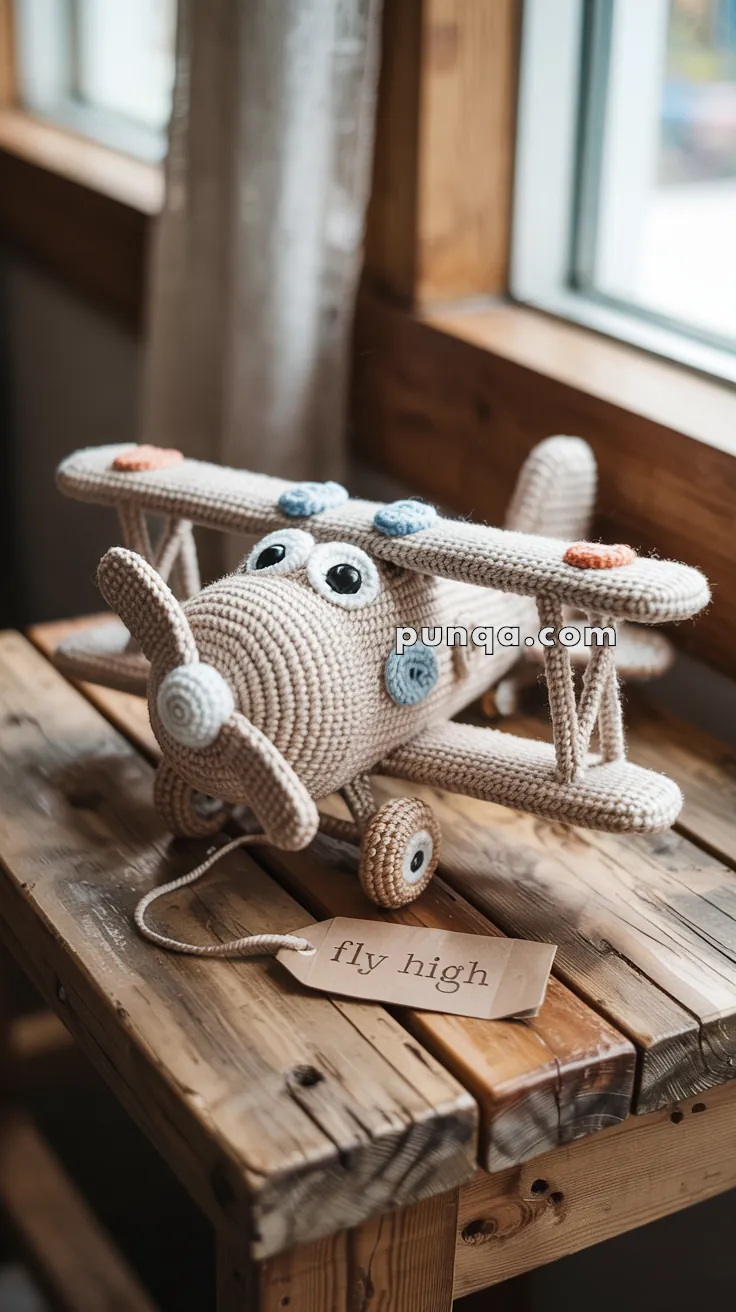
Take your crochet skills to new heights with this Amigurumi Biplane pattern! Whether you’re crafting for aviation enthusiasts, adding a nostalgic touch to your handmade collection, or simply love making unique amigurumi designs, this free pattern lets you stitch up a charming biplane bursting with personality. With its classic double wings, tiny propeller, and vintage-inspired details, this crochet biplane captures the spirit of adventure in every stitch. Perfect for gifting to fellow crochet lovers, decorating a themed space, or simply celebrating the joy of handmade creations, this amigurumi biplane is ready to soar into your collection! ✈️✨
Designed for customization, this pattern allows you to experiment with different colors, embroidered details, or even tiny accessories like a miniature pilot or clouds for extra charm. Craft a classic red-and-white biplane, create a playful version with exaggerated features, or even stitch up a full aviation-inspired set with matching aircraft! Whether gifted as a whimsical keepsake, displayed as a quirky accent, or made simply for the joy of crafting, this Amigurumi Biplane is a fun and creative project—perfect for bringing the thrill of flight to every stitch! 🧶🌤️
🛩️ Amigurumi Biplane Crochet Pattern
Take your imagination to the skies with this adorable amigurumi biplane! With double wings, cartoon-style eyes, and a cute propeller, it makes the perfect handmade toy or nursery decoration. Whether you’re crafting for a little aviator or a whimsical home display, this biplane is a charming project that’s fun to make and full of character.
✨ Skill Level
Intermediate – Includes shaping, sewing parts, and structural elements (supports, propeller).
📏 Finished Size
Approx. 8 inches (20 cm) long using DK yarn and a 2.5 mm hook.
🧶 Materials
- Yarn (DK or light worsted weight):
- Color A: Light tan or beige (main body)
- Color B: Cream or light gray (details)
- Color C: Blue and orange (wing buttons)
- Black and white (eyes)
- Other Supplies:
- Crochet hook: 2.5–3.0 mm
- Fiberfill stuffing
- Tapestry needle
- Stitch markers
- Pipe cleaners or floral wire (optional for wing supports)
- Safety eyes or black buttons (optional)
- Cardboard (optional to stabilize wings)
🧵 Abbreviations (US Terms)
MR – Magic Ring
sc – Single Crochet
inc – Increase
dec – Decrease
ch – Chain
sl st – Slip Stitch
FO – Fasten Off
BLO – Back Loop Only
✈️ Fuselage (Body – Color A)
Round 1: MR, 6 sc
Round 2: inc x6 (12)
Round 3: (1 sc, inc) x6 (18)
Round 4: (2 sc, inc) x6 (24)
Round 5–30: sc around (24)
Stuff as you go.
Round 31: (2 sc, dec) x6 (18)
Round 32: (1 sc, dec) x6 (12)
Round 33: dec x6 (6)
FO, weave yarn tail through front loops and pull tight.
🔄 Propeller (Color B)
Blades (make 2):
Ch 7, turn
Row 1: sc 6
Row 2–3: sc across
FO, leave a long tail for sewing.
Center Hub:
MR, 6 sc
Round 2: inc x6 (12)
Round 3: sc around
FO and sew blades across center. Attach to front of fuselage.
👀 Eyes (White + Black)
White Circle (make 2):
MR, 6 sc
Round 2: (1 sc, inc) x3 (9)
FO
Black Pupil:
MR, 4 sc
FO and sew to center of white part.
Sew eyes to front top of fuselage.
✈️ Wings (Make 2 – Color A)
Ch 26
Row 1: sc in 2nd ch and across (25)
Rows 2–4: sc across (25)
FO, leave long tail for sewing.
Wing Buttons (Color C/Blue/Orange):
MR, 6 sc
Round 2: inc x6 (12)
FO and sew to upper wing
Assembly:
- Sew one wing on top (just behind eyes)
- Sew second wing below the body, aligned vertically
- Optional: Insert pipe cleaners between top/bottom wings to mimic wing supports.
✈️ Wheels (Color B + Color A for tire edge)
Wheel (make 2):
MR, 6 sc
Round 2: inc x6 (12)
Round 3: (1 sc, inc) x6 (18)
Change to Color A:
Round 4: sc around
FO and stuff lightly, sew to bottom of body sides
Axle Support (Color A):
Ch 7, sc across
Roll and sew as wheel connector
Sew between the two wheels under the plane
✈️ Tail Fin & Stabilizers
Vertical Fin (Color A):
Ch 6
Row 1: sc in 2nd ch and across (5)
Rows 2–4: sc across
FO and sew to top back of fuselage
Side Stabilizers (make 2):
Ch 5
Row 1: sc in 2nd ch and across (4)
Rows 2–3: sc across
FO and sew to each side of tail
✂️ Final Touches
- Weave in all ends
- Sew a “Fly High” tag or make your own with embroidery
- Optional: Add embroidery to the wings for stitching details or a small flag decal
💡 Customization Ideas
- Use pastel yarns for a nursery-safe version
- Make multiple in rainbow colors for a mobile
- Add little aviator goggles or felt cheeks for extra charm!
Your amigurumi biplane is ready to take off into your collection or someone’s heart 💨✈️🧸
Let it fly high with love!