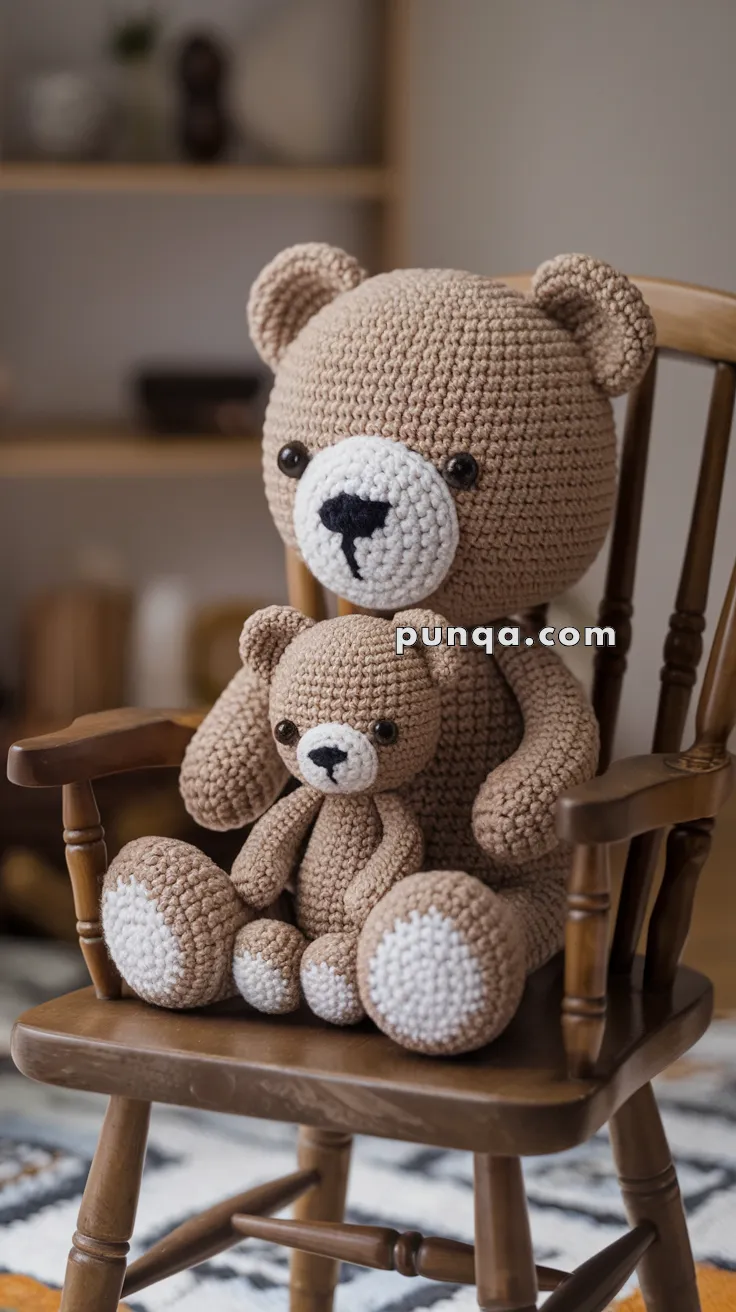
Welcome to the heartwarming and cuddly world of amigurumi! 🐻✨ Today, I’m excited to share my free crochet pattern for an Amigurumi Bear With Cub—a tender and adorable creation perfect for animal lovers, woodland-themed décor, or anyone who enjoys crafting expressive and lovable plush designs! 🧶 Whether you love stitching up sweet parent-child duos, experimenting with textured fur, or simply want to add a charming bear and cub to your handmade lineup, this pattern will guide you through crafting a beautifully sculpted plush with soft ears, gentle expressions, and a touch of cozy warmth! 🌲
This design embraces earthy browns, soft creams, and thoughtful shaping to bring a heartwarming and nurturing presence to your crochet projects! 🧶✨ I’ve carefully outlined each step to ensure your Amigurumi Bear With Cub turns out just right—ready to snuggle into your collection or become a treasured handmade gift! 🎁 So grab your hooks, pick out classic bear hues, and let’s stitch up an adorable bear and cub duo! 🐻
🧸 Amigurumi Bear with Cub Crochet Pattern
Create a snuggly pair of teddy bears with this free crochet pattern! Featuring a big bear and a little cub, this lovable duo is made using classic amigurumi techniques and simple shaping—perfect for cuddles or display!
✨ Skill Level
Beginner to Intermediate – Basic shaping, assembly, and color changes.
📏 Finished Size
-
Large Bear: ~30–35 cm (12–14 in)
-
Small Bear: ~15–18 cm (6–7 in)
🧶 Materials
-
Worsted weight yarn:
-
Light brown/beige – body, head, limbs
-
White – muzzle, paw pads
-
Black – embroidery for nose and mouth
-
-
Safety eyes:
-
Large bear: 12–14 mm
-
Small bear: 8–10 mm
-
-
Crochet hook: 3.5–4.0 mm
-
Stuffing (polyfill)
-
Yarn needle, scissors, stitch marker
🧾 Abbreviations (US Terms)
-
MR – magic ring
-
sc – single crochet
-
inc – increase (2 sc in one st)
-
dec – decrease (sc 2 together)
-
st(s) – stitch(es)
-
FO – fasten off
🐻 Large Teddy Bear
Head
With brown:
-
MR, 6 sc (6)
-
inc around (12)
-
(sc, inc) x 6 (18)
-
(2 sc, inc) x 6 (24)
-
(3 sc, inc) x 6 (30)
-
(4 sc, inc) x 6 (36)
-
(5 sc, inc) x 6 (42)
-
(6 sc, inc) x 6 (48)
-
(7 sc, inc) x 6 (54)
-
(8 sc, inc) x 6 (60)
11–22. sc around (60)
👉 Place safety eyes between R10–11, ~6–7 sts apart, low on face. -
(8 sc, dec) x 6 (54)
-
(7 sc, dec) x 6 (48)
-
(6 sc, dec) x 6 (42)
-
(5 sc, dec) x 6 (36)
-
(4 sc, dec) x 6 (30)
-
(3 sc, dec) x 6 (24) – stuff firmly
-
(2 sc, dec) x 6 (18)
-
(sc, dec) x 6 (12)
-
dec around (6)
FO, close.
Muzzle (White)
-
MR, 6 sc (6)
-
inc around (12)
-
(sc, inc) x 6 (18)
-
(2 sc, inc) x 6 (24)
-
(3 sc, inc) x 6 (30)
-
sc around (30)
FO, leave tail.
👉 Sew centered, lightly stuffed. Embroider a big black oval nose, vertical line, and small “Y” mouth.
Ears (Make 2)
With brown:
-
MR, 6 sc (6)
-
(sc, inc) x 3 (9)
-
(2 sc, inc) x 3 (12)
4–5. sc around (12)
FO, flatten, sew to sides of head angled slightly forward.
Body
With brown:
-
MR, 6 sc (6)
-
inc around (12)
-
(sc, inc) x 6 (18)
-
(2 sc, inc) x 6 (24)
-
(3 sc, inc) x 6 (30)
-
(4 sc, inc) x 6 (36)
-
(5 sc, inc) x 6 (42)
8–18. sc around (42) -
(5 sc, dec) x 6 (36)
-
(4 sc, dec) x 6 (30)
-
(3 sc, dec) x 6 (24) – stuff firmly
-
(2 sc, dec) x 6 (18)
-
(sc, dec) x 6 (12)
-
dec around (6)
FO, close.
Arms (Make 2) – Floppy & Thin
With brown:
-
MR, 6 sc (6)
-
inc around (12)
-
sc around (12)
4–18. sc around (12) – stuff lightly
FO, leave tail. Sew to body sides, just below head.
Legs (Make 2)
With white:
-
MR, 6 sc (6)
-
inc around (12)
-
(sc, inc) x 6 (18)
-
(2 sc, inc) x 6 (24)
👉 Switch to brown
5–8. sc around (24) -
(2 sc, dec) x 6 (18)
-
(sc, dec) x 6 (12) – stuff well
FO, leave tail.
👉 Make separate white circles for paw pads:
-
MR, 6 sc → (sc, inc) x 6 = 18 → (2 sc, inc) x 6 = 24.
-
Sew paw pads to front of feet.
🐻 Small Teddy Bear
(Same method, scaled down)
Head
With brown:
-
MR, 6 sc (6)
-
inc around (12)
-
(sc, inc) x 6 (18)
-
(2 sc, inc) x 6 (24)
-
(3 sc, inc) x 6 (30)
-
(4 sc, inc) x 6 (36)
7–16. sc around (36)
👉 Insert safety eyes between R9–10, close to muzzle sides. -
(4 sc, dec) x 6 (30)
-
(3 sc, dec) x 6 (24)
-
(2 sc, dec) x 6 (18) – stuff
-
(sc, dec) x 6 (12)
-
dec around (6)
FO.
Muzzle (White)
-
MR, 6 sc (6)
-
inc around (12)
-
(sc, inc) x 6 (18)
-
(2 sc, inc) x 6 (24)
FO, sew flat, embroider nose + mouth.
Ears (Make 2)
-
MR, 6 sc (6)
-
(sc, inc) x 3 (9)
-
sc around (9)
FO, flatten, sew.
Body
-
MR, 6 sc (6)
-
inc around (12)
-
(sc, inc) x 6 (18)
-
(2 sc, inc) x 6 (24)
-
(3 sc, inc) x 6 (30)
6–12. sc around (30) -
(3 sc, dec) x 6 (24)
-
(2 sc, dec) x 6 (18)
-
(sc, dec) x 6 (12) – stuff
-
dec around (6)
FO.
Arms (Make 2)
-
MR, 6 sc (6)
-
inc around (12)
3–10. sc around (9) – stuff lightly
FO, sew floppy.
Legs (Make 2)
With white:
-
MR, 6 sc (6)
-
inc around (12)
-
(sc, inc) x 6 (18)
👉 Switch to brown
4–6. sc around (18) -
(sc, dec) x 6 (12)
FO, stuff.
👉 Paw pads: make a white flat circle of 18 sts and sew to front.
🪡 Assembly for Both Bears
-
Sew head to body firmly.
-
Attach arms loosely so they flop.
-
Sew legs at bottom front.
-
Add paw pads to legs.
-
Sew ears on head.
-
Position muzzle low on face, sew flat, embroider nose/mouth.
🌟 Finishing Touches
Now you have a matching teddy bear pair: one big, one small, both with oversized heads, short bodies, floppy arms, and chubby feet with paw pads. Just like in the photo — a timeless duo ready for cuddles.