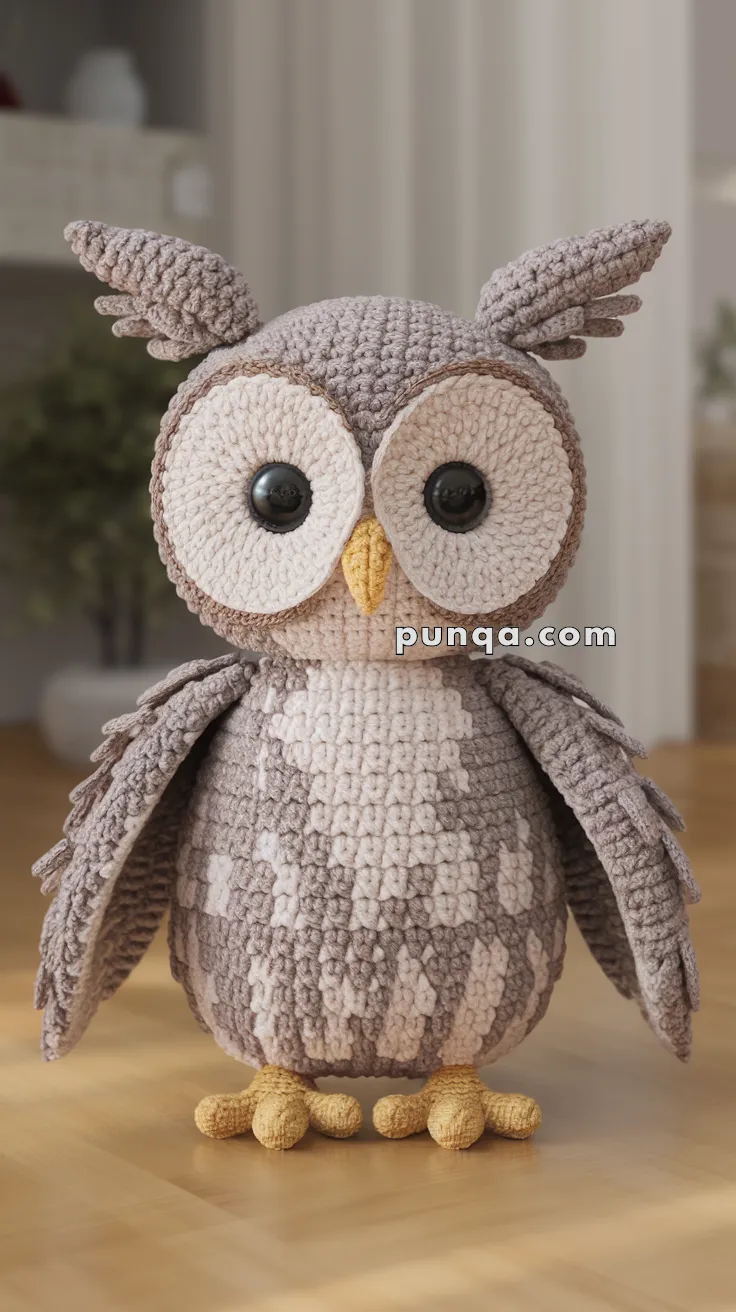
Welcome to the wise and whimsical world of amigurumi! 🦉✨ Today, I’m excited to share my free crochet pattern for an Amigurumi Barn Owl Baby—a charming and cuddly creation perfect for bird lovers, woodland-themed décor, or anyone who enjoys crafting expressive and lifelike plush designs! 🧶 Whether you love stitching up feathered friends, experimenting with textured details, or simply want to add a sweet barn owl baby to your handmade lineup, this pattern will guide you through crafting a beautifully sculpted plush with soft wings, curious eyes, and a touch of nocturnal charm! 🌙
This design embraces warm browns, soft creams, and intricate shaping to bring a heartwarming and majestic presence to your crochet projects! 🧶✨ I’ve carefully outlined each step to ensure your Amigurumi Barn Owl Baby turns out just right—ready to perch in your collection or become a treasured handmade gift! 🎁 So grab your hooks, pick out classic barn owl hues, and let’s stitch up an adorable baby owl! 🦉
🦉 Amigurumi Barn Owl Baby Crochet Pattern
Capture the gentle elegance of a barn owl with this ultra-cuddly amigurumi owl baby! With soft feathered wings, big eyes, and a pixel-style pattern across the belly, this plush friend is a perfect handmade companion for woodland nursery decor or owl lovers of all ages.
✨ Skill Level
Intermediate – Requires experience with color changes, shaping, and sewing pieces.
📏 Finished Size
Approx. 25 cm (10 in) tall
(using DK yarn and a 3–3.5 mm hook)
🧶 Materials
Yarn (DK / light worsted):
-
Warm grey – head, body, wings, ear tufts
-
Pale cream – face discs, chest panel, belly markings
-
Golden yellow – beak and feet
Notions:
-
14–16 mm black safety eyes
-
Polyester fiberfill
-
Tapestry needle
-
Stitch marker
-
Scissors
Hook:
3–3.5 mm crochet hook
🪡 Abbreviations (US Terms)
MR – magic ring
sc – single crochet
inc – increase
dec – decrease (sc2tog)
sl st – slip stitch
ch – chain
hdc – half double crochet
st(s) – stitch(es)
FO – fasten off
🧍 Body & Head (Worked in One Piece)
Worked bottom-up in continuous rounds using warm grey.
R1: 6 sc in MR (6)
R2: inc ×6 (12)
R3: (sc, inc) ×6 (18)
R4: (2 sc, inc) ×6 (24)
R5: (3 sc, inc) ×6 (30)
R6: (4 sc, inc) ×6 (36)
R7: (5 sc, inc) ×6 (42)
R8–R14: sc around (42)
🎨 Belly & Chest Colorwork
Beginning around R9, introduce pale cream stitches:
-
Work a vertical cream panel centered on the front (6–8 stitches wide)
-
Keep the sides and back warm grey
-
Add occasional single cream stitches on the lower belly for a soft, natural mottled look
R15: (5 sc, dec) ×6 (36)
R16: (4 sc, dec) ×6 (30)
R17: (3 sc, dec) ×6 (24)
Stuff firmly, shaping into a rounded oval.
R18: (2 sc, dec) ×6 (18)
R19: (sc, dec) ×6 (12)
R20: dec ×6 (6)
FO and close.
👁 Face Discs
Cream Eye Discs (Make 2)
Using pale cream.
R1: 6 sc in MR (6)
R2: inc ×6 (12)
R3: (sc, inc) ×6 (18)
R4: (2 sc, inc) ×6 (24)
R5: sc around (24)
FO, leave a long tail.
Grey Eye Rims (Make 2)
Using warm grey.
R1: 6 sc in MR (6)
R2: inc ×6 (12)
R3: (sc, inc) ×6 (18)
FO.
Eye Assembly
Insert safety eyes through the centers of the cream discs.
Place the grey rims behind the cream discs.
Sew each layered eye unit onto the head so the discs slightly overlap at the center.
🧡 Beak
Using golden yellow.
R1: 4 sc in MR (4)
R2: (sc, inc) ×2 (6)
R3–R4: sc around (6)
Lightly stuff into a narrow triangle and sew between the eyes, pointing downward.
🪽 Wings (Layered Feather Style)
Make 2 using warm grey.
R1: 6 sc in MR (6)
R2: inc ×6 (12)
R3: (sc, inc) ×6 (18)
R4: (2 sc, inc) ×6 (24)
R5: sc around (24)
Feather Rows (Worked Flat Around Edge)
Row 1: (sl st, ch 2, 2 hdc in same st, sl st in next st) repeat around
Row 2: Repeat, slightly offset
Row 3: Repeat once more
FO.
Wings should be thick, rounded, and softly layered.
Sew to the sides of the body, slightly forward.
🟡 Feet (Three-Toe Style)
Toes (Make 6)
Using golden yellow.
R1: 5 sc in MR (5)
R2–R3: sc around (5)
Lightly stuff.
Foot Assembly
Sew three toes side-by-side to form one foot.
Flatten slightly and attach one foot to the front base of the body.
Repeat for the second foot.
🌿 Ear Tufts
Make 2 using warm grey.
R1: 6 sc in MR (6)
R2: (sc, inc) ×3 (9)
R3: sc around (9)
Flatten slightly and fold at the base.
Sew to the top of the head, angled gently outward.
🧵 Final Assembly
-
Attach eye units
-
Sew beak in place
-
Attach wings
-
Sew feet to base
-
Attach ear tufts
-
Shape belly and wings gently by hand
🎀 Finishing Notes
-
Keep stuffing firm but not hard
-
Allow wings to rest naturally downward
-
Avoid stiffening; softness enhances realism
🌟 Final Thoughts
Your barn owl baby is now complete — a soft, expressive companion with realistic proportions, gentle texture, and classic barn owl charm. Perfect for woodland décor, nursery accents, or as a treasured handmade gift.
Happy crocheting 🦉🧶