Step into a world of creativity and fashion with this Amigurumi Barbie Doll crochet pattern! Inspired by the timeless charm of Barbie, this delightful design captures her signature elegance, flowing hair, and stylish outfit in every stitch. With carefully crafted details that bring her iconic look to life, this crochet Barbie is perfect for adding a touch of glamour to your handmade collection. Whether you’re crafting for doll lovers, creating a nostalgic keepsake, or simply enjoy making character-inspired amigurumi designs, this pattern lets you stitch up a miniature Barbie bursting with personality! 💖✨
Designed for customization, this pattern allows you to experiment with different outfit colors, embroidered details, or even tiny accessories like a miniature purse or sunglasses for extra flair. Craft a classic Barbie with her signature pink hues, create a whimsical version with bold tones, or even stitch up a full set of fashion-inspired amigurumi for a dazzling display! Whether gifted as a cherished keepsake, displayed as a stylish accent, or made simply for the joy of crafting, this Amigurumi Barbie Doll is a fun and creative project—perfect for bringing a touch of handmade glamour to every stitch! 🧶💖
💖 Amigurumi Pink Fashion Doll Crochet Pattern
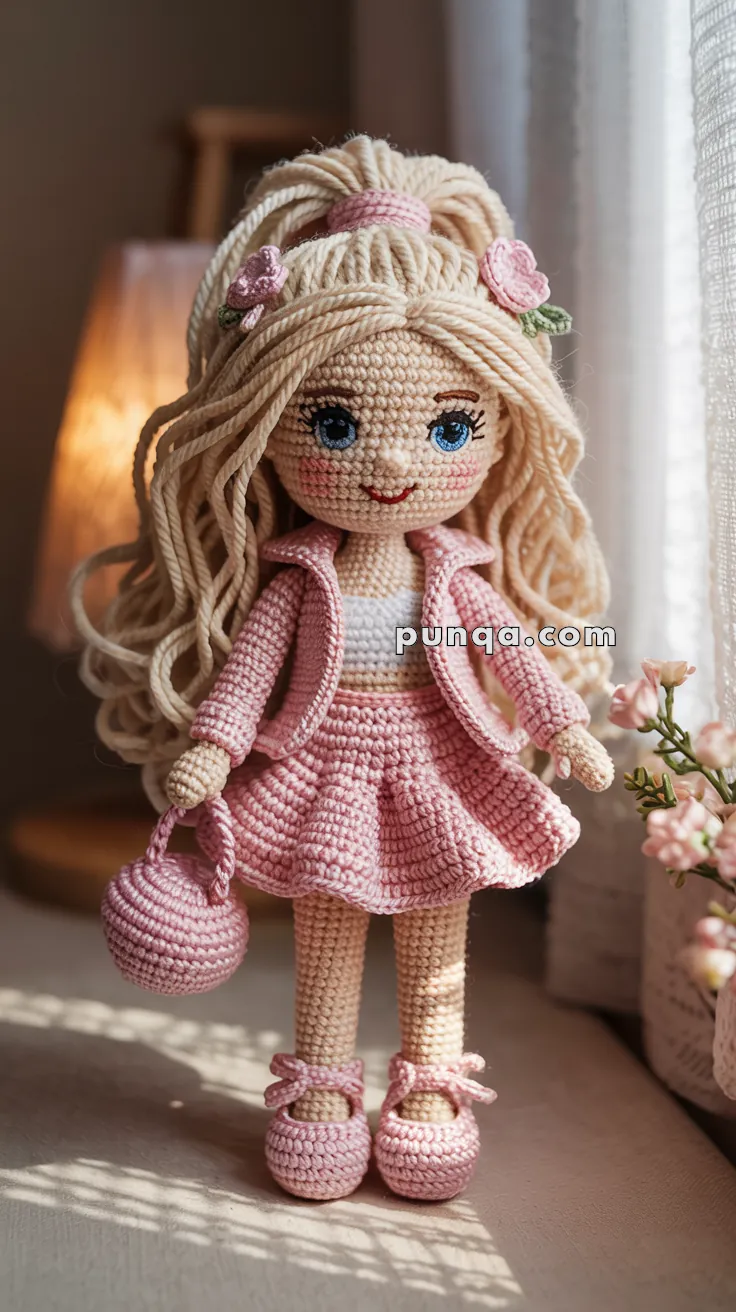
Create an elegant crochet fashion doll with a large expressive face, long creamy-blonde hair, a high half-up ponytail, floral hair clips, a fitted white top, cropped pink jacket, full circle skirt, bow-tied shoes, and a matching round handbag. 🌸🎀
The doll is designed with a softly rounded head, narrow neck, slim torso, long straight legs, petite hands, and removable layered clothing. Firm head and neck construction help support the generously styled hair while the wide skirt and structured shoes keep the finished doll balanced for display.
✨ Skill Level
Intermediate to Advanced
This pattern includes:
- Detailed facial embroidery
- Long-limbed doll shaping
- Dense yarn-hair installation
- Half-up ponytail styling
- Removable layered clothing
- Tailored jacket construction
- Full flared skirt shaping
- Shoes with ankle ties and bows
- Round stuffed handbag
- Small crochet flowers and leaves
📏 Finished Size
Using sport-weight cotton yarn with a 2.25–2.5 mm crochet hook, the finished doll measures approximately:
31–33 cm (12¼–13 in) tall
The skirt measures approximately 18–20 cm (7–8 in) across when spread naturally.
🧶 Yarn Requirements
Use sport-weight cotton or a smooth cotton-blend yarn for the doll and clothing. A soft DK acrylic or cotton-acrylic yarn works well for the hair.
Doll and Clothing
- Light skin tone: 90–105 g
- Dusty pink: 105–125 g
- White: 22–28 g
- Creamy blonde hair yarn: 110–135 g
- Rose pink for flowers and lips: 8–10 g
- Soft green for leaves: 4–5 g
- Blue embroidery floss: small amount
- Black embroidery floss: small amount
- Brown embroidery floss: small amount
- White embroidery floss: small amount
Filling
- Polyester fiberfill: approximately 110–140 g
🧵 Materials
- 2.25–2.5 mm crochet hook
- Tapestry needle
- Fine embroidery needle
- Stitch markers
- Pins
- Scissors
- Polyester fiberfill
- Small comb or wide-tooth doll-hair comb
- Optional 1–1.5 mm craft wire for neck and arms
- Floral tape for wrapping wire
- Smooth dowels or curling rods for styling the hair
- Optional plastic canvas circles for the shoe soles
🔤 Abbreviations — US Terms
MR — Magic Ring
sc — Single Crochet
inc — Increase: 2 sc in one stitch
dec — Invisible Decrease
sl st — Slip Stitch
ch — Chain
hdc — Half Double Crochet
dc — Double Crochet
BLO — Back Loop Only
FLO — Front Loop Only
FO — Fasten Off
Work in continuous rounds unless stated otherwise.
🧍♀️ Head
The head is broad across the forehead and cheeks, with a subtly tapered chin.
Using skin-tone yarn:
R1
MR 6. (6)
R2
inc ×6. (12)
R3
(1 sc, inc) ×6. (18)
R4
(2 sc, inc) ×6. (24)
R5
(3 sc, inc) ×6. (30)
R6
(4 sc, inc) ×6. (36)
R7
(5 sc, inc) ×6. (42)
R8
(6 sc, inc) ×6. (48)
R9–18
sc around. (48)
R19
(6 sc, dec) ×6. (42)
R20
(5 sc, dec) ×6. (36)
R21
(4 sc, dec) ×6. (30)
Begin stuffing firmly.
R22
(3 sc, dec) ×6. (24)
R23
(2 sc, dec) ×6. (18)
Continue stuffing. Keep the forehead rounded and press gently beneath the cheek area to define the chin.
R24
(1 sc, dec) ×6. (12)
R25
dec ×6. (6)
FO and close.
The finished head should be wider than the torso, with enough depth at the back to support the heavy hairstyle.
👂 Ears — Make 2
Using skin-tone yarn:
R1
MR 5.
R2
sc around. (5)
FO.
Flatten and sew the ears to the sides of the head between Head Rounds 14 and 17.
👃 Nose
Using skin-tone yarn:
R1
MR 5. (5)
R2
sc around. (5)
FO.
Add only a tiny amount of stuffing and sew to the center of the face.
Keep the nose small and softly raised.
👀 Embroidered Eyes
Mark the eyes between approximately Head Rounds 12 and 16, leaving 7–8 stitches between their inner edges.
Eye Whites
Using white embroidery floss, satin-stitch two wide almond-shaped eye whites.
Blue Irises
Embroider a blue circle in the lower central portion of each eye.
Black Pupils
Add a black pupil inside each iris.
Highlights
Add one larger and one smaller white highlight to each pupil.
Eyeliner and Lashes
Using black floss:
- Outline the upper eye edge.
- Add three long outer lashes.
- Add two shorter lashes toward the center.
- Add a very fine lower lash line.
The eyes should appear large, bright, and slightly upturned at the outer corners.
🤎 Eyebrows
Using brown embroidery floss, stitch one thin curved eyebrow above each eye.
The eyebrows should arch gently rather than appearing straight.
😊 Mouth
Using deep rose embroidery floss:
- Embroider a small upper curve.
- Add a fuller lower curve.
- Leave a tiny opening at the center to create the smiling expression.
A tiny white stitch may be added inside the smile.
🩷 Blush
Using pink floss, work several fine horizontal stitches beneath each eye.
Keep the blush softly blended and wider than the mouth.
🧍♀️ Neck and Torso
The torso has a narrow neck, defined waist, and gently rounded hips.
Using skin-tone yarn:
R1
MR 6. (6)
R2
inc ×6. (12)
R3–8
sc around. (12)
These rounds form the long, slim neck.
R9
(1 sc, inc) ×6. (18)
R10
(2 sc, inc) ×6. (24)
R11–15
sc around. (24)
R16
(2 sc, dec) ×6. (18)
R17–19
sc around. (18)
These rounds form the waist.
R20
(2 sc, inc) ×6. (24)
R21
(3 sc, inc) ×6. (30)
R22–26
sc around. (30)
Stuff firmly, adding extra support inside the neck.
R27
(3 sc, dec) ×6. (24)
R28
(2 sc, dec) ×6. (18)
FO, leaving a long tail.
🦵 Legs — Make 2
The legs are long and straight, with narrow ankles and slightly fuller thighs.
Using skin-tone yarn:
R1
MR 6. (6)
R2
inc ×6. (12)
R3–9
sc around. (12)
R10
(3 sc, inc) ×3. (15)
R11–31
sc around. (15)
Stuff evenly but not rigidly.
Keep the upper four rounds lightly stuffed for easier assembly.
FO, leaving a long sewing tail.
🦶 Feet — Make 2
Using skin-tone yarn:
R1
Ch 7.
Starting in the second chain:
5 sc, 3 sc in the last chain, continue along the opposite side, 4 sc, inc. (14)
R2
inc, 4 sc, 3 inc, 4 sc, 2 inc. (20)
R3–4
sc around. (20)
R5
(2 sc, dec) ×5. (15)
Stuff firmly.
FO and sew one foot to each leg.
💪 Arms — Make 2
Using skin-tone yarn:
R1
MR 6. (6)
R2
inc ×6. (12)
R3–5
sc around. (12)
R6
(2 sc, dec) ×3. (9)
R7–24
sc around. (9)
Stuff the hand lightly.
Leave the forearm and upper arm softly stuffed so the arms hang naturally.
FO, leaving a sewing tail.
👍 Thumbs — Make 2
Using skin-tone yarn:
R1
MR 4. (4)
R2–3
sc around. (4)
FO.
Sew one thumb to the inner side of each hand.
🪡 Doll Assembly
Sew the legs beneath the body, leaving approximately two stitches between them.
Attach the arms high on the torso, angled slightly downward.
Sew the head securely to the neck. Because the hair is heavy, reinforce the neck seam several times.
Optional: insert a wrapped wire or firm stuffing column through the neck and into the head.
🤍 Fitted White Top
The white top fits closely around the torso and ends just above the skirt waistband.
Using white yarn:
Row 1
Ch 25.
Starting in the second chain, sc across. (24)
Rows 2–8
Ch 1, turn, BLO sc across. (24)
FO.
Wrap around the torso and seam at the back.
Tack the upper and lower edges to the body.
👗 Pink Circle Skirt
The skirt is full and falls in deep, rounded folds.
Using dusty-pink yarn:
Waistband
Ch 25 and join without twisting.
R1
sc around. (24)
R2
BLO sc around. (24)
R3
inc around. (48)
R4
(1 sc, inc) ×24. (72)
R5–6
sc around. (72)
R7
(5 sc, inc) ×12. (84)
R8–10
sc around. (84)
R11
(6 sc, inc) ×12. (96)
R12–14
sc around. (96)
R15
(7 sc, inc) ×12. (108)
R16–18
sc around. (108)
R19
(8 sc, inc) ×12. (120)
R20
hdc around. (120)
FO.
Position the waistband at the narrowest part of the torso. The hem should finish above the knees.
Gently steam the skirt and arrange it into broad folds.
🧥 Cropped Pink Jacket
The jacket ends just above the skirt waistband and remains open at the front.
Jacket Back
Using pink yarn:
Row 1
Ch 25.
Starting in the second chain, sc across. (24)
Rows 2–14
Ch 1, turn, sc across. (24)
Row 15
sc 7 and FO.
Skip 10 center stitches, rejoin yarn, sc across the final 7 stitches.
These sections form the shoulders.
Front Panels — Make 2
Row 1
Ch 11.
Starting in the second chain, sc across. (10)
Rows 2–10
sc across. (10)
Row 11
Decrease once at the neckline edge. (9)
Row 12
Decrease once at the neckline edge. (8)
Rows 13–14
sc across. (8)
FO.
Sew the front panels to the back at the shoulders and side seams.
Leave the center front open.
🩷 Jacket Sleeves — Make 2
Using pink yarn:
R1
MR 9. (9)
R2
(2 sc, inc) ×3. (12)
R3–20
sc around. (12)
R21
(3 sc, inc) ×3. (15)
R22–24
sc around. (15)
FO.
Slide the sleeves over the doll’s arms and sew the wider openings into the jacket armholes.
🧥 Jacket Collar
Using pink yarn:
Row 1
Ch 23.
Starting in the second chain, sc across. (22)
Rows 2–4
sc across. (22)
FO.
Sew around the back neckline and fold outward.
🧥 Wide Lapels — Make 2
Using pink yarn:
Row 1
Ch 13.
Starting in the second chain:
sl st, sc, 2 hdc, 5 dc, 2 hdc, sc. (12)
FO.
Sew one lapel diagonally along each front neckline edge.
The wider end should sit near the collar and the pointed end should finish near the waist.
👠 Pink Shoes — Make 2
The shoes have rounded toes, open upper sections, and decorative ankle ties.
Using pink yarn:
R1
Ch 8.
Starting in the second chain:
6 sc, 3 sc in the final chain, continue along the opposite side, 5 sc, inc. (16)
R2
inc, 5 sc, 3 inc, 5 sc, 2 inc. (22)
R3
(3 sc, inc) ×5, 2 sc. (27)
R4
BLO sc around. (27)
R5–7
sc around. (27)
R8
8 sc, dec ×5, 9 sc. (22)
R9
7 sc, dec ×3, 9 sc. (19)
FO.
Place the foot inside and sew the shoe around the ankle.
Optional: insert a small plastic canvas oval inside each sole.
🎀 Shoe Ties and Bows
Ankle Tie
Ch 28.
FO.
Thread the chain through the upper shoe stitches and tie it around the ankle.
Bow
Ch 10 and join into a loop.
Wrap the center tightly with yarn.
Make two bows per shoe and sew them beside the ankle tie for the full ribboned appearance.
👜 Round Handbag
The handbag is a rounded, lightly stuffed purse with a curved handle.
Panels — Make 2
Using pink yarn:
R1
MR 6. (6)
R2
inc ×6. (12)
R3
(1 sc, inc) ×6. (18)
R4
(2 sc, inc) ×6. (24)
R5
(3 sc, inc) ×6. (30)
R6
(4 sc, inc) ×6. (36)
FO on the first panel.
Hold both panels together and sc through both layers.
Add a small amount of stuffing before closing.
Handle
Ch 30.
Starting in the second chain, sl st across.
Sew both ends to the upper sides of the handbag.
Tack the handle inside one hand if needed.
👩 Blonde Hair
The hair is extremely full and extends past the waist.
Cut approximately 110–130 strands of creamy-blonde DK yarn, each measuring 42–48 cm (16½–19 in).
Each strand will be folded during attachment.
Hairline
Mark a curved hairline across the forehead and around both ears.
Attach yarn strands using lark’s head knots.
Scalp Coverage
Work dense rows from the hairline toward the crown.
Add extra strands:
- Along the part
- At both temples
- Behind the ears
- Across the nape
- Around the crown
The crocheted scalp should not remain visible.
🎀 Side-Swept Front Hair
Create a slightly off-center part.
Attach additional strands along a diagonal line from the crown toward one eyebrow.
Sweep these strands across the forehead and secure discreetly near the opposite temple.
Leave several strands loose beside the face.
🌸 Half-Up Ponytail
Gather the upper third of the hair at the crown.
Leave the side and back lengths loose.
Pink Hair Band
Using pink yarn:
Ch 17 and join into a ring.
Work 3 rounds of sc.
FO.
Wrap around the gathered section.
Secure the ponytail to the crown with several hidden stitches to create height and volume.
🌊 Loose Hair Waves
Divide the hanging hair into small groups and wrap them around smooth dowels.
Apply gentle steam from a safe distance.
Allow the yarn to cool fully before removing it from the rods.
Separate curls gently with the fingers. Do not brush.
🌸 Hair Flowers
Small Five-Petal Flower
Using rose-pink yarn:
In an MR, repeat five times:
ch 2, 2 dc, ch 2, sl st.
Close the ring and FO.
Rolled Rose
Ch 20.
Starting in the second chain, work 2 hdc into each chain.
Roll the curling strip into a rose and sew its base securely.
🌿 Leaves
Using green yarn:
Ch 7.
Starting in the second chain:
sl st, sc, hdc, hdc, sc, sl st.
FO.
Sew leaves behind the flowers.
Place one flower near each side of the hairstyle and another near the ponytail base.
✨ Final Styling
Dress the doll in this order:
- White top
- Pink skirt
- Cropped jacket
- Shoes and ankle ties
- Handbag
Arrange the hair so most of it falls over the shoulders and down the back.
Keep the jacket front open and the white top visible.
Lift the ponytail slightly at the crown and spread the loose waves around the skirt.
💡 Final Shaping Tips
- Keep the head and neck very firmly supported.
- The skirt should end above the knees, not near the ankles.
- Keep the jacket cropped at waist level.
- Make the lapels broad and clearly folded outward.
- Leave the lower front of the jacket open.
- Attach enough hair to create full coverage and volume.
- Keep the shoes rounded and slightly oversized.
- Position the handbag beside one thigh rather than across the torso.
- Angle both arms slightly away from the body.
- Check that the legs remain long, straight, and evenly spaced.
💕 Final Thoughts
Your elegant crochet fashion doll is ready for her handmade debut. 🌸💖
With her bright embroidered eyes, soft blush, full blonde waves, high half-up ponytail, floral hair accessories, cropped pink jacket, fitted white top, wide circle skirt, ribboned shoes, and matching handbag, she combines graceful amigurumi proportions with a polished fashion-doll style.
Happy Crocheting! 🧶✨