I’ve always found the world of amigurumi to be a delightful adventure, full of creativity and charm! There’s something so joyful about turning a simple ball of yarn into a cuddly creature, like an antelope, with its graceful horns and sleek body. The process of creating an antelope amigurumi pattern is both a challenge and a joy, as it involves combining different techniques to capture the animal’s unique features. From its curved horns to its slender legs, each stitch brings the antelope to life, and it’s as satisfying as finishing a puzzle. Plus, who wouldn’t love the idea of a tiny antelope friend sitting cutely on a shelf? 🦌💖
Creating an antelope amigurumi pattern is a journey that starts with choosing the perfect yarn and colors that mimic the antelope’s natural beauty. The real fun begins when I sit down with my hook and start crocheting the body, adding in little details that make each piece unique. I love experimenting with different textures for the horns or adding a touch of whimsy with bright colors. And let’s not forget the immense satisfaction of assembling all the pieces, watching them transform into a lovable creature. It’s amazing how a few simple materials and stitches come together to create something so delightful! 🌟✨
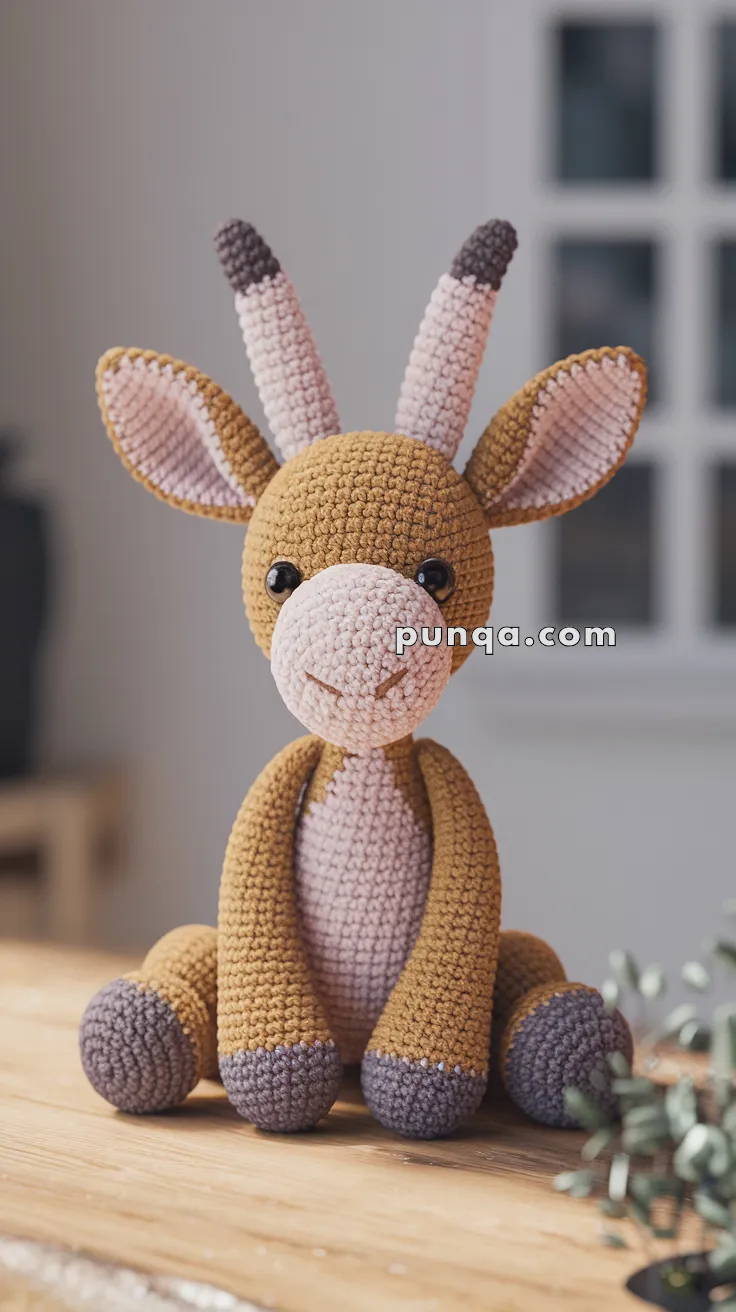
🦌 Amigurumi Antelope Crochet Pattern
Meet your new safari friend! This sweet, sitting antelope is the perfect mix of charm and elegance. With upright horns, oversized ears, and cuddly limbs, it’s ideal as a nursery companion or for your wild animal amigurumi collection. This antelope plush works up beautifully with basic stitches and soft, natural colors.
✨ Skill Level
Easy to Intermediate – Basic stitches, minimal shaping, and assembly required.
📏 Finished Size
Approx. 10–11 inches (25–28 cm) tall when made with DK or worsted yarn and a 2.5–3.5 mm hook.
🧶 Materials
Yarn (DK or Worsted Weight):
-
Caramel or tan (main body)
-
Light beige or blush (snout and belly)
-
Dusty brown or gray (hands, feet, horn tips)
-
Pale pink (inner ears)
-
Small amount black yarn (mouth and nostrils)
Supplies:
-
Crochet hook: 2.5 mm or 3.0 mm
-
Safety eyes (10–12 mm)
-
Tapestry needle
-
Stitch markers
-
Polyfill stuffing
-
Scissors
🧵 Abbreviations (US Terms)
MR – Magic Ring
sc – Single Crochet
inc – Increase
dec – Decrease
sl st – Slip Stitch
ch – Chain
FO – Fasten Off
BLO – Back Loop Only
🧠 Head (Tan + Beige)
-
MR with beige, 6 sc
-
inc x6 (12)
-
(1 sc, inc) x6 (18)
-
(2 sc, inc) x6 (24)
-
(3 sc, inc) x6 (30)
6–8. sc around (30) -
Switch to tan: sc (30)
10–15. sc around (30) -
(3 sc, dec) x6 (24)
-
(2 sc, dec) x6 (18)
– Insert safety eyes between R9–10, approx. 6 sts apart
– Embroider nostrils and smile with black yarn -
(1 sc, dec) x6 (12)
-
dec x6 (6), FO and close
🦴 Snout (Beige)
-
MR, 6 sc
-
inc x6 (12)
-
(1 sc, inc) x6 (18)
4–5. sc around (18), FO and sew to lower front of head
🐐 Body (Tan + Beige)
-
MR with beige, 6 sc
-
inc x6 (12)
-
(1 sc, inc) x6 (18)
-
(2 sc, inc) x6 (24)
-
(3 sc, inc) x6 (30)
6–10. sc with beige (30) -
Switch to tan: sc around (30)
12–20. sc around (30) -
(3 sc, dec) x6 (24)
-
(2 sc, dec) x6 (18)
– Stuff firmly -
(1 sc, dec) x6 (12)
-
dec x6 (6), FO and close
🦵 Arms (Make 2, Gray → Tan)
-
MR with gray, 6 sc
-
inc x6 (12)
3–4. sc (12) -
Switch to tan: sc around (12)
6–12. sc (12)
– Stuff lightly, FO and sew to body sides
🐾 Legs (Make 2, Gray → Tan)
-
MR with gray, 6 sc
-
inc x6 (12)
3–5. sc (12) -
Switch to tan: sc around (12)
7–11. sc (12)
– Stuff lightly, FO and sew to base of body in sitting position
👂 Ears (Make 2 Outer Tan + 2 Inner Pink)
Outer Ear (Tan):
-
Ch 6
-
sc in 2nd ch, sc x3, 3 sc in last
-
Rotate, sc x3, inc (12)
-
sc around (12), FO
Inner Ear (Pink):
Same pattern, skip final round to make it smaller
– Sew inner to outer, fold and stitch to sides of head
🦙 Horns (Make 2, Beige → Dark Brown Tips)
-
MR with dark brown, 6 sc
-
sc around (6)
-
Switch to beige: sc (6)
4–12. sc around (6)
– Stuff lightly, FO and sew to top of head
✂️ Assembly
-
Sew head to body
-
Attach arms to sides and legs to bottom in seated pose
-
Sew ears and horns to head
-
Attach snout, embroider nostrils and mouth
-
Weave in all ends
💡 Optional Add-ons
-
Add a tufted tail
-
Use felt or embroidery for simple eyes if desired
-
Brush inner ears for a fuzzy look
🧶 Finishing Touch
And that’s your cuddly antelope complete! Calm, charming, and ready for cuddles, this soft safari cutie is sure to bring warmth and joy to anyone lucky enough to receive it. 🦌💛