Welcome to the regal and heartwarming world of amigurumi! 🦁✨ Today, I’m thrilled to share my free crochet pattern for an Amigurumi Lioness With Cub—a majestic and adorable duo perfect for wildlife lovers, family-themed décor enthusiasts, or anyone who enjoys crafting expressive and tender plush designs. Whether you’re an experienced crocheter or new to the craft, this pattern will guide you step-by-step through creating a lioness radiating strength and grace alongside her playful cub, capturing the timeless bond of motherhood in the wild.
This design embraces natural, earthy tones, intricate textured details, and thoughtful shaping to bring a true-to-life presence to your amigurumi collection. Each stitch showcases both the regal elegance of the lioness and the sweet spirit of her cub, making this duo an exceptional addition to your handmade gallery or a cherished gift for someone special. So grab your hooks, select your favorite rich hues, and let’s embark on this wild crafting adventure together!
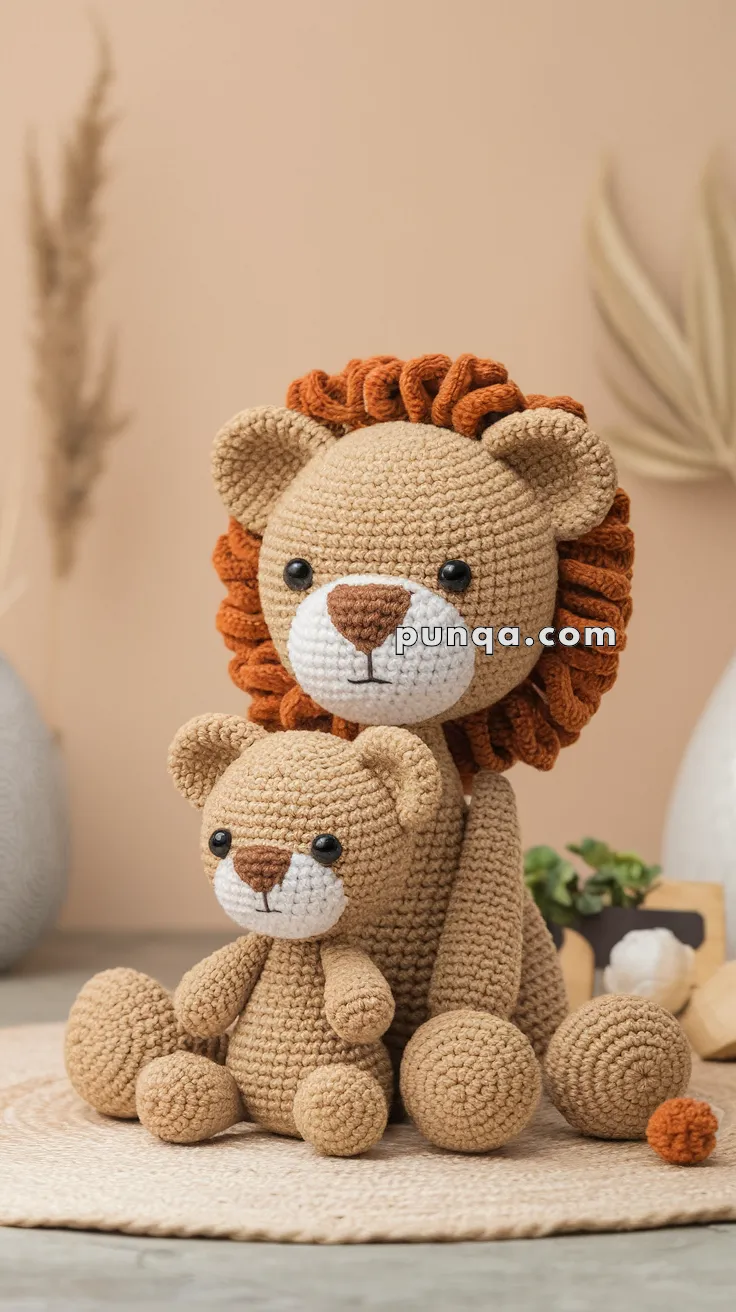
🦁 Amigurumi Lioness with Cub Crochet Pattern
Create a heartwarming wildlife pair with this adorable lioness and cub amigurumi set. With a simple round face, floppy limbs, and cozy cuddles, this pair is perfect for nursery decor or handmade gifts.
✨ Skill Level
Beginner–Intermediate – basic amigurumi shaping, loop stitch mane, and simple sewing.
📏 Finished Sizes
-
Adult Lion: ~25 cm (10 in) tall when seated
-
Cub: ~14 cm (5.5 in) tall
🧶 Materials
-
Yarn (DK or Light Worsted Weight):
-
Light Brown (main body) – ~70 g (adult), 40 g (cub)
-
White (muzzle) – small amount
-
Rust / Burnt Orange (mane + tail tip) – ~25 g
-
Black (nose/mouth embroidery) – scrap
-
-
Hook: 2.75 mm or 3.0 mm
-
Stuffing: Fiberfill
-
Safety Eyes: 10 mm (adult), 6 mm (cub)
-
Tapestry needle, stitch markers, scissors
🧵 Abbreviations (US Terms)
MR – Magic Ring
sc – Single Crochet
inc – Increase (2 sc in same stitch)
dec – Decrease (sc2tog)
ch – Chain
sl st – Slip Stitch
FLO – Front Loop Only
BLO – Back Loop Only
FO – Fasten Off
🦁 Adult Lion Pattern
🧠 Head (Light Brown)
-
MR, 6 sc (6)
-
inc ×6 (12)
-
(sc, inc) ×6 (18)
-
(2 sc, inc) ×6 (24)
-
(3 sc, inc) ×6 (30)
-
(4 sc, inc) ×6 (36)
7–14. sc around (36) -
(4 sc, dec) ×6 (30)
-
(3 sc, dec) ×6 (24)
-
(2 sc, dec) ×6 (18)
-
(sc, dec) ×6 (12)
-
dec ×6 (6) – FO and close.
➡ Place eyes between Rounds 10–11, ~7 sts apart.
➡ Stuff firmly before closing.
🐽 Muzzle (White)
-
MR, 6 sc (6)
-
inc ×6 (12)
-
(sc, inc) ×6 (18)
4–5. sc around (18) -
(sc, dec) ×6 (12), FO and stuff lightly.
➡ Sew low on head, centered.
➡ Embroider the nose in dark brown (triangle shape) and a short black line extending down.
➡ Add a small horizontal smile curve.
👂 Ears (Make 2 – Light Brown)
-
MR, 6 sc (6)
-
inc ×6 (12)
-
(sc, inc) ×6 (18)
-
sc around (18)
-
(1 sc, dec) ×6 (12)
Flatten and sew to top sides of the head between Rnds 5–6 from crown.
🦁 Mane (Rust / Burnt Orange)
➡ The mane in the photo uses loop stitches, forming tight, thick curls concentrated around the back and sides of the head, leaving the face front open.
-
Attach yarn to back of head between ears.
-
Work loop stitch around the back half of the head in horizontal rounds.
-
Continue for 4–5 rows downward, layering loops densely.
Each loop should be ~1.5–2 cm long. -
Secure ends firmly.
Optional: Lightly brush loops to fluff slightly.
🧍 Body (Light Brown)
-
MR, 6 sc (6)
-
inc ×6 (12)
-
(sc, inc) ×6 (18)
-
(2 sc, inc) ×6 (24)
-
(3 sc, inc) ×6 (30)
6–13. sc around (30) -
(3 sc, dec) ×6 (24)
-
(2 sc, dec) ×6 (18)
-
(sc, dec) ×6 (12), FO.
Stuff firmly.
➡ Slightly oval the bottom so the lion sits upright.
🐾 Arms (Make 2 – Light Brown)
-
MR, 6 sc (6)
-
inc ×6 (12)
3–7. sc around (12) -
(2 sc, dec) ×3 (9)
9–12. sc around (9)
Stuff lightly, FO, and sew angled forward.
🦵 Legs (Make 2 – Light Brown)
-
MR, 6 sc (6)
-
inc ×6 (12)
-
(sc, inc) ×6 (18)
4–6. sc around (18) -
(2 sc, dec) ×4, sc 6 (14)
8–10. sc around (14)
Stuff firmly. FO and attach to body base slightly forward so the lion sits naturally.
🦁 Tail (Light Brown + Rust Tip)
-
With light brown, ch 18.
-
sc back along chain (17), FO.
-
Add small rust yarn tassel or pom-pom tip.
Attach to body back.
🧸 Cub Pattern
Follow adult pattern with these adjustments:
Head: Stop increases at 30 sts, then work 5 rounds even.
Body: Stop increases at 24 sts, then 5–6 rounds even.
Arms/Legs: Only 8–9 rounds total per limb.
Muzzle: Keep at 12 sts max.
Eyes: Use 6 mm.
No mane.
Tail: 12 ch long with smaller tuft.
Sew head tilted slightly for a youthful look.
🪡 Assembly Order
-
Sew muzzle to head and embroider nose + mouth.
-
Insert and secure safety eyes.
-
Attach ears.
-
Join head to body securely.
-
Sew arms and legs symmetrically.
-
Add tail.
-
For lion, attach mane last around back and sides.
✨ Finishing Touches
-
Add blush with fabric pastel or light pink yarn.
-
Slightly flatten the base of both figures for stability.
-
Pose the cub seated in front of or leaning on the larger lion.
-
For added charm, use matte cotton yarn to mimic natural fur texture.
This cuddly lioness and her baby cub are perfect companions for storytelling, gifting, or wild safari decor! 🦁🧶