Creating an amigurumi rainbow parrot is like embarking on a colorful adventure filled with creativity and joy! 🌈 There’s something truly delightful about bringing a vibrant parrot to life with just some yarn, a crochet hook, and a splash of imagination. The appeal of amigurumi lies in its ability to transform simple materials into adorable, huggable creatures that spark joy in anyone who sees them. I love how each stitch in the rainbow parrot pattern adds a unique personality to the toy, making it a wonderful project for both beginners eager to explore the world of crochet and experienced crafters looking to add a splash of color to their collection.
The process of creating a rainbow parrot starts with selecting your yarn colors. I find the rainbow spectrum so appealing because it brings a sense of whimsy and cheerfulness to the parrot. 🦜 Once the colors are chosen, it’s all about getting into the rhythm of crochet! Starting with the head and working through the body, wings, and those adorable little feet, each step is a building block in this playful creation. The best part is seeing the parrot come to life in your hands, feathers and all. By the time I sew on the eyes and embroider a beak, the parrot is ready to bring smiles and brighten up any room it inhabits.
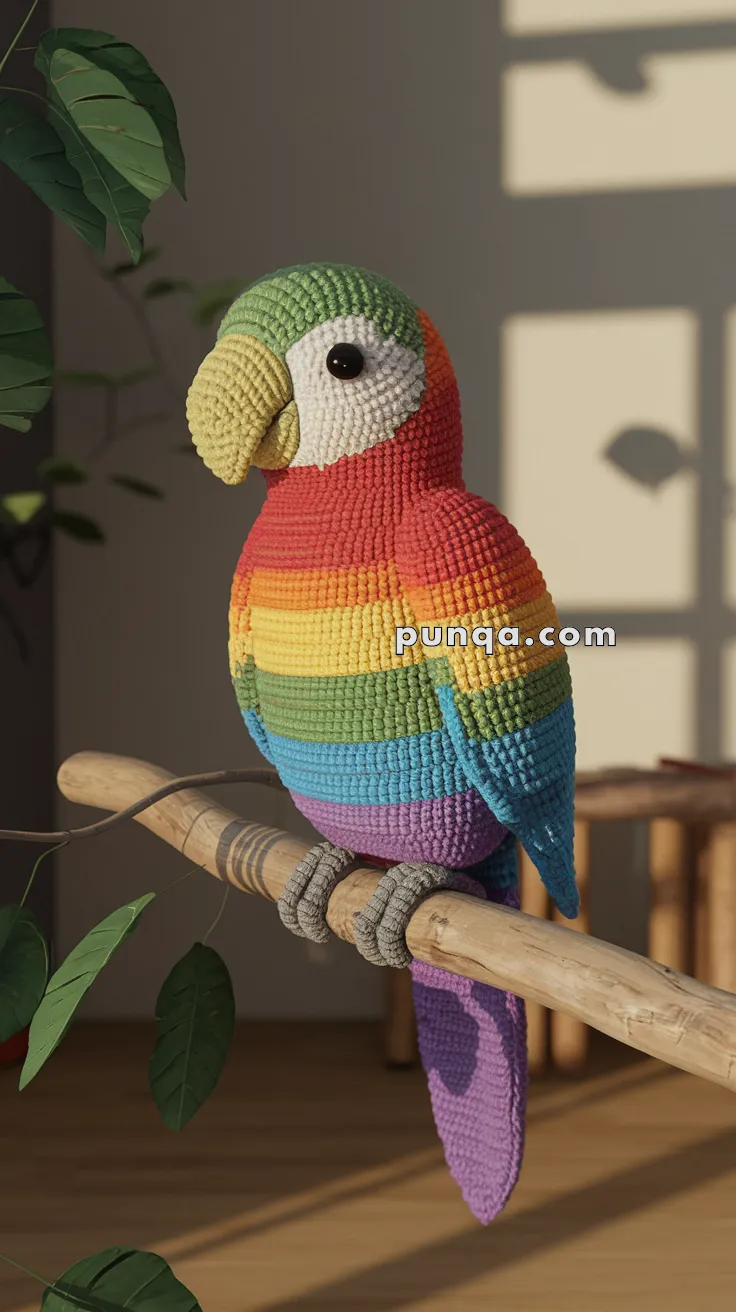
🦜 Amigurumi Rainbow Parrot – FREE Crochet Pattern
Add a burst of color to your home with this vibrant and tropical rainbow parrot! With its beautiful striped feathers and realistic perch pose, it’s the perfect cheerful companion for bird lovers and playful decor enthusiasts.
🧶 Materials:
-
Yarn in green, red, orange, yellow, light green, blue, purple, white, and black
-
2.5 mm or 3.0 mm crochet hook
-
12 mm safety eyes
-
Fiberfill stuffing
-
Yarn needle
-
Stitch marker
-
Optional: Wire for legs and claws (for a stable perch grip)
✨ Abbreviations (US Terms):
-
MR – Magic Ring
-
sc – Single Crochet
-
inc – Increase
-
dec – Decrease
-
ch – Chain
-
sl st – Slip Stitch
-
FO – Fasten Off
🧠 Skill Level:
Intermediate – Includes color changes, shaping, and optional wiring for claws.
✂️ Pattern Instructions
🔸 Head:
-
Start with green yarn, MR, sc 6
-
Inc evenly to 48 sts
-
Change to white for face patch
-
Work even rounds, position and insert safety eyes
-
Stuff and shape, FO and set aside
🔹 Beak (Top and Bottom):
-
Top Beak: With yellow yarn, MR, sc 6
-
Inc for several rounds to form curved shape
-
Slightly flatten and sew to front of face
-
-
Bottom Beak: Smaller half-oval in yellow, attach under top beak
🔸 Body:
-
Start from neck down using red yarn
-
Inc in rounds until 54 sts
-
Begin working in rainbow stripe colors (orange, yellow, green, blue, purple) every few rounds
-
Slightly taper at bottom for tail connection
-
Stuff firmly and FO
🔹 Wings (Make 2):
-
Work flat or in rounds, using rainbow stripes
-
Slight shaping for curve
-
Lightly stuff if desired
-
Sew to both sides of the body
🔸 Tail:
-
Use purple yarn
-
Work in long oval or triangle shape
-
Stuff lightly and attach to base of body
🔹 Legs and Claws:
-
With grey yarn, crochet tubes for legs
-
For claws: ch 5, sl st back, make 3 per foot
-
Attach claws to ends of legs
-
Optional: Insert wire before sewing to allow grip pose on perch
🧵 Assembly:
-
Sew head to top of body securely
-
Attach wings symmetrically on both sides
-
Sew tail to the back bottom
-
Position and sew legs under body, wrapping claws around a wooden dowel if desired
-
Embroider or glue felt for details if needed
🌿 Display Tip:
Perch your parrot on a wooden stick, curtain rod, or even a plant stand for a tropical vibe! Add jungle leaves around for full effect.
✨ Finishing Touches:
-
Use a slicker brush to gently fluff wings for feathered texture
-
Add a small wire loop on the back if you want to hang the parrot
-
Use embroidery floss to create nostrils or brow line for more detail