✨ Skill Level
Intermediate to Advanced
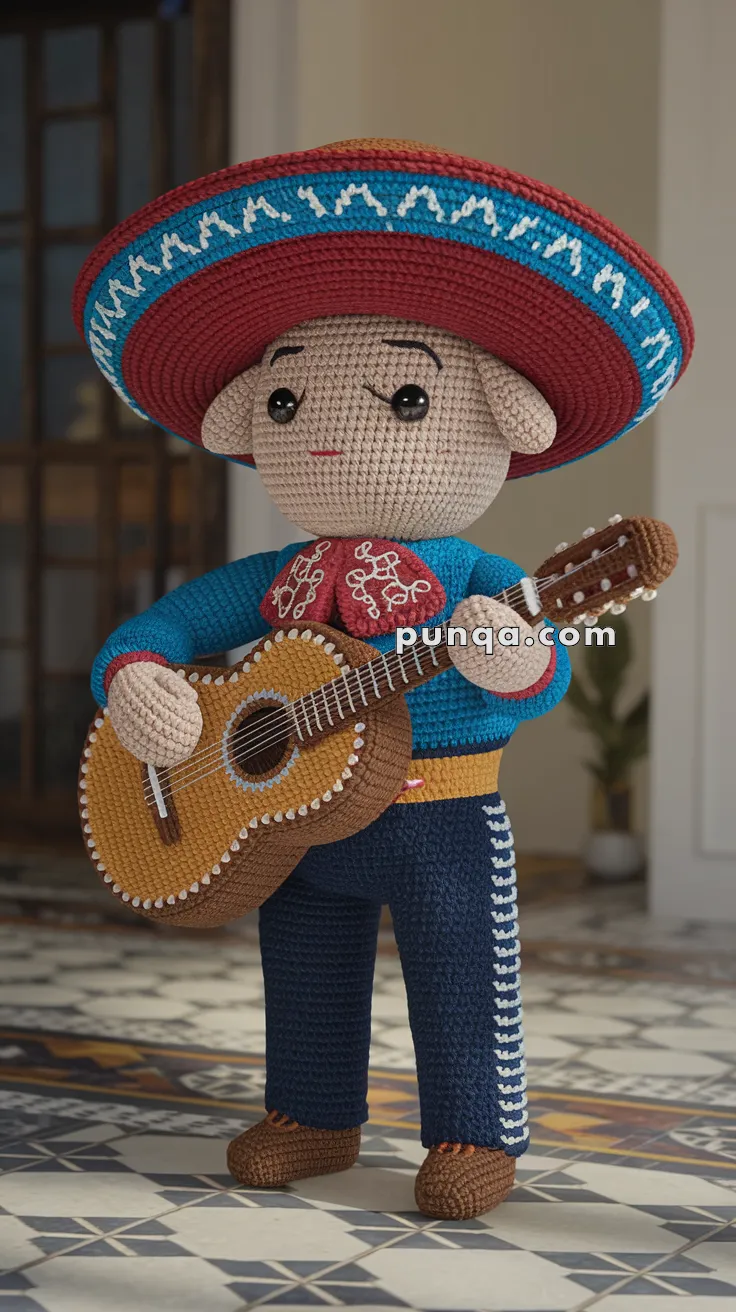
This project includes color changes, embroidery, accessory shaping, and structural elements for the sombrero and guitar.
📏 Finished Size
Approximately 32–35 cm (12–14 inches) tall using worsted weight yarn and a 2.5–3 mm crochet hook.
🧶 Yarn Requirements
Worsted weight cotton or acrylic yarn recommended.
Skin tone (light beige) – about 40 g
Turquoise (jacket) – about 35 g
Navy blue (pants) – about 35 g
Red (sombrero and bow tie) – about 30 g
Turquoise accent (sombrero band) – about 10 g
Golden yellow (belt) – about 5 g
Medium brown (guitar body and shoes) – about 30 g
Dark brown (guitar neck and guitar edge) – about 10 g
White (decorative embroidery) – about 8 g
Black (facial embroidery and guitar strings) – small amount
🧰 Tools & Materials
2.5–3 mm crochet hook
8–10 mm safety eyes
Polyfill stuffing
Embroidery needle
Stitch markers
Thin cardboard or plastic sheet for sombrero support
Strong sewing thread
Optional: fabric glue for guitar strings.
🧵 Abbreviations (US Terms)
MR – Magic Ring
SC – Single Crochet
INC – Increase
DEC – Decrease
CH – Chain
SL ST – Slip Stitch
BLO – Back Loop Only
FLO – Front Loop Only
FO – Fasten Off
👦 Head
With skin tone yarn
Round 1
MR 6 SC (6)
Round 2
INC ×6 (12)
Round 3
(1 SC, INC) ×6 (18)
Round 4
(2 SC, INC) ×6 (24)
Round 5
(3 SC, INC) ×6 (30)
Round 6
(4 SC, INC) ×6 (36)
Rounds 7–15
SC around (36)
Insert safety eyes between Rounds 10–11, about 8 stitches apart.
Round 16
(4 SC, DEC) ×6 (30)
Round 17
(3 SC, DEC) ×6 (24)
Round 18
(2 SC, DEC) ×6 (18)
Stuff firmly.
Round 19
(1 SC, DEC) ×6 (12)
Round 20
DEC ×6 (6)
FO and close.
Facial Details
Embroider:
• Small straight red mouth
• Soft curved black eyebrows
👂 Ears (Make 2)
With skin tone yarn
MR 6 SC
(1 SC, INC) ×3 (9)
SC around (9)
FO leaving long tail.
Flatten slightly and sew just below eye level on each side of the head.
🧍 Body
With turquoise yarn
Round 1
MR 6 SC (6)
Round 2
INC ×6 (12)
Round 3
(1 SC, INC) ×6 (18)
Round 4
(2 SC, INC) ×6 (24)
Rounds 5–10
SC around (24)
Belt Round
Change to golden yellow
Round 11
SC around (24)
Pants
Switch to navy blue
Rounds 12–22
SC around (24)
Stuff lightly.
Round 23
(2 SC, DEC) ×6 (18)
Round 24
(1 SC, DEC) ×6 (12)
FO.
🦵 Legs (Make 2)
Shoes
With brown yarn
MR 6 SC
INC ×6 (12)
Rounds 3–5
SC around (12)
Pants
Switch to navy blue
Rounds 6–18
SC around (12)
Stuff lightly.
FO leaving long tail.
Sew legs evenly to body.
Charro Pant Embroidery
Using white yarn, embroider decorative loops down the outer seam of each pant leg.
💪 Arms (Make 2)
With skin tone yarn
MR 6 SC
INC ×6 (12)
Rounds 3–5
SC around (12)
Switch to turquoise
Rounds 6–16
SC around (12)
Lightly stuff.
Flatten slightly and sew to sides of body.
Position arms forward to hold the guitar.
👔 Bow Tie
With red yarn
CH 10
Row 1
SC across
Row 2
SC across
FO.
Wrap yarn around center to form bow.
Sew under chin.
Add decorative white embroidered swirls.
🎩 Sombrero
Crown
With red yarn
MR 6 SC
INC ×6 (12)
(1 SC, INC) ×6 (18)
(2 SC, INC) ×6 (24)
Rounds 5–8
SC around (24)
FO.
Brim
With red yarn
MR 6 SC
INC ×6 (12)
(1 SC, INC) ×6 (18)
(2 SC, INC) ×6 (24)
(3 SC, INC) ×6 (30)
(4 SC, INC) ×6 (36)
(5 SC, INC) ×6 (42)
(6 SC, INC) ×6 (48)
Continue increasing until brim diameter reaches 17–18 cm.
Work 1 round turquoise for the decorative band.
Finish with 1 round red FLO to create a crisp outer edge.
Insert a thin cardboard circle inside the brim to help the sombrero keep its shape.
Hat Decoration
Using white yarn, embroider repeating decorative M-shaped stitches across the turquoise band.
🎸 Guitar
The guitar is built as a rounded 3D shape so it looks natural in the musician’s arms.
Guitar Front Panel
With golden brown yarn
CH 7
Row 1
SC in 2nd CH and across (6)
Turn the rectangle into an oval by crocheting around it.
Increase slightly at the two rounded ends each round.
Work 6 rounds until the shape resembles a guitar body with a wider lower half.
FO.
Guitar Back Panel
Repeat the same shape.
Guitar Sides
Attach dark brown yarn to the edge of the front panel.
SC evenly around.
Work 4 rounds to create the thickness of the guitar.
Place the back panel on top and sew around the edges while lightly stuffing.
This creates a rounded acoustic guitar shape, similar to a real instrument.
Sound Hole
Embroider a black circle in the center.
Outline the sound hole with light blue stitches.
Add small white decorative stitches around the guitar edge.
Neck
With dark brown yarn
CH 14
Row 1–4
SC across (13)
FO and attach to guitar body.
Headstock
CH 6
SC across for 3 rows.
Attach to the neck.
Frets
Embroider thin white horizontal lines across the neck.
Strings
Using thin black or dark thread, attach 6 parallel strings from the bridge to the headstock.
Secure with tiny knots or fabric glue.
🧷 Assembly
Sew head firmly to body.
Attach legs evenly for stable standing.
Position arms forward.
Place the sombrero on the head and stitch lightly in place.
Attach bow tie.
Position guitar diagonally across the chest.
Sew hands around the guitar neck and body so it appears the musician is holding it naturally.
🎉 Final Thoughts
This cheerful mariachi guitarist is full of character, color, and musical charm. The wide sombrero, embroidered charro suit, and beautifully shaped guitar make this project a striking decorative doll that celebrates traditional mariachi culture.
With its detailed accessories and vibrant design, this handcrafted musician becomes a joyful centerpiece for any crochet collection. Display it proudly, gift it to a music lover, or let it inspire your next creative crochet adventure. 🎸🧶🇲🇽


This doll is really beautifully crafted.👏🏻