Oh my gosh, have you ever seen anything so adorable as a Baby Yoda amigurumi? 🥹 Crafting one of these little cuties is like bringing a sprinkle of joy and magic into your life. The combination of crochet’s therapeutic rhythm and the enchanting allure of Baby Yoda makes this project irresistible. As someone who absolutely adores both crocheting and the Star Wars universe, I find that creating these miniature versions of the beloved character is a delightful way to express creativity. It’s no wonder why crafters everywhere are picking up their hooks and getting in on the fun!
Now, let’s talk about the process. Crafting a Baby Yoda amigurumi involves a series of well-organized steps that even beginners can follow with a little patience. 🧶 It starts with selecting the perfect yarn, usually a blend of green and beige to capture Grogu’s unique charm. From there, it’s about mastering some basic stitches, like single crochet and magic rings, to form the different parts of the body. The real magic happens as each piece begins to take shape, and you sew them together, adding those iconic features like the oversized ears and wide eyes. By the end, you’re left with a tiny, handmade masterpiece that’s as rewarding as it is adorable.
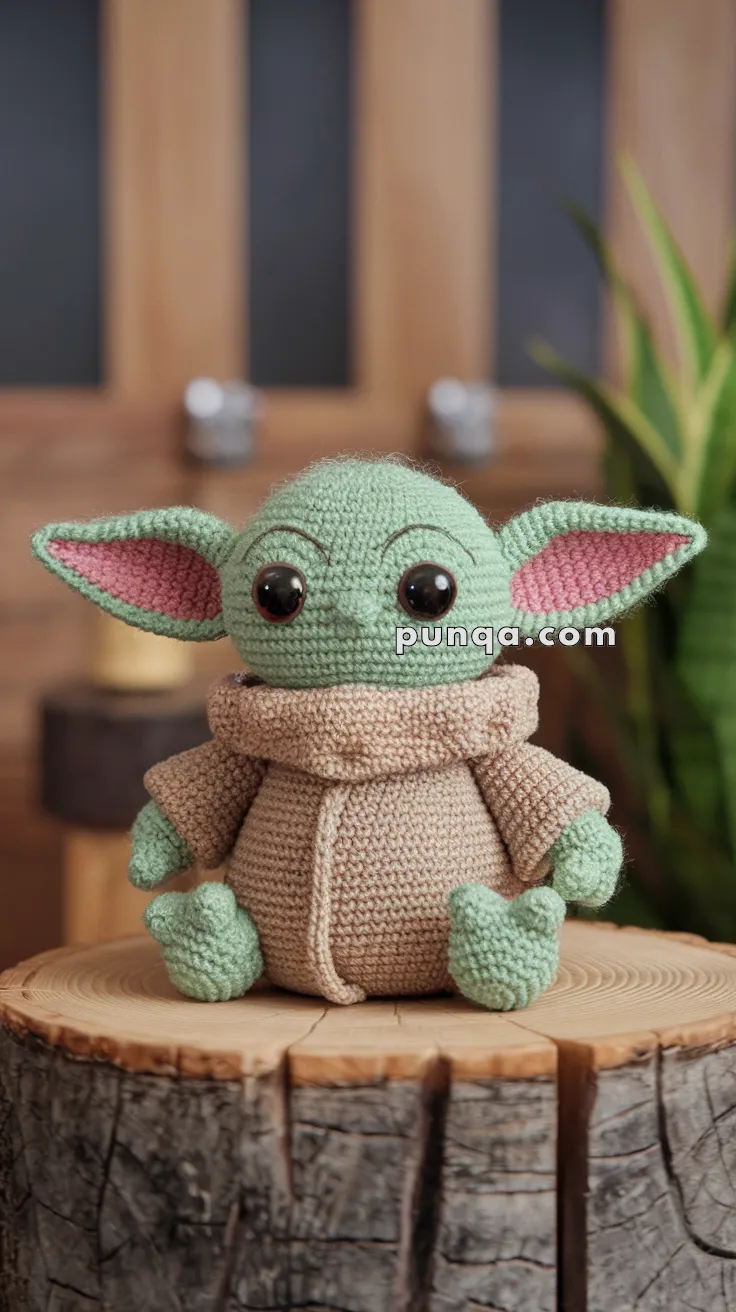
👶🛸 Amigurumi Baby Yoda (Grogu) Crochet Pattern
Skill Level: Intermediate
Finished Size: ~7–8 inches (18–20 cm) tall
🧶 Materials
Worsted weight yarn in:
– Light green (head, ears, hands, feet)
– Beige/tan (robe)
– Pink (inner ears)
12 mm safety eyes
Polyester fiberfill stuffing
3.0 mm crochet hook
Yarn needle
Stitch marker
Scissors
✨ Abbreviations (US Terminology)
sc – single crochet
inc – increase (2 sc in the same stitch)
dec – decrease (sc two together)
ch – chain
sl st – slip stitch
MR – magic ring
BLO – back loop only
FLO – front loop only
🧵 Pattern Instructions
🧠 Head
With light green yarn:
MR, 6 sc (6)
inc x6 (12)
(sc, inc) x6 (18)
(2 sc, inc) x6 (24)
(3 sc, inc) x6 (30)
(4 sc, inc) x6 (36)
Rounds 7–14: sc around (36)
(4 sc, dec) x6 (30)
(3 sc, dec) x6 (24)
– Insert safety eyes between rounds 9 and 10, about 9 stitches apart
– Embroider eyebrows above eyes with darker green
(2 sc, dec) x6 (18)
(1 sc, dec) x6 (12)
dec x6 (6)
– Stuff firmly and fasten off
👂 Ears (Make 2)
With light green yarn:
Ch 6
Row 1: sc in 2nd ch and across (5)
Rows 2–5: sc across (5)
Row 6: dec, sc, dec (3)
Row 7: sc3tog
– Switch to pink yarn
– Sc around ear for inner ear detail
– Fold and sew to sides of head
🧤 Arms (Make 2)
With light green yarn:
MR, 6 sc (6)
inc x6 (12)
Rounds 3–6: sc around (12)
(2 sc, dec) x3 (9)
Rounds 7–9: sc around (9)
Switch to beige yarn:
Rounds 10–12: sc around (9)
– Stuff lightly and sew to body
🦶 Legs (Make 2)
With light green yarn:
MR, 6 sc (6)
inc x6 (12)
Rounds 3–5: sc around (12)
(2 sc, dec) x3 (9)
Rounds 6–7: sc around (9)
Switch to beige yarn:
Rounds 8–10: sc around (9)
– Stuff and sew to base of body
👘 Body (Robe)
With beige yarn:
MR, 6 sc (6)
inc x6 (12)
(sc, inc) x6 (18)
(2 sc, inc) x6 (24)
(3 sc, inc) x6 (30)
Rounds 6–14: sc around (30)
(3 sc, dec) x6 (24)
(2 sc, dec) x6 (18)
– Stuff and close
– Attach arms and legs
– Stitch robe collar flap in place if making one
🧣 Robe Collar
Ch 20
Row 1: sc across (19)
Rows 2–4: sc across
– Wrap around neck and stitch in place
🧷 Finishing Touches
-
Sew head onto body securely
-
Attach ears at a slight angle downward
-
Position arms and legs for sitting posture
-
Embroider nose and mouth with black thread or dark green
-
Stitch down robe collar and fluff up with a brush for texture
🎯 Tips
-
Use safety eyes with backing for better security
-
Add beans or pellets in the base for weight
-
Brush the robe yarn gently with a wire brush to make it fuzzy
-
For more detail, you can add little fingers using surface crochet