Hop aboard a charming crochet adventure with this Amigurumi London Routemaster Bus pattern! Whether you’re crafting for travel lovers, adding a nostalgic touch to your handmade collection, or simply enjoy making detailed amigurumi designs, this free pattern lets you stitch up the iconic red double-decker bursting with personality. With its classic shape, bold red color, and signature windows, this crochet bus captures the essence of London’s beloved transport in every stitch. Perfect for gifting to fellow crochet enthusiasts, decorating a themed space, or simply celebrating the joy of handmade creations, this amigurumi Routemaster bus is sure to bring smiles—one stitch at a time! 🚍✨
Designed for customization, this pattern allows you to experiment with different details, embroidered accents, or even tiny accessories like a miniature bus stop or passengers for extra charm. Craft a classic London bus with its signature look, create a playful version with exaggerated features, or even stitch up a full city-inspired set with matching landmarks! Whether gifted as a whimsical keepsake, displayed as a quirky accent, or made simply for the joy of crafting, this Amigurumi London Routemaster Bus is a fun and creative project—perfect for bringing a touch of British charm to every stitch! 🧶🇬🇧
🧶 Amigurumi London Routemaster Bus Crochet Pattern
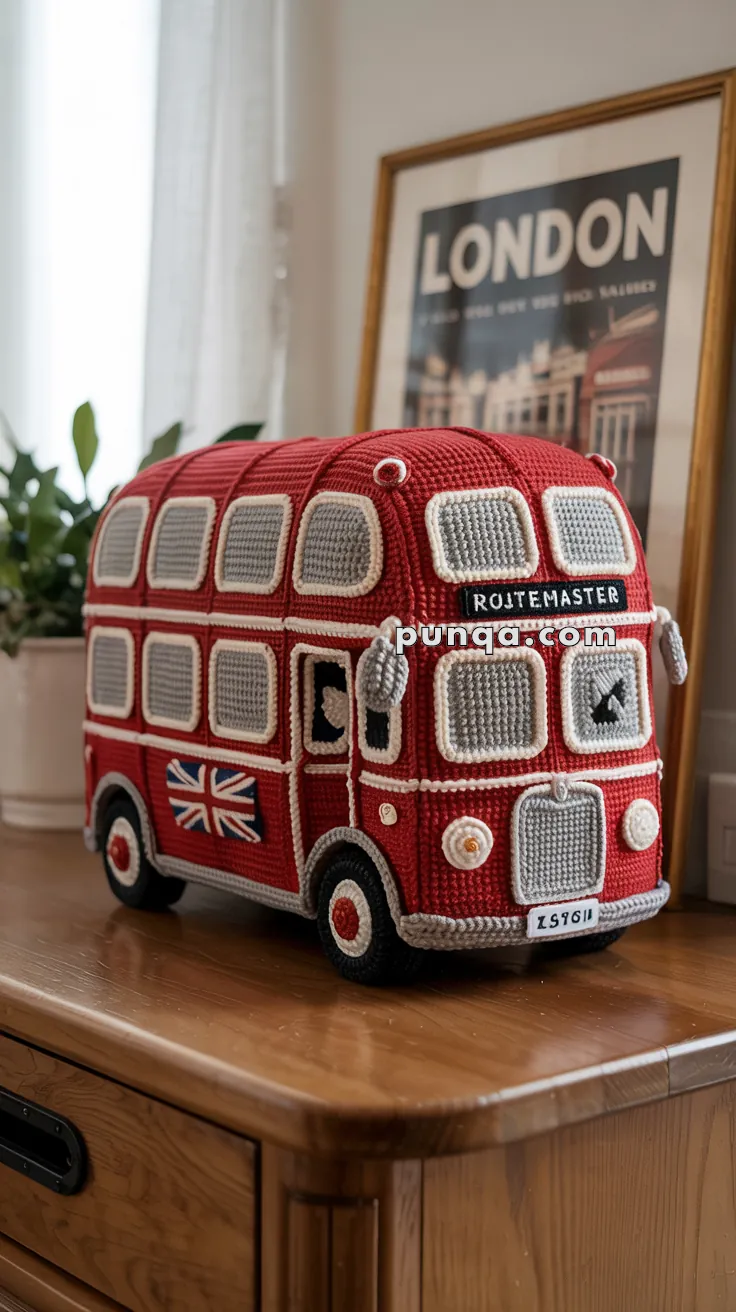
Bring iconic charm into your handmade world with this Amigurumi London Routemaster Bus! Featuring the signature red double-decker shape, Union Jack side detail, embroidered signage, and rounded corners, this project is perfect for display or gifting to lovers of all things British 🇬🇧.
✨ Skill Level
Advanced – Requires structured assembly, precise panel sizing, and colorwork for details.
📏 Finished Size
Approx. 28 cm (L) × 15 cm (H) × 10 cm (W) when made with DK or light-worsted yarn and a 3.0–3.5 mm hook.
🧵 Materials
- Yarn (DK or light-worsted):
- Red – Main body
- Light Grey – Windows, grill
- White – Trim, window frames, outlines, headlight rims
- Black – Tires, silhouettes, lettering
- Blue + Red + White – Union Jack
- Medium Grey – Bumpers and undercarriage
- Yellow – Headlight centers
- Hook: 3 – 3.5 mm
- Stuffing: Polyester fiberfill
- Plastic canvas or cardboard (for sides, roof, and base)
- Tapestry needle, scissors, stitch markers
- Embroidery thread: White (for “ROUTEMASTER”), Black (for plate)
🔁 Abbreviations (US)
MR – Magic Ring
sc – Single Crochet
inc – Increase (2 sc in 1 st)
dec – Decrease (sc2tog)
ch – Chain
sl st – Slip Stitch
FO – Fasten Off
🟥 Side Panels (× 2, mirrored)
Color: Red
- Ch 56, sc 10 rows (56).
- R 11–14 → decrease 1 st each end every other row to gently curve front and back.
- R 15–18 → sc across (approx 48 sts remaining).
- FO.
👉 Each side should show two horizontal decks of 3 windows, with the Union Jack flag centered on the lower rear section.
🪟 Windows (× 16)
Color: Light Grey + White trim
- Ch 8, sc 6 rows (7 sts each).
- Switch to White, sc around for border.
- Make 16 windows total:
- 6 each side (3 top + 3 bottom)
- 2 front + 2 rear.
- Space them evenly with a 1-st gap between each; all edges framed in White for the thick window outlines seen in the photo.
🚪 Door & Driver Windows (Front Right)
Smaller rectangles (Ch 5, 3 rows sc + White border).
Add Black surface-stitched silhouettes for driver and dog cut-outs.
Attach at front right side — door below and driver above.
🪞 Side Mirrors (× 2)
Color: Light Grey.
Ch 5, sc 1 row.
Sew flat beside front windows at driver height.
Curve outward slightly.
🚏 Roof Panel
Color: Red.
- Ch 50, sc 10 rows.
- At each end dec 1 st per row for 4 rows to create curved edges.
- Add White border around edge (imitating trim).
- FO.
Stuff lightly or insert plastic canvas to keep the arched shape.
⬛ Front Panel
Color: Red.
- Ch 30, sc 10 rows.
- Curve upper edge by dec each end next 2 rows.
- Attach 2 grey front windows (one top, one bottom).
- Sew grey grill centered beneath windows.
- Add White “ROUTEMASTER” sign above top windows on a Black banner (strip 3 rows high).
🚖 Grill
Color: Light Grey.
Ch 12, sc 6 rows.
Add 4 vertical white sl st lines.
Attach center front below windows.
💡 Headlights (× 2)
White + Yellow center.
R1 – MR 6 sc.
Stitch 1 Yellow dot in center.
Sew each side of grill inside white frames.
🔢 License Plate
Color: White.
Ch 8, sc 3 rows.
Embroider black “LS961”.
Sew below grill centered.
🧱 Back Panel
Similar to front panel without grill or sign.
Add 2 light-grey windows (one per deck) with white frames.
⚙️ Wheels (× 4)
Black + White rim + Red hubcap.
R1 – MR 6 sc
R2 – inc × 6 (12)
R3 – (1 sc, inc) × 6 (18)
R4 – (2 sc, inc) × 6 (24)
Change to White, sc 1 round for rim.
Make small Red center (MR 4 sc) and sew on.
Attach four wheels beneath body aligning with wheel arches (arch trim in Grey + White edge line).
🧩 Bottom Panel / Undercarriage
Color: Medium Grey.**
Ch 50, sc 8 rows.
Insert cardboard for stiff base before sewing closed.
🇬🇧 Union Jack Side Patch
Base: Blue square (Ch 12, 6 rows sc).
Embroider white and red cross lines with surface stitch to match flag in photo.
Attach centered on lower rear side panel.
🧵 Assembly Order
1️⃣ Attach windows to side, front, and rear panels.
2️⃣ Join sides to front and back using mattress stitch in White for bold outline.
3️⃣ Sew roof panel on top with rounded front.
4️⃣ Attach bottom panel, insert stuffing and optional supports.
5️⃣ Add wheels, mirrors, lights, license plate, Union Jack.
6️⃣ Embroider “ROUTEMASTER” banner and plate text last for crisp finish.
🧽 Finishing Tips
- Lightly stuff corners and roof to keep edges softly rounded.
- Reinforce interior with cardboard for clean planes.
- Use invisible joins so white trim lines look continuous.
- Optional: brush with soft toothbrush to remove yarn sheen and add velvety texture.
✅ Final Accuracy Checklist
✔ Two levels of three windows each side
✔ Two front and two rear windows
✔ Grey grill with white slats
✔ Black “ROUTEMASTER” sign above front windows
✔ Union Jack on rear side panel
✔ White trims around all edges and arches
✔ Four black wheels with red centers
✔ Mirrors, license plate, headlights in correct placement
✔ Rounded roof corners and plump 3D structure
This iconic Amigurumi London Bus is ready to roll into your collection with timeless character and handmade charm! 🚌🇬🇧