Rev up your crochet skills with this Amigurumi Mini Cooper pattern! Whether you’re crafting for car enthusiasts, adding a playful touch to your collection, or simply love detailed amigurumi designs, this free pattern lets you stitch up a charming Mini Cooper full of personality. With its sleek shape, signature headlights, and adorable wheels, this crochet car captures the essence of the beloved classic in every stitch. Perfect for gifting to auto lovers, decorating a fun display, or simply celebrating the joy of crochet, this amigurumi Mini Cooper is ready to cruise into your handmade treasures! 🚗✨
Designed for customization, this pattern allows you to experiment with different colors, embroidered details, or even tiny accessories like racing stripes or a miniature license plate for extra flair. Craft a classic red Mini, create a pastel version for a whimsical touch, or even stitch up a full fleet of tiny cars! Whether displayed as a nostalgic keepsake, gifted to a fellow crochet enthusiast, or made simply for the joy of crafting, this Amigurumi Mini Cooper is a dynamic and exciting project—perfect for bringing a touch of automotive charm to every stitch! 🧶🏁

🚗 Amigurumi Classic Mini Cooper Crochet Pattern
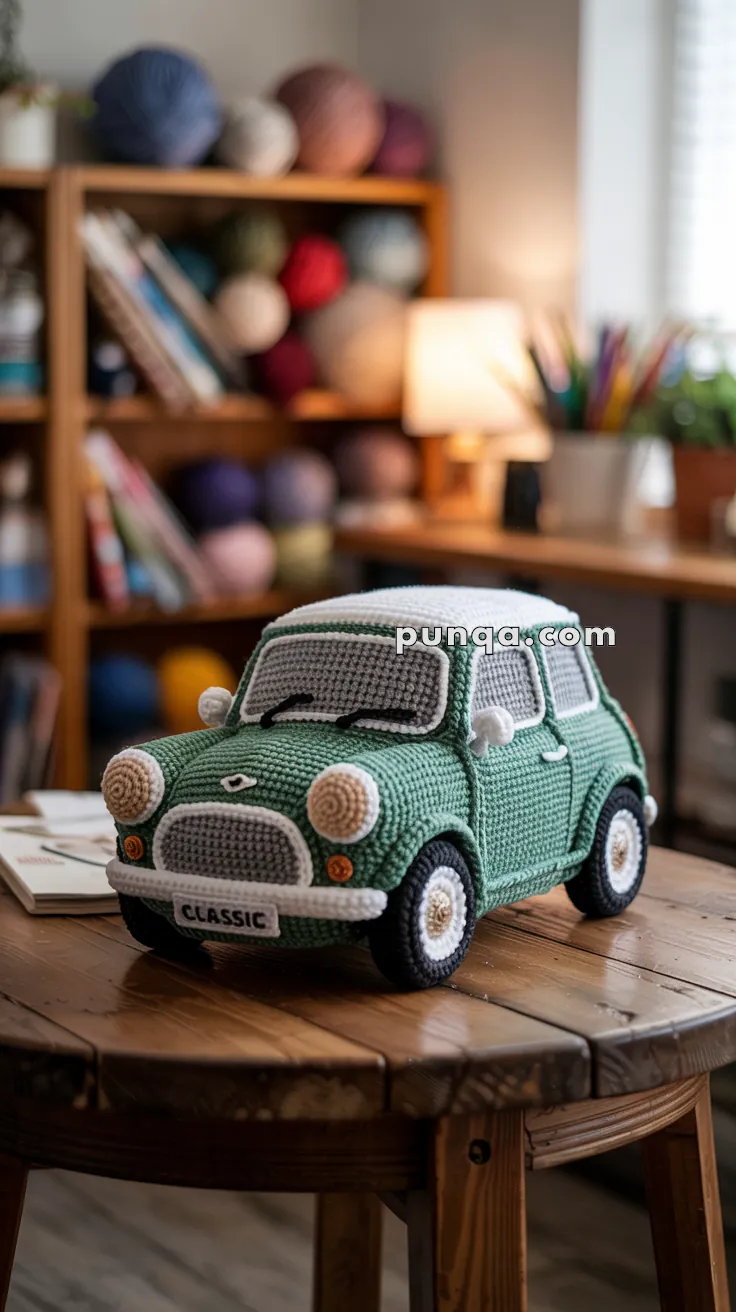
This charming crochet Mini Cooper brings retro character and handmade style together in the cutest way. Rounded headlights, sage-green bodywork, curved windshield, and recessed wheels give this little car an irresistibly nostalgic feel. Whether you’re making it for display, gifting it to a car enthusiast, or adding it to a handmade collection, this soft, plush Mini has delightful details in every stitch.
✨ Skill Level
Intermediate to Advanced – involves shaping, layered component construction, surface details, and structured assembly.
📏 Finished Size
Approx. 23 cm (9 in) long and 13 cm (5 in) tall using DK yarn and a 2.5 mm hook.
🧶 Materials
- DK Weight Yarn
- Sage Green – 60 g (body)
- White – 35 g (roof, bumpers, trim, mirrors)
- Medium Grey – 20 g (windows, grille center)
- Beige – 20 g (headlights, hubcaps)
- Black – 25 g (tires, outlines, wipers, hood seam)
- Orange – small amount (turn signals)
- Tools
- 2.5 mm crochet hook
- Polyfill stuffing
- Optional: plastic canvas for reinforcement
- Tapestry needle
- Stitch markers
🧵 Abbreviations (US Terms)
MR – magic ring
sc – single crochet
inc – increase
dec – invisible decrease
sl st – slip stitch
ch – chain
BLO – back loop only
FLO – front loop only
FO – fasten off
🚘 Car Body (Sage Green)
Ch 21
Round 1: sc in 2nd ch from hook, sc 18, 3 sc in last ch; continue on underside: sc 18, inc (42)
Round 2: (6 sc, inc) × 6 (48)
Rounds 3–7: sc around (48)
Round 8: (7 sc, inc) × 6 (54)
Rounds 9–17: sc around (54)
Stuff firmly but evenly. Shape into a rounded, slightly domed rectangle with softened corners.
FO, leaving a long tail.
🏠 Roof Panel (White)
Ch 22
Row 1: sc 20
Rows 2–10: ch 1, turn, sc across (20)
Work one round of sc around all edges.
Lightly steam to round the corners.
🪟 Windows (Medium Grey)
Front Windshield
Ch 17
Row 1: sc 15
Rows 2–4: ch 1, turn, sc across (15)
Row 5: ch 1, turn, dec, 11 sc, dec (13)
FO.
Side Windows (Make 2)
Ch 12
Row 1: sc 10
Rows 2–4: ch 1, turn, sc 10
Row 5: ch 1, turn, dec, 6 sc, dec (8)
FO.
Sew windows around the upper body, forming a gentle slope around the roof.
⚪ Chrome Trim (White)
Surface-slip-stitch a clean white line along the bottom edge of all windows.
🎛 Grille (Medium Grey + White Border)
With grey:
Ch 12
Rows 1–4: sc across (10)
FO.
With white yarn, sc evenly around the entire piece to give a soft oval border.
Attach centered at the front.
🔆 Headlights (Beige, Make 2)
MR, 6 sc
Round 2: inc around (12)
Round 3: (1 sc, inc) × 6 (18)
Round 4: sc around (18)
Lightly stuff and sew to front corners.
Add a tiny black embroidered dot in each center.
🟠 Turn Signals (Orange, Make 2)
MR, 5 sc, FO.
Sew just beneath and slightly inward from the headlights.
⚪ Bumpers (White, Front & Back)
Ch 26
Rows 1–2: sc across (24)
FO and curve while sewing onto the lower front and back edges.
Let the corners angle slightly upward to match the rounded look.
🛞 Wheels (Black + Beige, Make 4)
Tires (Black)
MR, 6 sc
Round 2: inc around (12)
Round 3: (1 sc, inc) × 6 (18)
Rounds 4–5: sc around (18)
FO.
Hubcaps (Beige)
MR, 6 sc
Round 2: (1 sc, inc) × 3 (9)
FO.
Sew hubcap into tire center. Add a tiny white stitch for highlight.
Attach wheels deeply recessed into the body’s underside.
🌀 Wheel Arches (Sage Green, Make 4)
MR, 6 sc
Round 2: inc around (12)
Round 3: (1 sc, inc) × 6 (18)
Round 4: sc around (18)
Flatten gently into an oval and stitch directly above each wheel.
🪞 Side Mirrors (White, Make 2)
MR, 6 sc, join and FO.
Sew onto the window frame area, not the green body.
🚪 Door Handles (White)
Embroider a short horizontal white line on each side door.
⚙ Hood Seam (Black)
Surface stitch a thin, slightly curved line above the grille.
🧼 Windshield Wipers
Using black thread, embroider two soft curved “U” shapes at the bottom of the windshield.
🪧 Front License Plate
Ch 8
Rows 1–2: sc across
Embroider CLASSIC in black.
Attach centered on front bumper.
🧩 Assembly
- Sew roof panel flush onto the body.
- Attach windshield, then side windows.
- Add the white chrome trim under windows.
- Sew grille, headlights, and turn signals.
- Attach front and rear bumpers.
- Position wheel arches above their wheels.
- Sew recessed wheels underneath the body.
- Add mirrors to the grey window area.
- Embroider door handles.
- Add hood seam and windshield wipers.
- Smooth stuffing and adjust curves.
🎀 Finishing Touches
- Light steam helps shape the body and roof.
- Gently press wheel arches into an oval.
- Keep surface embroidery lines soft and clean for a plush toy look.
🎉 Final Result
Your crocheted Mini Cooper features:
- Smooth sage-green body
- Flush white roof and bumpers
- Medium-grey windshield and side windows
- Beige rounded headlights
- Recessed wheels with beige hubcaps
- Side mirrors, hood seam, and wipers
- “CLASSIC” license plate
A delightful handmade piece full of character and charm. 🚗💚


