Welcome to the fast and thrilling world of amigurumi! 🏎️✨ Today, I’m excited to share my free crochet pattern for an Amigurumi Racing Car—a sleek and dynamic creation perfect for motorsport fans, playful décor, or anyone who enjoys crafting detailed and structured plush designs! 🧶 Whether you love stitching up miniature vehicles, experimenting with bold color contrasts, or simply want to add a speedy racing car to your handmade lineup, this pattern will guide you through crafting a beautifully sculpted plush with aerodynamic shaping, sporty details, and a touch of high-speed charm! 🚦
This design embraces vibrant colors, precise shaping, and intricate details to bring an energetic and adventurous presence to your crochet projects! 🧶✨ I’ve carefully outlined each step to ensure your Amigurumi Racing Car turns out just right—ready to zoom into your collection or become a treasured handmade gift! 🎁 So grab your hooks, pick out fiery reds, electric blues, or classic blacks, and let’s stitch up a race-ready car! 🏎️
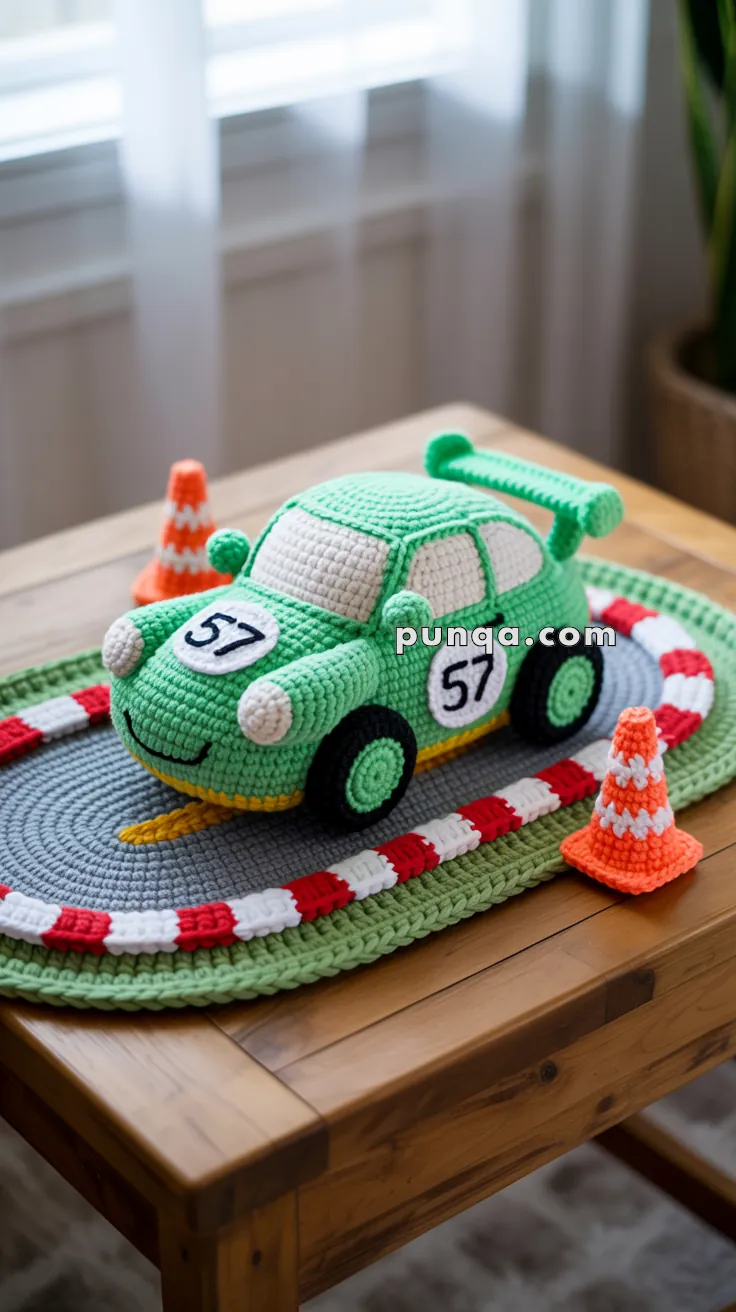
🏁 Amigurumi Racing Car Play Set Crochet Pattern
Bring playtime to life with this adorable handmade racing car set! Featuring a mint-green race car #57, bright orange cones, and a checkered racetrack, this crochet project is a delightful mix of fun, detail, and craftsmanship. Perfect for car lovers and kids alike, it’s both decorative and playable!
✨ Skill Level
Intermediate – includes shaping, color changes, appliqué work, and assembly.
📏 Finished Size
- Car: approx. 8–9 in (20–23 cm) long
- Mat: approx. 12 × 18 in (30 × 45 cm)
- Cones: approx. 3 in (7–8 cm) tall
🧶 Materials
- DK or light-worsted weight yarn:
- Mint Green – car body, spoiler, wheel rims
- Light Cream – windows, headlights, number circles
- Black – tires, thick window outlines, undercarriage trim
- Yellow – bumper stripe, track arrow
- Red & White – track border
- Medium Gray – racetrack surface
- Light Green – grass border
- Orange & White – traffic cones
- 2.75–3 mm crochet hook
- Fiberfill stuffing
- Stitch marker and tapestry needle
- Optional: thin cardboard insert for mat stiffness
🧵 Abbreviations (US Terms)
MR – Magic Ring
sc – Single Crochet
inc – Increase (2 sc in same stitch)
dec – Decrease (sc 2 together)
ch – Chain
sl st – Slip Stitch
BLO – Back Loop Only
FLO – Front Loop Only
FO – Fasten Off
🚗 Racing Car Pattern
Main Body (Mint Green)
- MR 6 sc
- inc x6 (12)
- (1 sc, inc) x6 (18)
- (2 sc, inc) x6 (24)
- (3 sc, inc) x6 (30)
- (4 sc, inc) x6 (36)
7–13. sc around (36) - sc 12, inc x6, sc 18 (42) – creates the curved hood bump
15–22. sc around (42) - (5 sc, dec) x6 (36)
- (4 sc, dec) x6 (30)
- (3 sc, dec) x6 (24)
Stuff firmly. - (2 sc, dec) x6 (18)
- (1 sc, dec) x6 (12)
- dec x6, FO.
💡 Detail: Surface stitch a thin yellow line across the lower front for a bumper accent.
Windows (5 total – 2 each side + 1 windshield)
With cream yarn:
ch 8, turn, sc 7, ch 1 turn × 4 rows (5 rows total). FO.
Using black yarn, work 1–2 full rounds of sc around each window to create a thick bold frame, just like in the photo.
Attach two on each side (front and rear windows) and one windshield slightly on the hood, angled upward.
Spoiler
Mint green yarn:
ch 12, sc across for 3 rows. FO.
Edge once in sc around for firmness.
Create 2 support posts: ch 5 each and attach to underside of spoiler ends. Sew securely to the rear top of the car.
Wheels (4 pieces)
Black yarn:
- MR 6 sc
- inc x6 (12)
- (1 sc, inc) x6 (18)
4–5. BLO sc around (18)
Lightly stuff.
Surface stitch a mint-green circle about 2 rounds wide in the center for the rim.
Sew wheels flush to the car base so the car sits low and balanced on the mat.
Headlights (2 pieces)
Cream yarn:
- MR 6 sc
- inc x6 (12)
- sc around (12)
Stuff lightly and sew to front corners.
Number Patches (2 pieces)
White yarn:
- MR 6 sc
- inc x6 (12)
- (1 sc, inc) x6 (18) FO.
Embroider “57” in black yarn. Attach one patch to each side door.
🟢 Racetrack Mat Pattern
Track Base
With gray yarn:
ch 40; sc along both sides of chain, increasing at each end to form an oval.
Continue until oval measures ~12 × 18 in.
Checkered Border
Alternate 3 stitches red, 3 stitches white for 3 complete rounds to create the distinctive checkerboard edge.
Grass Border
With light green yarn, work 2–3 rounds of sc for a thicker grassy edge. This matches the wide green border seen in the reference photo.
Center Arrow
With yellow yarn:
ch 6, sc 2 rows.
Triangle tip: decrease 1 st each row until point forms.
Sew arrow pointing forward in the track center.
🧡 Traffic Cones (2 pieces)
Orange yarn:
- MR 5 sc
- (1 sc, inc) ×2 + sc (7)
- sc around
- (2 sc, inc) ×2 + sc (10)
- Change to white, sc around (stripe)
- (3 sc, inc) ×2 + sc (13)
7–8. Change to orange, sc around ×2 - FLO sc around (13); continue 2 more FLO rounds to make a flat square base.
Stuff and FO.
Color order: Orange base → White stripe → Orange top
✂️ Finishing Touches
- Attach all parts securely with matching yarn or fabric glue.
- Position wheels flat so the car rests low and stable.
- Arrange traffic cones and sew or glue in place.
- Steam-block the racetrack mat to flatten and shape the oval perfectly.
- Optional: insert thin cardboard or plastic under the mat for extra firmness.
✅ Pattern Accuracy Highlights
✔ Thick black window frames (1–2 sc rounds)
✔ Two side windows per side + one hood-angled windshield
✔ Mint-green wheel rims and low-profile stance
✔ Checkerboard red-white track border
✔ Yellow bumper stripe and center arrow
✔ Orange-white-orange traffic cone pattern
✔ 2–3 rounds green grass border
💬 Final Thoughts
This amigurumi racing car play set is a show-stopper for kids, collectors, or display shelves. The thick window frames, vivid colors, and soft track details make it feel lively and real. Every element — from the green car #57 to the tiny cones — captures the joyful spirit of handmade play.
🏎️ Crochet your own race day today!