Welcome to the graceful and compassionate world of royal-inspired amigurumi! 👑💙 Today, I’m honored to share my FREE crochet pattern for an Amigurumi Princess Diana—a heartfelt tribute to the beloved People’s Princess. Whether you’re creating a memorial piece for a royal enthusiast, crafting an inspirational gift, or simply wishing to celebrate Diana’s enduring legacy in yarn form, this design captures her iconic blonde bob, elegant posture, and timeless style that continues to inspire.
This design blends regal elegance with heartfelt simplicity, with step-by-step instructions for her signature hairstyle, classic outfits, and gentle expression. Choose soft ivory and delicate blues for her wedding gown look, or sophisticated blacks and reds for her iconic 90s fashion moments. The pattern includes options for both her youthful princess years and her later humanitarian work. 🌹 So grab your hooks, select your finest yarns, and let’s crochet a tribute to a woman whose kindness and courage touched millions. “Stitch by stitch, we honor a life of compassion and change.” 🧶✨
👑 Amigurumi Princess Diana – Free Crochet Pattern
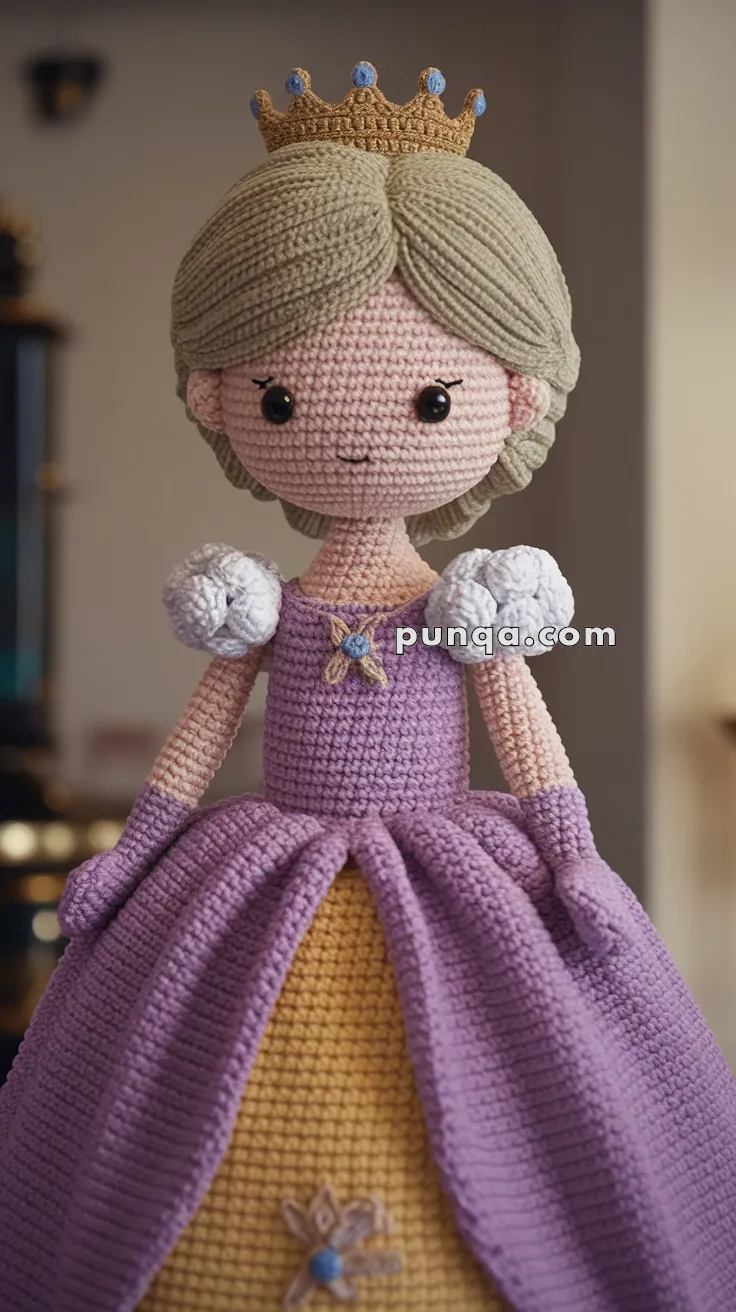
Graceful, regal, and charming — this amigurumi version of Princess Diana in a royal purple gown will be a treasured heirloom doll. With soft sculpted hair, puffed sleeves, a layered dress, elegant gloves, and a crown fit for a queen, this project is perfect for advanced amigurumi makers who love detailed dolls.
✨ Skill Level
Advanced – includes hair shaping, layered gown assembly, and accessory detailing.
📏 Finished Size
Approximately 33–35 cm (13–14 inches) tall using DK or sport-weight yarn and a 2.5–3 mm crochet hook.
🧶 Materials and Yarn Amounts
You will need DK or sport-weight yarn in these approximate amounts:
-
Skin tone (light peach or beige): 40 g
-
Light blonde or sandy beige (hair): 55 g
-
Lilac purple (dress and gloves): 70 g
-
Golden yellow (inner skirt): 35 g
-
White (puffed sleeves): 20 g
-
Gold (crown): 10 g
-
Blue and beige scraps (brooch and crown jewels): less than 5 g each
-
Black embroidery thread (smile and lashes): less than 1 g
Additional supplies:
2.5–3 mm crochet hook, 8–10 mm safety eyes, polyester stuffing, tapestry needle, stitch marker, pins, and optional blush or powder for cheeks.
🧵 Abbreviations (US Terms)
MR – Magic Ring
sc – Single Crochet
inc – Increase
dec – Decrease
ch – Chain
sl st – Slip Stitch
BLO – Back Loop Only
FLO – Front Loop Only
FO – Fasten Off
👩 Head
With skin tone yarn:
MR, 6 sc
Round 2: inc ×6 (12)
Round 3: (1 sc, inc) ×6 (18)
Round 4: (2 sc, inc) ×6 (24)
Round 5: (3 sc, inc) ×6 (30)
Round 6: (4 sc, inc) ×6 (36)
Round 7: (5 sc, inc) ×6 (42)
Rounds 8–16: sc around (42)
Insert safety eyes between rounds 12–13, 8 stitches apart.
Round 17: (5 sc, dec) ×6 (36)
Round 18: (4 sc, dec) ×6 (30)
Round 19: (3 sc, dec) ×6 (24)
Stuff firmly.
Round 20: (2 sc, dec) ×6 (18)
Round 21: (1 sc, dec) ×6 (12)
Round 22: dec ×6 (6). FO and close.
Add eyelashes and a small curved smile with embroidery thread.
💇 Hair
Use light blonde or sandy beige yarn.
Hair cap:
MR, 6 sc
Round 2: inc ×6 (12)
Round 3: (1 sc, inc) ×6 (18)
Round 4: (2 sc, inc) ×6 (24)
Round 5: (3 sc, inc) ×6 (30)
Round 6: (4 sc, inc) ×6 (36)
Rounds 7–11: sc around (36). FO and sew to head.
Front hair swoops (make 2):
ch 12, sc back down chain, FO. Shape into smooth curves and sew along the forehead toward the ears.
Back strands (make 4–5):
ch 18, sl st back along chain. Attach along lower back of head and curve downward to shape soft waves.
Use light steam or shaping with pins to create the gentle center part and side volume.
👑 Crown
Use gold yarn.
ch 30, join to form ring.
Round 1: sc around.
Round 2: (ch 3, sl st in next st) repeat around to form 5–6 small points.
Sew or glue a small blue bead or embroidered gem to every other point.
Attach crown securely to top of head.
🧍 Body and Neck
With skin tone yarn:
MR, 6 sc
Rounds 2–4: sc around (6)
Switch to purple:
Round 5: inc ×6 (12)
Round 6: (1 sc, inc) ×6 (18)
Rounds 7–12: sc around (18). Stuff firmly. FO.
✋ Arms (Make 2)
Start with skin tone yarn:
MR, 6 sc
Round 2: (1 sc, inc) ×3 (9)
Rounds 3–5: sc around (9)
Switch to purple for gloves:
Rounds 6–15: sc around (9)
Stuff lightly. FO and sew to upper sides of the body.
🌸 Puffed Sleeves (Make 2)
Use white yarn:
MR, 6 sc
Round 2: inc ×6 (12)
Round 3: (1 sc, inc) ×6 (18)
Round 4: sc around (18)
Round 5: (1 sc, dec) ×6 (12)
Round 6: dec ×6 (6)
FO and sew to shoulder tops over the arm join.
👗 Inner Skirt (Gold Yarn)
Start at waist:
MR, 6 sc
Round 2: inc ×6 (12)
Round 3: (1 sc, inc) ×6 (18)
Round 4: (2 sc, inc) ×6 (24)
Round 5: (3 sc, inc) ×6 (30)
Round 6: (4 sc, inc) ×6 (36)
Continue increasing evenly to reach 60–66 stitches total.
Work 10–15 rounds even for the skirt’s full length. FO.
💜 Outer Gown (Lilac Yarn)
Make two wide overlapping front panels.
For each panel:
ch 2, turn.
Row 1: 2 sc.
Continue increasing one stitch at each end of every row until the panel forms a rounded triangular shape matching the skirt’s height.
Add a single crochet border for structure. FO.
Attach both panels at the waist, letting them overlap slightly in front. Shape the folds to create a natural drape effect.
💎 Brooch
Use beige yarn: ch 3, join to ring, sc around.
Add a small embroidered blue center gem and beige bow ends below.
Sew at the center neckline of the bodice.
👒 Assembly
Sew hair and crown onto the head.
Attach arms to body.
Sew puffed sleeves over shoulders.
Join head to neck.
Sew the gold skirt in place and layer the purple gown on top.
Add the brooch and any final embroidery details.
Lightly shape the skirt for fullness using your hands or gentle steam.
💡 Notes
-
The doll’s body ends where the skirt begins — she stands upright due to the firm, stuffed cylindrical base.
-
No separate feet are included because they are hidden beneath the gown’s structure.
-
For extra stability, you can insert a small circular cardboard disk inside the bottom of the skirt before final closing.
Your Princess Diana doll will have a graceful silhouette, a beautifully layered gown with perfect drape, and a soft, serene expression. She’s ideal as a collectible or a cherished handmade gift. ✨👸