Bring a touch of enchantment to your crochet collection with this Amigurumi Magic Lamp pattern! Inspired by the legendary lamp from fairy tales, this whimsical design captures its elegant curves, ornate spout, and mystical charm in every stitch. With its intricate details and magical aura, this crochet magic lamp is perfect for adding a dash of fantasy to your handmade projects. Whether you’re crafting for storybook lovers, creating a unique decor piece, or simply enjoy making imaginative amigurumi designs, this pattern lets you stitch up a miniature lamp bursting with wonder! ✨🪔
Designed for customization, this pattern allows you to experiment with different shades of gold, embroidered details, or even tiny accessories like a miniature genie or sparkling embellishments for extra flair. Craft a classic magic lamp with rich metallic tones, create a whimsical version with vibrant hues, or even stitch up a full set of fairy tale-inspired amigurumi for a dazzling display! Whether gifted as a mystical keepsake, displayed as a charming accent, or made simply for the joy of crafting, this Amigurumi Magic Lamp is a fun and creative project—perfect for bringing a touch of handmade magic to every stitch! 🧶💖✨
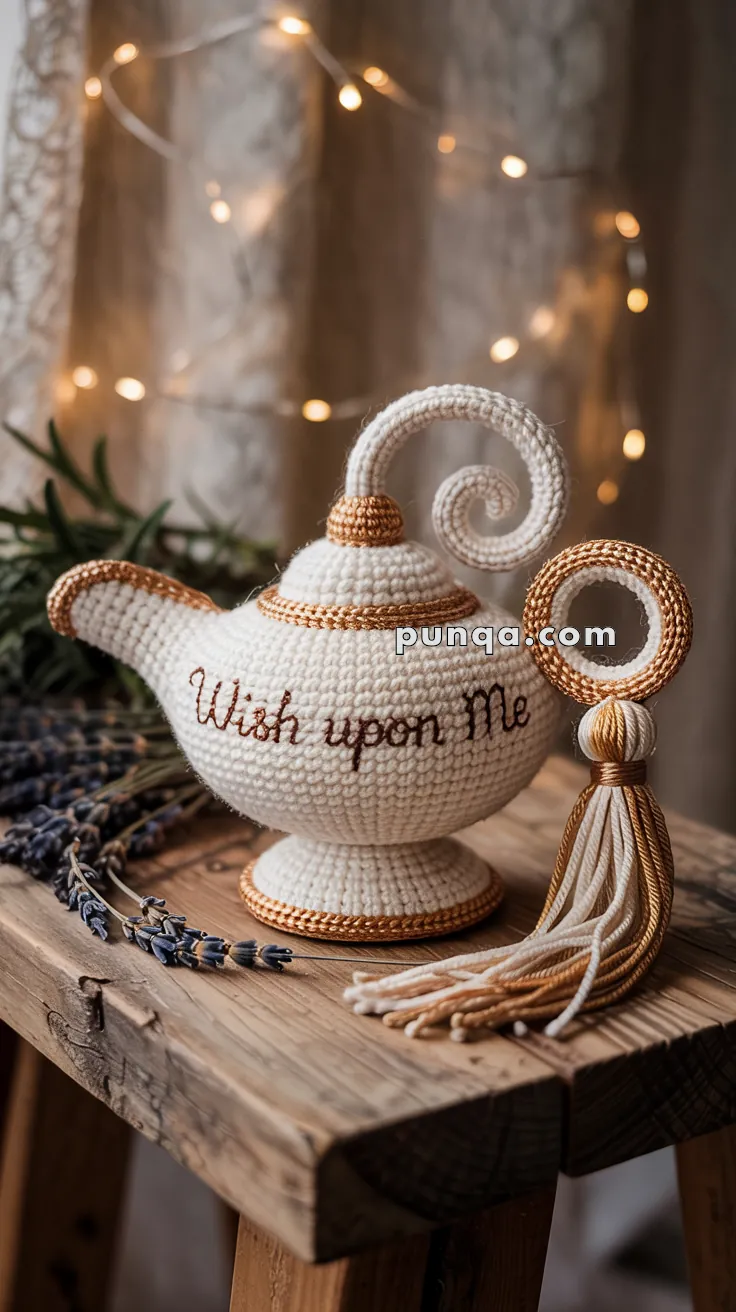
🧞 Amigurumi Magic Lamp Crochet Pattern – “Wish Upon Me”
Bring the enchantment of fairytales to life with this elegant crochet genie lamp. Featuring a graceful curved spout, double-loop handle, spiral finial, and shimmering gold trim, this piece captures timeless charm. Perfect as a home décor accent, photo prop, or symbolic handmade gift — just don’t forget to make a wish! 🌟
✨ Skill Level
Intermediate – Includes shaping, wire support, embroidery, and assembly with decorative detailing.
📏 Finished Size
Approx. 8–10 in (20–25 cm) long when made with DK or worsted-weight yarn and a 3 mm hook.
🧶 Materials
- DK or Worsted Weight Yarn:
- Cream or Ivory – main body (approx. 120 g)
- Gold or Bronze – trim and accents (approx. 40 g)
- Brown – embroidery for lettering (small amount)
- Crochet hook: 3 mm
- Polyfill stuffing
- Craft wire (16–18 gauge for handle and spout; pipe cleaners for small curls)
- Yarn needle
- Stitch markers
- Scissors
- Optional: felt or cardboard circle for base and lid support, hot glue for reinforcement
🔤 Abbreviations (US Terms)
MR – Magic Ring
sc – Single Crochet
inc – Increase (2 sc in one stitch)
dec – Decrease (sc2tog)
sl st – Slip Stitch
BLO – Back Loop Only
FO – Fasten Off
🪄 Step 1: Pedestal & Body (worked continuously)
With cream yarn:
R1: MR, 6 sc [6]
R2: inc ×6 [12]
R3: (sc, inc) ×6 [18]
R4: (2 sc, inc) ×6 [24]
R5: (3 sc, inc) ×6 [30]
R6: (4 sc, inc) ×6 [36]
R7: (5 sc, inc) ×6 [42]
R8: (6 sc, inc) ×6 [48]
R9–10: sc around [48]
R11: (6 sc, dec) ×6 [42]
R12: (5 sc, dec) ×6 [36]
R13 (join base to body): In BLO, sc around [36]
R14: (5 sc, inc) ×6 [42]
R15–20: sc around [42]
R21: (6 sc, inc) ×6 [48]
R22–30: sc around [48]
R31: (6 sc, dec) ×6 [42]
R32: (5 sc, dec) ×6 [36]
R33: (4 sc, dec) ×6 [30]
Stuff firmly as you go.
FO and close the top opening neatly.
If desired, insert a felt or cardboard circle inside the base before stuffing to help it sit flat and stable.
🛢️ Step 2: Lid
With cream yarn:
R1: MR, 6 sc [6]
R2: inc ×6 [12]
R3: (sc, inc) ×6 [18]
R4: (2 sc, inc) ×6 [24]
R5: (3 sc, inc) ×6 [30]
R6–10: sc around [30]
Stuff lightly.
R11: (3 sc, dec) ×6 [24]
FO and close.
Sew onto top of body, ensuring it sits flush.
Add one round of surface slip stitches in gold around the base of the lid for accent.
🌪 Step 3: Finial Spiral (Top Curl)
Use two strands of cream yarn held together.
R1: MR, 6 sc [6]
R2–40: sc around [6] (approx. 6–7 inches long)
Insert a doubled pipe cleaner or thin wire.
Form into a spiral with a tight inner loop and a gentle outward curl, about 2 inches wide.
Sew securely at the lid’s center.
Add a gold collar (1 round of slip stitches) around the join for elegance.
☄️ Step 4: Spout
With cream yarn:
R1: MR, 6 sc [6]
R2: (sc, inc) ×3 [9]
R3–4: sc around [9]
R5: (2 sc, inc) ×3 [12]
R6–9: sc around [12]
R10: (3 sc, inc) ×3 [15]
R11–20: sc around [15]
R21: (2 sc, dec) ×3 [12]
R22–23: sc around [12]
FO, insert wire and stuff lightly.
Bend into an elegant upward curve and sew to the front of the lamp body.
Add gold slip stitch edging along the top outer curve and the tip for the glowing rim effect.
🌀 Step 5: Handle with Double Rings
Large Outer Ring:
R1: MR, 6 sc [6]
R2: inc ×6 [12]
R3: (sc, inc) ×6 [18]
R4: sc around [18]
FO.
Stretch around a small metal or plastic ring, or stuff lightly with wire to hold its circular shape (~2.5 in diameter).
Small Inner Spiral:
R1: MR, 6 sc [6]
R2–20: sc around [6]
Insert wire, coil into a small swirl (about 1.5 in diameter).
Sew the small swirl inside the large ring, offset slightly upward.
Attach the full handle assembly to the body’s back — upper join near the lid level, lower join at the midsection.
Wrap each joint with gold yarn to form smooth transition caps.
🎀 Step 6: Tassel and Accent Ring
Cover a small ring with single crochet in gold. FO.
Make tassel using cream and gold yarn: cut 8–10 strands (6–8 in long each), fold in half, and tie firmly at the top.
Bind the neck with gold yarn 1 cm thick, then trim evenly to 3 in length.
Attach tassel to the gold ring.
Sew this decorative ring to the outer edge of the handle.
✨ Step 7: Embroidered Lettering
With brown yarn, embroider “Wish upon Me” across the center of the body using chain stitch for a smooth script.
Lightly curve the phrase to follow the belly of the lamp.
Sketch the letters first using erasable chalk or fabric pencil for guidance.
🪞 Step 8: Golden Detailing
Using gold yarn, add surface slip stitches to these areas:
- Edge of pedestal base
- Lid rim
- Spout tip and outer top curve
- Handle joints and accent ring
Keep the lines even and tension relaxed for a refined, metallic sheen.
🧵 Finishing Touches
- Adjust spout and handle angles by gently bending the internal wire until symmetrical.
- Weave in all ends securely.
- Optionally insert battery fairy lights through the base opening for a soft inner glow.
- Steam-block lightly to smooth stitches and enhance curves.
🌟 Result
Your completed “Wish Upon Me” Magic Lamp will feature:
- Smooth cream body with continuous curved silhouette
- Firm pedestal base for stability
- Long elegant spout with gold-edged rim
- Double-loop handle and spiral finial with matching tassel
- Hand-embroidered phrase in flowing brown script
This crochet lamp combines artistry, structure, and magic — a perfect handmade heirloom that looks enchanting in any setting. 🧞✨