Bring a touch of greenery to your crochet collection with this Amigurumi Aloe Vera pattern! Whether you’re crafting for plant lovers, adding a fresh accent to your handmade creations, or simply enjoy making adorable amigurumi designs, this free pattern lets you stitch up a charming aloe vera bursting with personality. With its spiky leaves, soft texture, and cute potted look, this crochet aloe vera captures the essence of nature in every stitch. Perfect for gifting to fellow crochet enthusiasts, decorating a cozy space, or simply celebrating the joy of handmade creations, this amigurumi aloe vera is sure to bring smiles—one stitch at a time! 🌿✨
Designed for customization, this pattern allows you to experiment with different shades of green, embroidered details, or even tiny accessories like a miniature pot or happy face for extra charm. Craft a classic aloe vera with its signature vibrant leaves, create a pastel version for a whimsical aesthetic, or even stitch up a full set of plant-inspired amigurumi for a delightful display! Whether gifted as a cherished keepsake, displayed as a playful accent, or made simply for the joy of crafting, this Amigurumi Aloe Vera is a fun and creative project—perfect for bringing a touch of handmade nature to every stitch! 🧶💖🧶
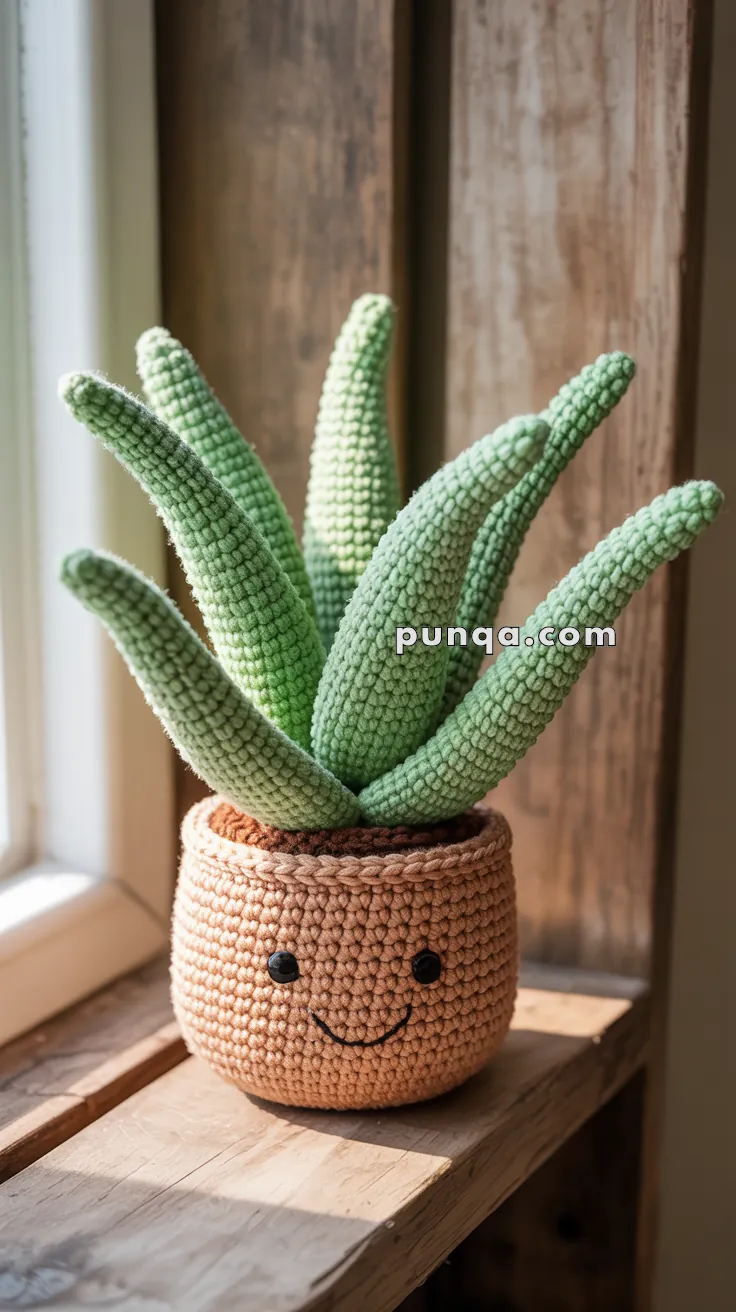
🌱 Amigurumi Aloe Vera in a Smiley Pot Crochet Pattern
Bring a splash of evergreen joy to any shelf or desk with this cute, maintenance-free aloe vera! The plush leaves curve naturally upward, while the little pot beams with a friendly face. It’s the perfect weekend project and an ideal gift for plant-loving friends who lack a green thumb.
✨ Skill Level
Beginner to Intermediate – Simple shaping, working in the round, and a few neat color changes.
📏 Finished Size
≈ 6 – 8 in (15 – 20 cm) tall when using DK or worsted-weight yarn and a 2.5 – 3.5 mm hook.
🧶 Materials
- Yarn (DK or Worsted weight)
- Pot: Light tan / terracotta (Color A)
- Soil insert: Chocolate brown (Color B)
- Leaves: Medium or sage green (Color C)
- 2.5 – 3.5 mm crochet hook
- 8 mm black safety eyes (2 pcs)
- Black embroidery thread (for smile)
- Poly-fiberfill stuffing
- Stitch marker
- Tapestry needle & scissors
🧵 Abbreviations (US Terms)
MR – Magic Ring
sc – Single Crochet
inc – Increase (2 sc in same st)
dec – Invisible Decrease
sl st – Slip Stitch
BLO – Back Loop Only
FO – Fasten Off
🪴 Pot (Bottom → Rim – work in a continuous spiral) – Color A
- MR, 6 sc (6)
- inc × 6 (12)
- (1 sc, inc) × 6 (18)
- (2 sc, inc) × 6 (24)
- (3 sc, inc) × 6 (30)
- (4 sc, inc) × 6 (36)
- (5 sc, inc) × 6 (42)
- BLO sc around (42) – creates a crisp fold for the pot side.
9 – 17. sc around (42) - sl st in next st, ch 1; work a simple surface braid by slip-stitching in the unused front loops of round 8 (optional decorative rim). FO and weave the end inside.
Add the Face
- Insert safety eyes between rounds 11 & 12, 6 sts apart.
- Stitch a curved smile with black embroidery thread between the eyes.
🌱 Soil Insert – Color B
- Repeat rounds 1 – 7 of the Pot (ending with 42 sts).
8 – 10. sc around (42).
FO leaving a long tail for sewing. Stuff lightly and set aside.
🍃 Aloe Leaf (make 7 – 9 in varying lengths) – Color C
Large Leaf (make 5)
- MR, 6 sc (6)
- inc × 6 (12)
3 – 6. sc around (12) - (3 sc, dec) × 2 (10)
8 – 13. sc around (10) - (2 sc, dec) × 2 + 2 sc (8)
15 – 18. sc around (8) - (2 sc, dec) × 2 (6)
- sc around (6)
Stuff lightly as you go; FO leaving a long tail for sewing.
Small Leaf (make 2 – 4)
- MR, 6 sc (6)
- inc × 6 (12)
3 – 4. sc around (12) - (4 sc, dec) × 2 (10)
6 – 9. sc around (10) - (3 sc, dec) × 2 (8)
11 – 12. sc around (8)
FO, stuff lightly, leave tail for sewing.
✂️ Assembly & Finishing Touches
- Join Soil → Pot: Place the stuffed soil insert snugly inside the pot. Whip-stitch the last round of the soil to the inner loops of round 17 of the pot.
- Attach Leaves: Arrange the largest leaves in a circular fan, sewing them firmly through both the soil and pot walls for stability. Fill gaps with the smaller leaves to create a natural, full cluster.
- Shape: Give each leaf a gentle bend for realistic flair. Roll the pot between your palms to round it nicely.
- Weave in any remaining ends and trim.
💡 Customization Ideas
- Mix two shades of green, alternating every few rounds for subtle variegation.
- Add tiny blush circles with pink yarn for an extra-cute expression.
- Crochet a matching coaster or mini macramé plant hanger to display your aloe in style.
- Insert a short floral-wire core before stuffing the leaves if you’d like them poseable.
This smiley aloe vera will stay perky forever and brighten any corner of your home or office—no watering required! Happy hooking! 🌼🧵