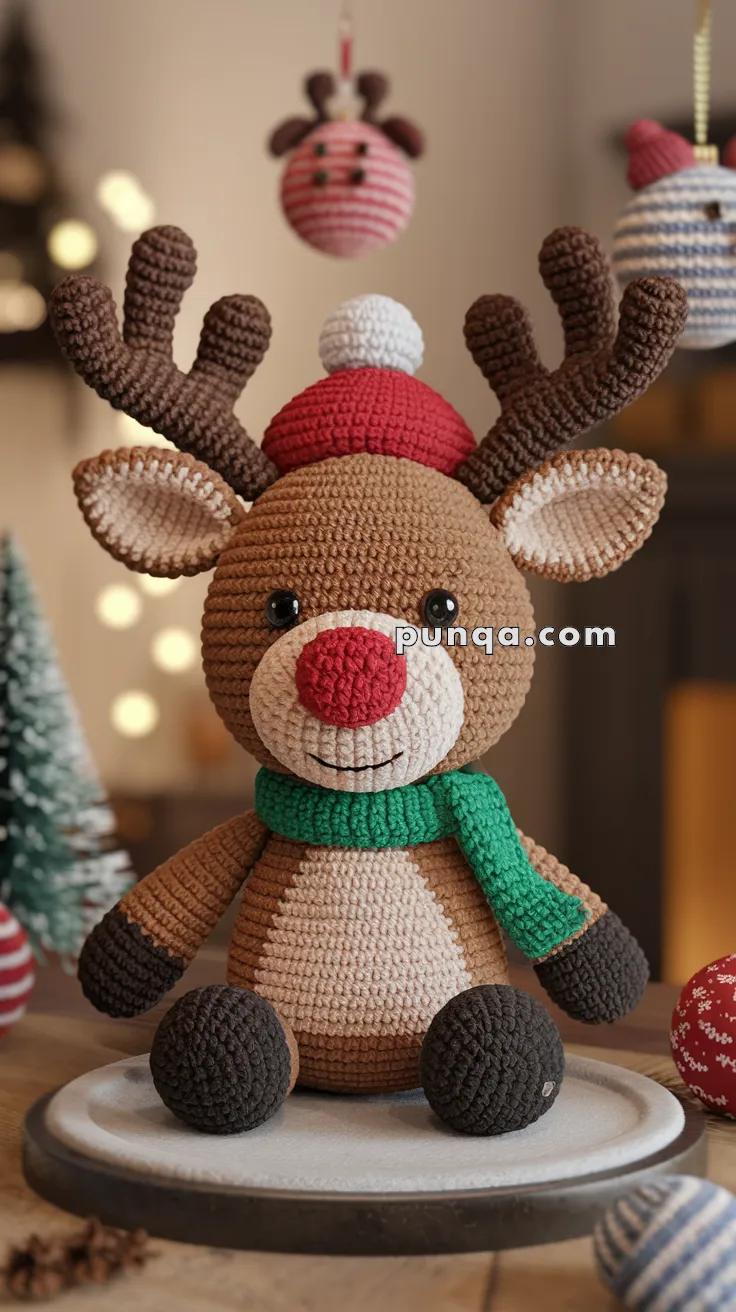
Prance into the holiday spirit with the Amigurumi Christmas Reindeer—a festive little friend that’s ready to spread cheer from antlers to hooves! 🦌🎄 With its cozy scarf, bright red nose, and twinkling eyes, this cuddly reindeer is the perfect addition to your seasonal décor or handmade gift lineup. Whether you’re crafting a Rudolph lookalike or a whole herd of merry companions, this pattern brings warmth and whimsy to every stitch.
Ideal for customizing with holiday colors, glittery yarns, or tiny accessories like bells and bows, this reindeer is a joyful project for crocheters of all levels. Add a sweater, a Santa hat, or even a mini sleigh to create your own winter wonderland scene. Whether perched on a mantel, tucked into a stocking, or gifted to someone special, the Christmas Reindeer is sure to make spirits bright—one loop at a time! 🧶✨
🦌 Crochet Christmas Reindeer Pattern
If you love creating handmade Christmas decorations, this crochet reindeer pattern is a perfect festive project.
With his bright red nose, soft brown fur, cozy hat, and green scarf, this adorable amigurumi reindeer brings warmth and cheer to any holiday setting.
🎄 Materials You’ll Need
Before you begin, gather all your supplies.
- Light Brown yarn – about 60 g (head, body, and ears)
- Beige yarn – about 20 g (snout, belly patch, ear insides)
- Dark Brown yarn – about 30 g (hooves and antlers)
- Red yarn – about 15 g (nose and hat)
- White yarn – about 10 g (hat brim and pom-pom)
- Green yarn – about 10 g (scarf)
- Crochet hook: 3.0 mm
- Safety eyes: 12–14 mm
- Black embroidery thread: for mouth
- Fiberfill stuffing
- Yarn needle and scissors
- Optional: floral wire or pipe cleaners for shaping antlers
👉 Yarn tip: Use DK or light-worsted cotton for a smooth finish and clear stitch definition.
📏 Size and Difficulty
The finished reindeer stands about 26–28 cm (10–11 inches) tall when seated.
This is an intermediate-level pattern, but patient beginners can follow along easily with careful counting.
🧶 Crochet Abbreviations (US Terms)
MR – Magic Ring
sc – single crochet
inc – increase (2 sc in same stitch)
dec – decrease (sc2tog)
ch – chain
sl st – slip stitch
st – stitch
🧸 How to Crochet the Head
- R1: MR, 6 sc (6)
- R2: inc × 6 (12)
- R3: (1 sc, inc) × 6 (18)
- R4: (2 sc, inc) × 6 (24)
- R5: (3 sc, inc) × 6 (30)
- R6: (4 sc, inc) × 6 (36)
- R7: (5 sc, inc) × 6 (42)
- R8: (6 sc, inc) × 6 (48)
- R9–R17: sc around (48)
Insert the safety eyes between rounds 10 and 11, about 10 stitches apart.
Continue decreasing:
- R18: (6 sc, dec) × 6 (42)
- R19: (5 sc, dec) × 6 (36)
- R20: (4 sc, dec) × 6 (30)
- R21: (3 sc, dec) × 6 (24)
Stuff the head firmly.
Finish with:
- R22: (2 sc, dec) × 6 (18)
- R23: (1 sc, dec) × 6 (12)
- R24: dec × 6 (6).
Fasten off and close the hole neatly.
🐽 Make the Snout and Nose
Snout (Beige):
- Ch 10.
- R1: 8 sc, 3 sc in last ch. Work down the opposite side of the chain, 7 sc, inc (20).
- R2: inc, 7 sc, inc × 3, 7 sc, inc × 2 (26).
- R3–R6: sc around (26).
Stuff well and fasten off.
Nose (Red):
- R1: MR, 6 sc (6).
- R2: inc × 6 (12).
- R3: (1 sc, inc) × 6 (18).
- R4: (2 sc, inc) × 6 (24).
- R5–R6: sc around (24).
- R7: (2 sc, dec) × 6 (18).
Stuff lightly and sew to the snout’s center.
Attach the snout to the head below the eyes.
Sew the red nose in the middle, and embroider a small black smile underneath.
👂 Crochet the Ears
Each ear has a light-brown outer side and a beige inner side.
Inner (Beige):
- R1: MR, 6 sc (6).
- R2: (1 sc, inc) × 3 (9).
- R3: (2 sc, inc) × 3 (12).
Outer (Light Brown):
Work the same rounds again, then place both pieces together and crochet around to join.
Flatten and sew ears below the antlers, slightly angled outward.
🦌 Make the Antlers
Each antler has one long trunk and three branches.
Main Trunk (Dark Brown):
- R1: MR, 6 sc (6).
- R2: inc × 6 (12).
- R3–R20: sc around (12).
Small Branch (×2):
- R1: MR, 6 sc (6).
- R2: (2 sc, inc) × 2 (8).
- R3–R6: sc around (8).
Medium Branch (×1):
- R1: MR, 6 sc (6).
- R2: inc × 6 (12).
- R3–R8: sc around (12).
Assemble each antler by sewing the branches onto the trunk in a staggered layout.
Insert wire or pipe cleaner inside before sewing to keep them upright.
🧍 Crochet the Body and Belly Patch
Body (Light Brown):
- R1: MR, 6 sc (6).
- R2: inc × 6 (12).
- R3: (1 sc, inc) × 6 (18).
- R4: (2 sc, inc) × 6 (24).
- R5: (3 sc, inc) × 6 (30).
- R6: (4 sc, inc) × 6 (36).
- R7: (5 sc, inc) × 6 (42).
- R8–R20: sc around (42).
Belly Patch (Beige):
Chain 12 and crochet an oval by working around both sides for 6 rows.
Sew this patch to the front center of the body from rounds 10–18.
Continue decreasing:
- R21: (5 sc, dec) × 6 (36).
- R22: (4 sc, dec) × 6 (30).
- R23: (3 sc, dec) × 6 (24).
Stuff well and fasten off.
🦾 Make the Arms and Legs
Arms (2 pcs):
Start with Dark Brown for hooves.
- R1: MR, 6 sc (6).
- R2: inc × 6 (12).
- R3–R4: sc around (12).
Switch to Light Brown. - R5–R12: sc around (12).
Stuff lightly, flatten, and sew angled downward on body sides.
Legs (2 pcs):
Dark Brown for hooves.
- R1: MR, 6 sc (6).
- R2: inc × 6 (12).
- R3: (1 sc, inc) × 6 (18).
- R4–R5: sc around (18).
Switch to Light Brown. - R6–R10: sc around (18).
Stuff firmly and sew flat at the bottom so your reindeer sits stably.
🐾 Tail
Light Brown yarn:
- R1: MR, 6 sc (6).
- R2: (2 sc, inc) × 2 (8).
- R3–R4: sc around (8).
Stuff lightly and sew to the lower back.
🎩 Crochet the Hat
Hat (Red):
- R1: MR, 6 sc (6).
- R2: inc × 6 (12).
- R3: (1 sc, inc) × 6 (18).
- R4: (2 sc, inc) × 6 (24).
- R5: (3 sc, inc) × 6 (30).
- R6–R15: sc around (30).
Brim (White):
- R16–R19: sc around (30) for a thick edge.
Fasten off.
The hat should sit loosely on the head, tilting slightly forward.
Pom-Pom: Wrap white yarn 50 times around two fingers, tie in the middle, cut loops, and trim to a fluffy ball. Sew to the hat’s tip.
🧣 Crochet the Scarf
Use green yarn.
- Ch 100.
- R1: hdc in 2nd ch and across (99).
- R2–R6: ch 1, turn, hdc in BLO for ribbed texture.
Fasten off and wrap once around the neck, securing lightly under the chin.
🧩 Assembly Steps
- Sew snout to face below eyes.
- Attach red nose to snout.
- Embroider smile under nose.
- Insert wire into antlers and sew them to head top.
- Attach ears below antlers, angled outward.
- Join head to body.
- Sew arms and legs in place.
- Add tail to back.
- Sew hat on a tilt and secure pom-pom.
- Wrap scarf and stitch in place.
🌟 Finishing Touches
- Shape the reindeer so it sits flat and upright.
- Adjust antlers gently for balance.
- Use a little blush on the cheeks for warmth.
- Brush yarn fibers lightly to soften the texture.
🎁 The Final Look
Your reindeer should have:
- A light-brown body with a beige belly patch
- Big red nose and smiling mouth
- Dark-brown antlers and hooves
- A red hat with white trim and pom-pom
- A bright green ribbed scarf
It’s the perfect handmade piece for your Christmas décor, bringing a cozy handmade charm to your holiday season.