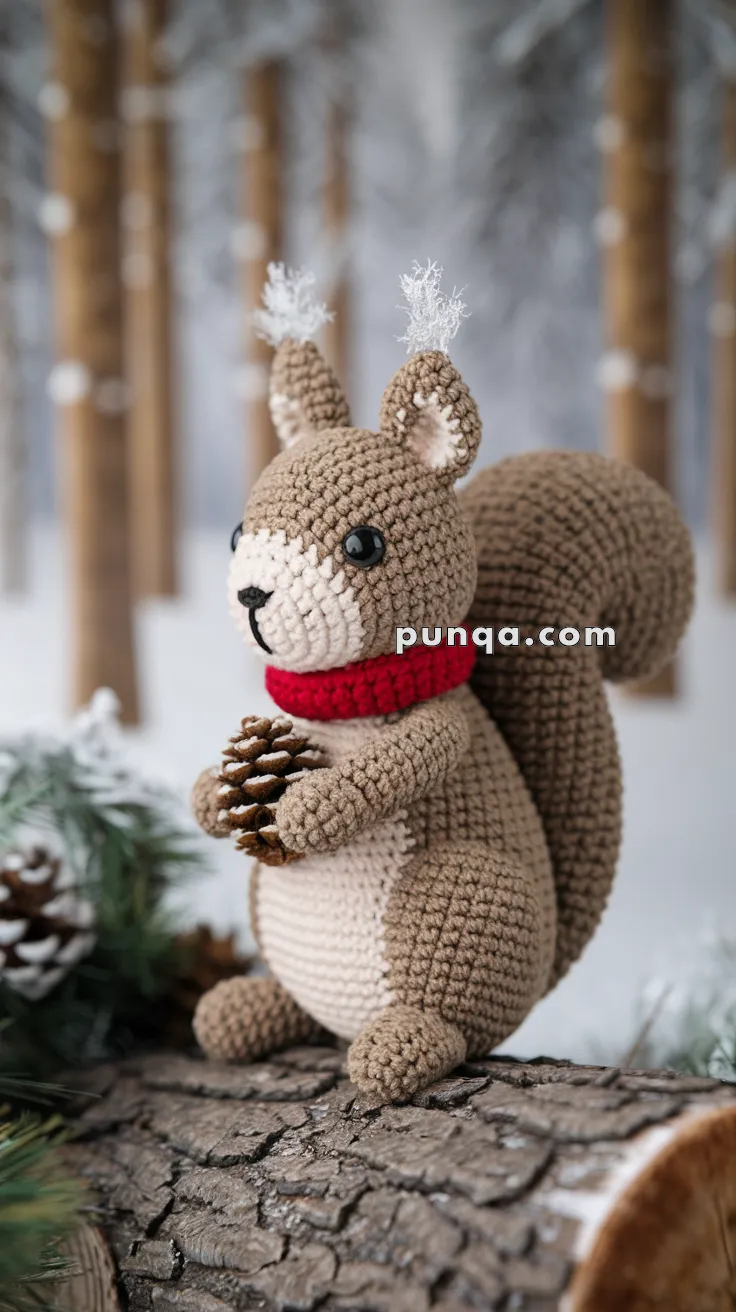
Get ready to add a dash of woodland whimsy to your holiday season with the Amigurumi Christmas Squirrel With Pinecone! 🐿️🎄 This festive little critter comes complete with a cozy scarf, a cheerful expression, and a perfectly stitched pinecone tucked in its tiny paws. Whether perched on a mantel, nestled in a wreath, or gifted to a nature-loving friend, this squirrel brings a heartwarming blend of forest charm and Christmas spirit to any space.
Perfect for crocheters who love seasonal characters and playful details, this pattern invites you to experiment with soft browns, snowy whites, and rich greens. Add holly accents, a sprinkle of sparkle, or even a mini gift sack to make your squirrel extra merry. The Amigurumi Christmas Squirrel With Pinecone is a delightful way to stitch up holiday magic—one cozy loop at a time! 🧶✨
🐿️ Cozy Winter Squirrel Amigurumi Pattern
Meet this adorable woodland friend complete with fluffy ear tufts, a big curled tail, and a bright red scarf! Perfect for winter décor or as a handmade gift.
✨ Skill Level
Intermediate – involves shaping, color changes, dimensional stuffing techniques, and careful assembly
📏 Finished Size
Approximately 9–10 inches (23–25 cm) tall when sitting, including tail
🧶 Materials You’ll Need
Yarn:
- Light Brown worsted weight yarn – 100g (220 yards)
- Cream/Beige worsted weight yarn – 50g (110 yards)
- Red worsted weight yarn – 15g (33 yards)
- White fuzzy/eyelash yarn – 5g (small skein)
Other Supplies:
- 3.0 mm crochet hook
- 12 mm black safety eyes (1 pair)
- Black embroidery thread
- Small real pinecone (approximately 1-1.5 inches long)
- Fiberfill stuffing
- Tapestry needle
- Stitch markers
- Pins for assembly
- Scissors
📝 Abbreviations (US Terms)
- sc – single crochet
- inc – increase (2 sc in one stitch)
- dec – decrease (invisible decrease)
- ch – chain
- sl st – slip stitch
- MR – magic ring
- FO – fasten off
- BLO – back loop only
- (…) x# – repeat instructions in parentheses # times
🎨 Gauge
Not critical, but adjust hook size if needed to create tight, firm fabric with no stuffing showing through. Gauge should be approximately 20 sc = 4 inches.
🧵 Pattern Instructions
Head
Start with light brown:
R1: MR, 6 sc (6)
R2: inc x6 (12)
R3: (1 sc, inc) x6 (18)
R4: (2 sc, inc) x6 (24)
R5: (3 sc, inc) x6 (30)
R6: (4 sc, inc) x6 (36)
R7: (5 sc, inc) x6 (42)
R8-12: sc around (42) – 5 rounds
R13: sc around (42) – Begin muzzle area: Work 20 sc in cream centered on the front, continue remaining 22 sc in brown. Mark the starting point so you can keep the cream section in the same position.
R14-15: Continue with 20 cream sc in front, 22 brown sc in back (42) – 2 rounds
R16-18: sc around in brown only (42) – 3 rounds
👉 Insert 12 mm safety eyes between R12-13, positioned about 8 stitches apart, on the brown portion just above where the cream section begins. Eyes should be slightly angled toward the center.
R19: (5 sc, dec) x6 (36)
R20: (4 sc, dec) x6 (30)
R21: (3 sc, dec) x6 (24)
👉 Stuff head very firmly, especially in the cream muzzle area. Add extra stuffing to the cream-colored portion to push it forward slightly and create subtle dimensional rounding. Continue stuffing as you close.
R22: (2 sc, dec) x6 (18)
R23: (1 sc, dec) x6 (12)
R24: dec x6 (6)
FO, close hole. Weave in end securely.
Embroidery:
- Using black embroidery thread, stitch a small triangular or oval nose centered on the cream muzzle area, positioned between and slightly below the eyes
- Add a vertical line straight down from the nose (about 4-5 stitches long)
- Optional: Add a small curved smile line on each side of the vertical line
Body
Start with light brown:
R1: MR, 6 sc (6)
R2: inc x6 (12)
R3: (1 sc, inc) x6 (18)
R4: (2 sc, inc) x6 (24)
R5: (3 sc, inc) x6 (30)
R6: (4 sc, inc) x6 (36)
R7-12: sc around (36) – 6 rounds
R13: sc around (36) – Begin belly patch: Work 18 sc in cream for the front belly (mark this starting point), continue remaining 18 sc in brown for the back. The cream section should be centered and will align with the direction the head faces.
R14-20: Continue with 18 cream sc in front, 18 brown sc in back (36) – 7 rounds
R21: (4 sc, dec) x6 in coordinating colors (30)
R22: (3 sc, dec) x6 (24)
👉 Stuff body very firmly with fiberfill, maintaining a rounded shape.
R23: (2 sc, dec) x6 (18)
R24: (1 sc, dec) x6 (12)
FO, leave a 15-inch tail for closing and attaching to head.
Arms (Make 2)
Light brown:
R1: MR, 6 sc (6)
R2: inc x6 (12)
R3-4: sc around (12) – 2 rounds
R5: (4 sc, dec) x2 (10)
R6-15: sc around (10) – 10 rounds
👉 Stuff the hand portion (R1-5) firmly. Leave the arm portion (R6-15) very lightly stuffed or unstuffed for flexibility when posing around the pinecone.
FO, leave long tail for sewing. Pinch opening flat.
Legs (Make 2)
Light brown:
R1: MR, 6 sc (6)
R2: inc x6 (12)
R3: (1 sc, inc) x6 (18)
R4-5: sc around (18) – 2 rounds
R6: 6 sc, 3 dec, 6 sc (15)
R7: 6 sc, 2 dec, 5 sc (13)
R8-11: sc around (13) – 4 rounds
👉 Stuff foot firmly (R1-7), keep leg portion (R8-11) lightly stuffed.
FO, leave long tail for sewing.
Ears (Make 2)
Light brown:
R1: MR, 4 sc (4)
R2: (1 sc, inc) x2 (6)
R3: sc around (6)
R4: (2 sc, inc) x2 (8)
R5-7: sc around (8) – 3 rounds
FO, leave 12-inch tail. Do not stuff. Pinch opening flat.
Adding Ear Tufts:
- Cut 10-12 strands of white fuzzy yarn, each about 3 inches long
- Hold all strands together and fold them in half as a bundle
- Insert hook through the top center of ear from inside to outside
- Catch the folded middle of the bundle with your hook
- Pull the loop through to the inside of the ear
- Pull all the loose ends through the loop and tighten (standard fringe technique)
- Fluff and separate the strands gently
- Trim to approximately 0.75-1 inch length, keeping the tuft natural and wispy
- Repeat for second ear
Tail
Light brown:
R1: MR, 6 sc (6)
R2: inc x6 (12)
R3: (1 sc, inc) x6 (18)
R4: (2 sc, inc) x6 (24)
R5: (3 sc, inc) x6 (30)
R6: (4 sc, inc) x6 (36)
R7: (5 sc, inc) x6 (42)
R8-24: sc around (42) – 17 rounds
👉 Stuff tail very firmly as you go to create a plump, full appearance.
R25: (5 sc, dec) x6 (36)
R26-27: sc around (36) – 2 rounds
R28: (4 sc, dec) x6 (30)
R29: sc around (30)
FO, leave a 20-inch tail for sewing and shaping.
Shaping the Tail:
- While tail is still pliable from handling, gently curve it into a “C” or comma shape
- The tail should be thick and full, with the curve starting about one-third from the tip
- Using the long sewing tail and tapestry needle:
- Thread through the inside curve to the outside curve
- Make 5-6 tacking stitches at different points along the curve
- Pull each stitch snug (but not tight) to set the curve
- Secure each tack with a small knot
- The curved tail should look natural and bouncy, not creased or kinked
- Set aside to maintain its shape before attaching
Scarf
Red yarn:
Ch 45
Row 1: Starting in 2nd ch from hook, sc across (44 sc)
FO, weave in ends.
Optional Fringe:
- Cut 8-10 strands of red yarn, each 2.5 inches long
- Attach 4-5 strands to each short end using fringe technique
- Trim evenly to approximately 1 inch length
🔨 Assembly Instructions
Step 1: Attach Head to Body
Position head on top of body so that:
- The cream muzzle faces the same direction as the cream belly patch
- The head sits securely where the body begins to narrow (around R21)
- There’s no gap between head and body
Pin in place and sew all the way around the neck join using the body’s tail. Add small amounts of extra stuffing while sewing if you notice any gaps. The connection should be very secure and firm.
Step 2: Attach Legs
Sew legs to the bottom-front of the body at approximately R4-6 of the body:
- Position them symmetrically on either side
- Angle slightly outward for a stable sitting base
- Feet should point forward
- Sew around the entire flattened opening of each leg
- Make sure legs are firmly attached and can support the squirrel in sitting position
Step 3: Attach Arms
Position arms at R16-18 of body (upper chest area, just below where neck meets body):
- Angle arms forward and slightly inward toward the center front
- Arms should naturally reach to about mid-belly level
- The “hands” (wider part) should be able to meet in the center
- Sew securely around the entire flattened opening
- Arms should be flexible enough to pose around a pinecone
Step 4: Attach Ears
Sew ears to the top-sides of the head at approximately R5-7:
- Position ears toward the back and sides of the head (not directly on top)
- Angle ears slightly outward and upward
- The white tufts should point upward and slightly back like natural ear tufts
- Sew the entire base of each ear securely
- Make sure ears are symmetrical when viewing from the front
Step 5: Attach Tail
This is the defining feature of your squirrel:
- Position the base of the tail at the upper-center back of the body at approximately R20-22
- The tail should attach vertically so it stands upward
- Orient the tail so the curve arcs forward over the squirrel’s back
- Use the long sewing tail to stitch all around the base opening
- Stitch through to the body multiple times for maximum security
- The tail should be stable and self-supporting in its curved position
- When viewed from the side, the tail should be the most prominent feature
Step 6: Add Scarf
Wrap the red scarf around the neck where the head meets the body:
- Cross the ends in front or let them hang down
- Wrap snugly but don’t compress the neck
- Using matching red thread and small stitches, tack the scarf in 2-3 places so it stays in position
- The scarf should look cozy and natural, not stiff
Step 7: Position Pinecone
Place the small real pinecone between the arms at chest level:
- Angle both arms naturally around it as if holding it
- The pinecone should rest against the cream belly patch
- Optional: Add a tiny dot of hot glue where one paw touches the pinecone, or make 1-2 tiny stitches through the pinecone scales to secure it
- The squirrel should look like it’s proudly presenting or protecting its pinecone treasure
✨ Finishing Touches
🎨 Final Details:
- Gently brush and fluff the white ear tufts using a clean toothbrush or mascara wand
- Separate any clumped fibers in the fuzzy yarn for a natural, wispy look
- Check that all yarn ends are securely woven in and trimmed
- Use fabric chalk, blush, or soft pastel in pink/peach to add subtle color to cheek areas (optional)
- Adjust the tail curve one final time if needed
- Make sure the squirrel sits stably without tipping
🌲 Styling and Display:
- Place on a natural wood slice, piece of bark, or moss-covered base
- Surround with real pinecones, acorns, dried leaves, and twigs
- Add artificial snow, white felt, or cotton batting for winter scenes
- Display on a mantel, shelf, or as a seasonal table centerpiece
- Create a woodland vignette with other forest animals
- Use as a handmade gift or holiday decoration
📸 Photography Tips:
- Natural lighting brings out the texture of the yarn
- Photograph against a blurred background of wood, branches, or bokeh lights
- Position at slightly below eye level to capture the cute face and curled tail
- Show the squirrel from multiple angles to highlight the dimensional features
💡 Pro Tips for Success
Color Changes: When working with two colors in one round (belly patch), carry the unused yarn loosely inside your work. Every 3-4 stitches, twist the two yarns together to trap the carried strand. This prevents holes and puckering.
Dimensional Muzzle Technique: The key to the realistic muzzle is in the stuffing technique. When you reach the cream section of the head, add small amounts of stuffing specifically to that area as you work the decrease rounds. Push stuffing forward into the cream area to create gentle forward projection without creating a harsh separate piece.
Stuffing Strategy by Part:
- Head: very firm, especially in muzzle area
- Body: very firm for good structure
- Tail: very firm to hold curve and stand upright
- Arms – hands: firm
- Arms – upper arms: very light or none for posability
- Legs – feet: firm
- Legs – upper: light
- Ears: no stuffing
Tension Consistency: Maintain consistent tension throughout. If you notice your tension loosening as you work (common when creating large pieces), take breaks and consciously check your tension. Loose stitches will show stuffing and create an uneven appearance.
Tail Shaping Secrets:
- Stuff the tail firmly but not rock-hard – it needs some give to curve naturally
- Shape while the tail is still slightly warm from your hands
- Don’t make the curve too tight – it should be gentle and flowing
- The tacking stitches should be snug but not pull the fabric into dimples
- If the tail won’t hold its curve, you may need to add more stuffing
Assembly Order Matters: Following the assembly order in this pattern ensures proper balance and proportion. Attaching pieces in a different order may result in awkward positioning or difficulty accessing sewing areas.
🎉 Your Winter Squirrel is Complete!
Congratulations! You’ve created an adorable woodland companion with realistic proportions, a dimensional face, fluffy ear tufts, and that signature show-stopping bushy curved tail. This charming squirrel with its cozy red scarf and precious pinecone is ready to bring warmth and woodland magic to any space.
Whether you’re keeping this little friend for yourself or gifting it to someone special, you’ve crafted something truly delightful. The attention to detail in the color work, shaping, and assembly creates a finished piece that looks professional and polished.
Enjoy your new squirrel friend and happy crocheting! 🧶🐿️❄️✨