Get ready to bring a little folklore magic to life with this Amigurumi Oni crochet pattern! Inspired by the legendary Japanese ogres, this mischievous yet lovable creature is perfect for adding a touch of whimsy to your handmade collection. Whether you’re a seasoned crocheter or just dipping your hook into the world of amigurumi, this free pattern makes it easy to craft your very own tiny guardian—or trickster! With its signature horns and expressive features, your Oni is sure to be a standout piece, ideal for gifting or displaying proudly.
This pattern is designed with fun in mind, giving you the flexibility to customize colors and details to make your Oni uniquely yours. Whether you lean toward traditional fiery reds or opt for a softer, pastel twist, the possibilities are endless! So, gather your yarn, grab your hook, and let’s dive into this playful, cultural-inspired crochet adventure. By the time you finish, you’ll have a little Oni that might look fierce—but is really full of charm! 🧶✨
👹 Amigurumi Oni Crochet Pattern
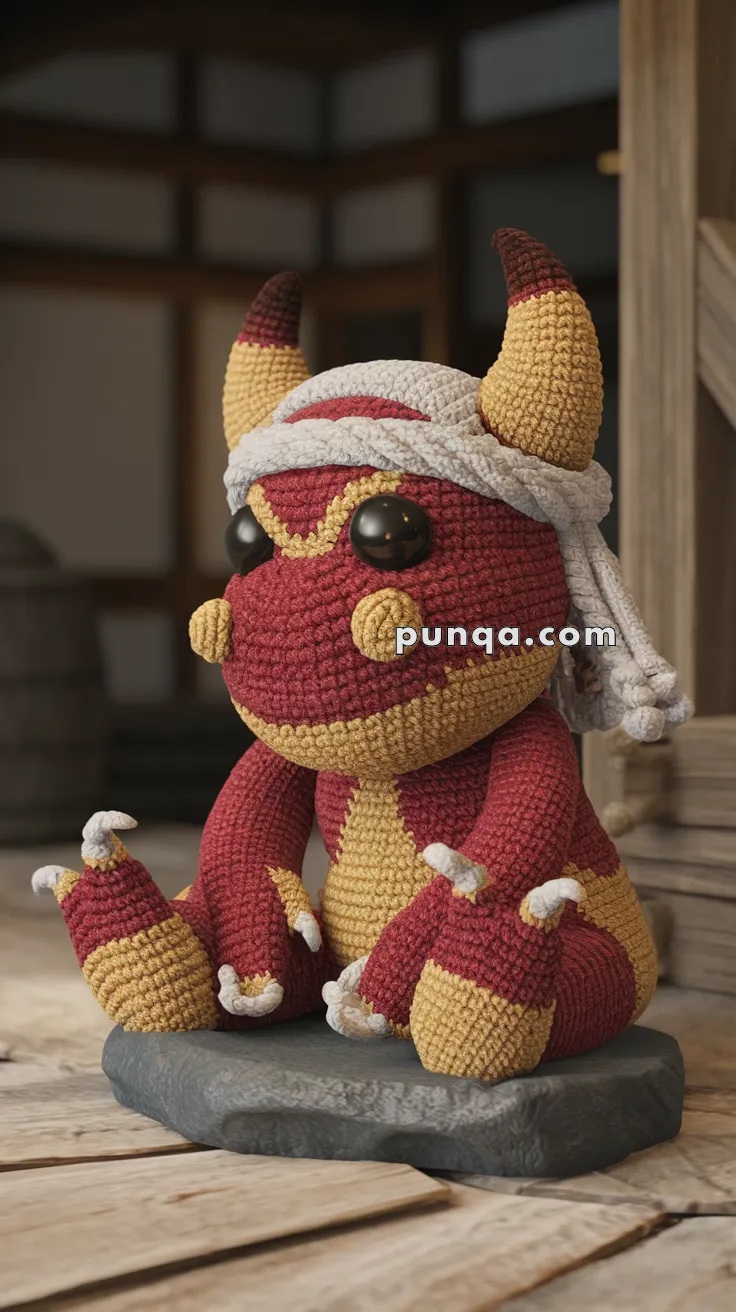
This adorable but mighty Oni amigurumi combines traditional folklore aesthetics with plush cuteness! Featuring powerful horns, an expressive face, hand-wrapped headband, and detailed claws, this mythical warrior is perfect for display, gifting, or a themed collection.
✨ Skill Level
Advanced Intermediate
Includes:
-
Colorwork shaping
-
Separate cheeks & claws
-
Horn construction
-
Wrapped headband
-
Seated pose assembly
📏 Finished Size
Approx. 20–25 cm (8–10 inches) tall when seated
(using DK or worsted yarn + 3.0 mm hook)
🧶 Materials
Yarn (DK or Worsted)
-
Deep Red – main body
-
Mustard Yellow – face mask, belly, horns, limbs
-
White – headband & claws
-
Dark Brown – horn tips
Tools
-
3.0–3.5 mm crochet hook
-
12 mm safety eyes
-
Polyester fiberfill
-
Yarn needle
-
Stitch markers
-
Scissors
⚠️ Wire is NOT required.
The Oni sits naturally with firm stuffing and wide legs.
🧵 Abbreviations (US)
MR – magic ring
sc – single crochet
inc – increase
dec – decrease
sl st – slip stitch
ch – chain
FO – fasten off
😈 Head (Red with Yellow Face Panel)
R1: MR 6 (6)
R2: inc x6 (12)
R3: (sc, inc) x6 (18)
R4: (2 sc, inc) x6 (24)
R5: (3 sc, inc) x6 (30)
R6: (4 sc, inc) x6 (36)
R7–13: sc around (36)
Insert eyes between R8–9, 7 sts apart.
Switch to yellow for front 16 stitches only to form face mask:
R14–16: sc around (36)
R17: (4 sc, dec) x6 (30)
R18: (3 sc, dec) x6 (24)
Stuff firmly
R19: (2 sc, dec) x6 (18)
R20: (sc, dec) x6 (12)
R21: dec x6 (6)
FO and close.
😊 Cheeks (Make 2 – Yellow)
MR 6
sl st, FO
Sew under each eye.
💪 Arms (Make 2)
Start Red:
R1: MR 6
R2: inc x6 (12)
R3–7: sc around (12)
Switch to Yellow:
R8–10: sc around (12)
Stuff lightly
FO
✋ Claws (Make 6 – White)
MR 4
R2–3: sc around (4)
FO
Sew 3 claws per arm in a curved line.
🦵 Legs (Make 2)
Start Yellow (feet):
R1: MR 6
R2: inc x6 (12)
R3–4: sc around (12)
Switch to Red:
R5–10: sc around (12)
Stuff firmly
FO
Flatten slightly for seated pose.
🦶 Foot Claws (Make 4 – White)
Same as hand claws.
Sew 2 claws on top of each foot.
🧍 Body (Red with Yellow Belly Panel)
R1: MR 6
R2: inc x6 (12)
R3: (sc, inc) x6 (18)
R4: (2 sc, inc) x6 (24)
R5: (3 sc, inc) x6 (30)
R6: (4 sc, inc) x6 (36)
Switch to yellow for front 18 sts only:
R7–12: sc around (36)
R13: (4 sc, dec) x6 (30)
R14: (3 sc, dec) x6 (24)
Stuff firmly
R15: (2 sc, dec) x6 (18)
R16: (sc, dec) x6 (12)
R17: dec x6 (6)
FO
🦄 Horns (Make 2)
Start Yellow:
R1: MR 4
R2: (sc, inc) x2 (6)
R3: (2 sc, inc) x2 (8)
R4–6: sc around (8)
Switch to Dark Brown:
R7–8: sc around (8)
Stuff lightly
FO
Sew tilted outward on top of head.
🧣 Headband (Wrapped Style)
With White yarn:
Ch 65
sl st back along chain
FO
Wrap around head and tie at side.
Create long hanging tails by chaining 12 twice and knotting ends.
🧩 Assembly
-
Sew head to body
-
Attach legs in seated position
-
Attach arms slightly forward
-
Sew horns
-
Wrap headband behind horns
-
Sew cheeks
-
Attach claws
-
Shape gently with hands
✨ Finishing Touches
-
Steam lightly for smooth shaping
-
Add small embroidered forehead marking if desired
-
Shape horns forward
-
Position arms resting on legs (as in photo)
🧠 Wiring?
No wiring needed.
Wide legs + firm stuffing keep the Oni stable and seated naturally.
🎉 Final Result
Your Oni will match the photo with:
👹 Round chubby body
🔥 Yellow face & belly
🦄 Two curved horns
🧣 Wrapped cloth headband
✋ White claws
🪑 Stable seated pose
😊 Cute but powerful guardian look
Perfect for:
-
Folklore collections
-
Desk décor
-
Handmade gifts
-
Mythical amigurumi displays
🧶 Your photo-accurate Oni amigurumi is now complete — fierce, friendly, and full of spirit!
Happy crocheting! 👹✨