I absolutely love the whimsical world of amigurumi, where a few strands of yarn can transform into delightful creatures. 🧶 One of my favorite projects has been crafting a wendigo amigurumi. Now, I know what you might be thinking: a wendigo? Isn’t that a creepy mythological creature? Traditionally, yes, but in the charming realm of amigurumi, even something as eerie as a wendigo can become irresistibly cute! There’s something magical about taking a creature known for its spooky folklore and turning it into a cuddly companion. With tiny antlers and a mischievous smile, my wendigo amigurumi brings joy to those who lay eyes on it.
Creating an amigurumi wendigo begins with gathering soft yarn in earthy tones, usually a blend of browns and grays, to capture that mythical forest-dweller vibe. ✨ The process can be both meditative and exciting as I start with a simple magic circle, gradually building up the body with single crochet stitches. Adding little touches, like embroidered eyes or tiny antlers, brings the character to life. The real delight, though, is in the details—choosing just the right yarn for its fur, or maybe a splash of color for an unexpected twist. Each step is like piecing together a joyful puzzle, and watching it slowly take shape is incredibly satisfying. By the time I finish, I have a playful plush that’s ready to join my growing collection of amigurumi friends! 🥳
🪶 Amigurumi Wendigo Crochet Pattern
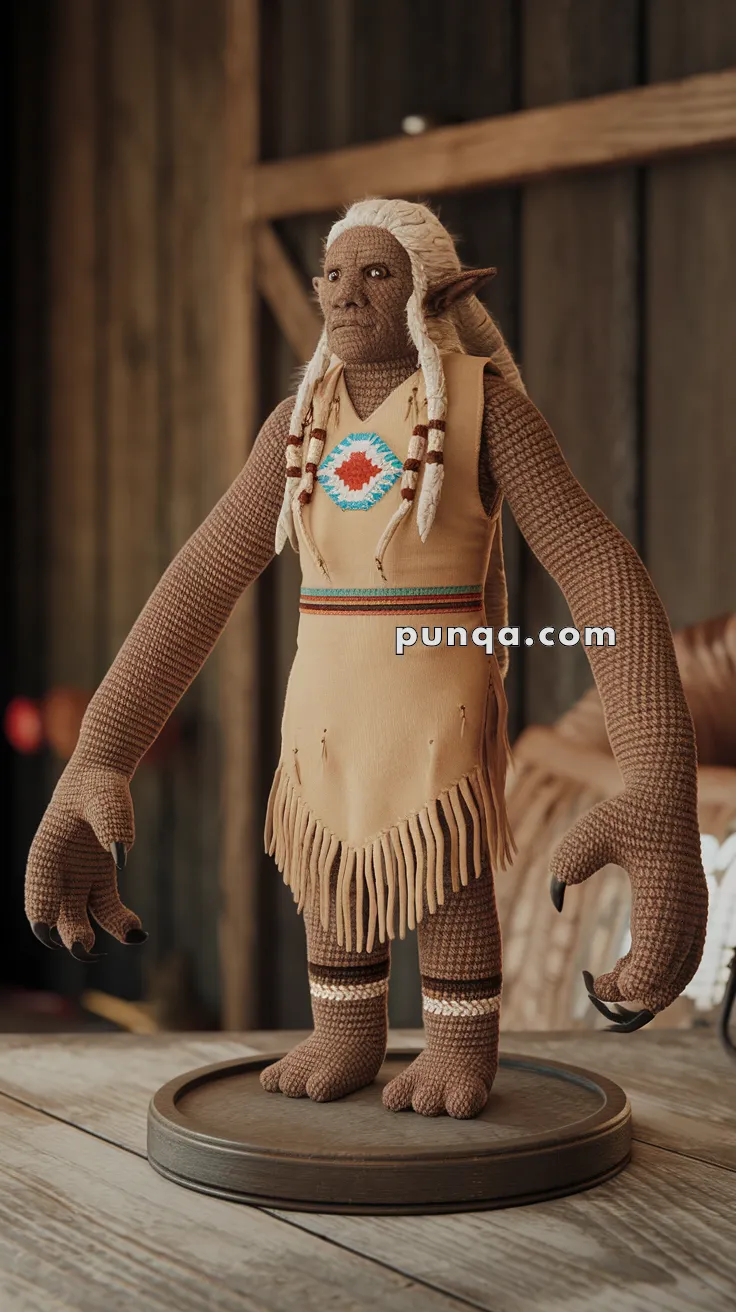
This tall and eerie Wendigo amigurumi captures both tribal elegance and folklore horror with its elongated limbs, claws, and hand-sewn native-style outfit. This project is perfect for advanced crocheters who love sculptural, mythical creatures with fine detailing.
🧵 Skill Level
Advanced
📏 Finished Size
Approximately 14–16 inches (35–40 cm) tall
🧶 Materials
-
Yarn:
-
Dark brown (main body)
-
Beige/tan (face and outfit base)
-
Black (claws and eye details)
-
Cream (hair and hair braids)
-
Accent colors: red, turquoise, white (for chest beadwork)
-
-
2.5 mm crochet hook
-
Fiberfill stuffing
-
Safety eyes (10–12 mm) or black yarn for embroidery
-
Stitch markers
-
Tapestry needle
-
Small piece of faux leather/felt for clothing
-
Sewing needle and matching thread
✨ Abbreviations (US Terms)
-
MR – Magic ring
-
sc – Single crochet
-
inc – Increase
-
dec – Decrease
-
sl st – Slip stitch
-
ch – Chain
-
FO – Fasten off
-
BLO/FLO – Back/Front Loop Only
👤 Head (Brown)
-
MR, 6 sc
-
inc x6 (12)
-
(1 sc, inc) x6 (18)
-
(2 sc, inc) x6 (24)
-
(3 sc, inc) x6 (30)
6–12. sc around -
(3 sc, dec) x6 (24)
-
(2 sc, dec) x6 (18)
– Insert safety eyes between Rnds 8–9 -
(1 sc, dec) x6 (12)
– Stuff and FO
🦴 Body (Brown)
-
MR, 6 sc
-
inc x6 (12)
-
(1 sc, inc) x6 (18)
-
(2 sc, inc) x6 (24)
5–10. sc around -
(3 sc, dec) x4, 4 sc (20)
-
sc around
-
(2 sc, dec) x5 (15)
14–16. sc around
– Stuff, FO
💪 Arms (Make 2 – Long Wendigo Style)
-
MR, 6 sc
-
inc x6 (12)
3–20. sc around (or until desired length)
– Slightly stuff
– FO and leave tail for sewing
Claws
-
Use black yarn to embroider or crochet small cones:
-
MR, 4 sc
-
(1 sc, inc) x2 (6)
-
sc around, FO
-
Attach 3 claws per hand
-
🦵 Legs (Make 2)
-
MR, 6 sc
-
inc x6 (12)
-
(1 sc, inc) x6 (18)
4–9. sc around
– Add white and brown stripe rows for tribal ankle bands
10–14. sc around
– Stuff firmly, FO
Feet Toes
-
You can sew in segments using 3 stitches to give the illusion of toes
-
Embroider nails with black yarn
🦰 Hair & Ears
Hair
-
Use strands of cream yarn
-
Attach with lark’s head knots across crown
-
Create two braids with darker brown beads or thread
-
Tie with tan yarn
Ears (Make 2)
-
MR, 4 sc
-
(1 sc, inc) x2 (6)
-
sc around
-
Flatten and sew on sides of head
👗 Outfit (Optional – Sewn or Felted)
-
Cut a tunic shape from tan felt
-
Sew on beaded/embroidered pattern to chest
-
Add colored yarn stitches in red/turquoise/white diamond motif
-
Add fringe to bottom
-
Sew sides closed or use yarn to stitch laced sides
-
Belt: braid or crochet long stripe in red/brown/turquoise
🧷 Assembly
-
Sew head to body
-
Attach arms slightly down from neck
-
Attach legs underneath torso
-
Add ears, embroider nose and brows
-
Dress the Wendigo in tunic
-
Sew on hair and braid details
-
Stitch claws to tips of arms
✨ Final Touches
-
Add black thread around eyes for shadowing
-
Stiffen claws and hair ends with fabric stiffener if needed
-
Lightly brush yarn hair for fluff
-
Pose him on a base or in a forest diorama!