Welcome to the eerie and enchanting world of amigurumi! 🌲👻 Today, I’m excited to share my free crochet pattern for a Spooky Haunted Tree—a delightfully creepy creation perfect for Halloween décor, haunted house displays, or anyone who loves crafting eerie and whimsical plush designs! 🎃 Whether you enjoy stitching up spooky-themed figures, creating textured and expressive pieces, or simply want to add a haunted tree to your handmade collection, this pattern will guide you through crafting a beautifully sculpted plush tree with twisted branches, eerie eyes, and a ghostly presence! 🖤
This design embraces dark tones, intricate shaping, and playful details to bring a touch of haunted magic to your crochet projects! 🧶🌙 I’ve carefully outlined each step to ensure your Amigurumi Spooky Haunted Tree turns out just right—ready to haunt your collection or become a treasured handmade Halloween decoration! 🎁 So grab your hooks, pick out deep browns, eerie grays, and glowing greens, and let’s stitch up a spine-chilling haunted tree friend! ✨
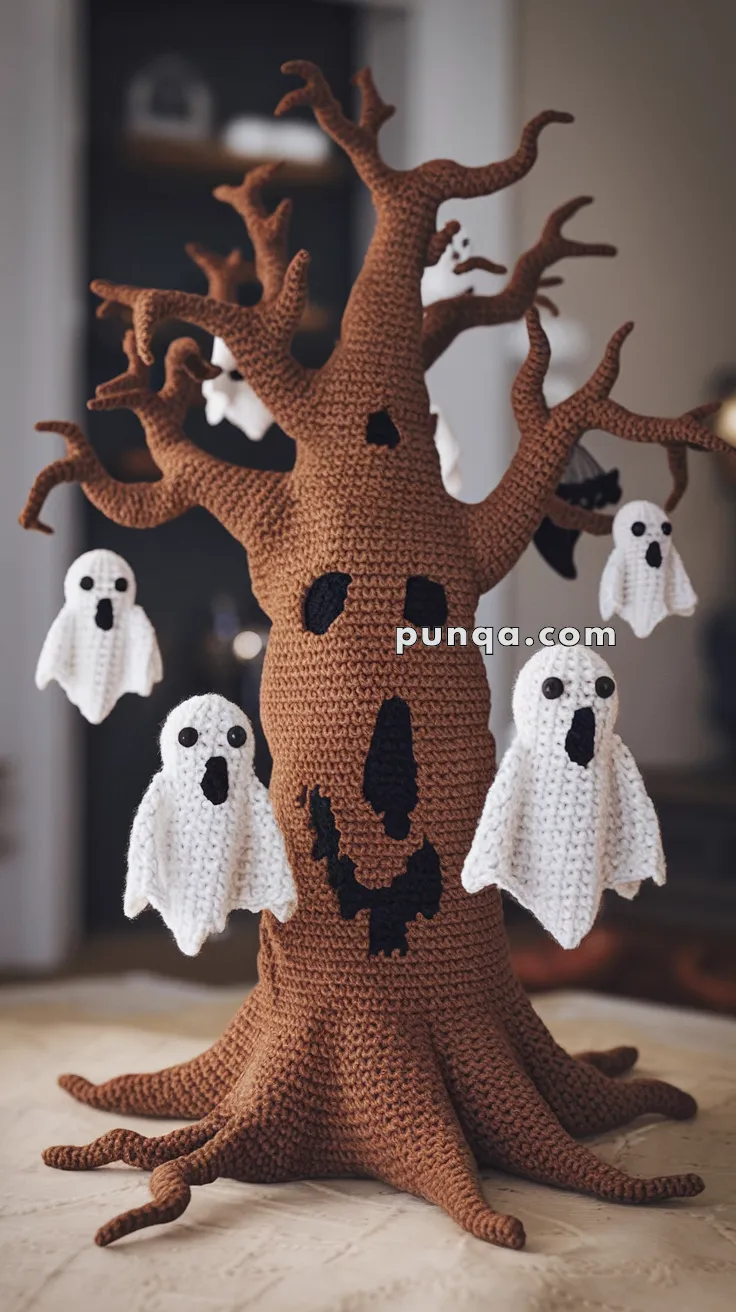
👻 Haunted Halloween Tree with Dangling Ghosts Crochet Pattern
Bring spooky vibes into your home with this handmade crochet haunted tree complete with dangling ghosts! 🌳✨ This project makes the perfect Halloween centerpiece — featuring a gnarled brown tree with root flares, twisted branches, a scary face, and six little floating ghosts swaying in the air.
Whether you’re looking for a fun Halloween decoration or a playful project to wow your friends and family, this pattern will guide you through every step.
✨ Skill Level
Intermediate to Advanced – shaping, sewing, and optional wire support in branches.
📏 Finished Size
-
Tree: approx. 38–42 cm (15–16 in) tall
-
Ghosts: approx. 8–10 cm (3–4 in) each
🧶 Materials
-
Worsted weight yarn:
-
Brown – ~350 g (tree, roots, branches)
-
White – ~70 g (ghosts)
-
Black – small amount (face appliqués & ghost faces)
-
-
Crochet hook: 4.0 mm for tree, 3.5 mm for ghosts/appliqués
-
Stuffing (poly-fill)
-
Craft wire or pipe cleaners (optional, for shaping branches)
-
Yarn needle & scissors
-
Fabric or hot glue (for attaching felt details, optional)
🧾 Abbreviations (US Terms)
-
MR – Magic Ring
-
sc – single crochet
-
inc – increase (2 sc in same st)
-
dec – decrease (sc 2 together)
-
ch – chain
-
sl st – slip stitch
-
st(s) – stitch(es)
-
BLO – back loop only
-
FLO – front loop only
-
FO – fasten off
🌲 Haunted Tree Pattern
Trunk
With brown yarn:
-
MR, 6 sc (6)
-
inc around (12)
-
(sc, inc) × 6 (18)
-
(2 sc, inc) × 6 (24)
-
(3 sc, inc) × 6 (30)
-
(4 sc, inc) × 6 (36)
-
(5 sc, inc) × 6 (42)
-
(6 sc, inc) × 6 (48)
-
(7 sc, inc) × 6 (54)
-
(8 sc, inc) × 6 (60)
-
BLO sc around (60) ← this round marks where the roots will be attached
12–16. sc around (60) -
(8 sc, dec) × 6 (54)
-
sc around (54)
-
(7 sc, dec) × 6 (48)
20–26. sc around (48) -
(6 sc, inc) × 6 (54) ← slight belly for shape
28–31. sc around (54) -
(7 sc, dec) × 6 (48)
-
sc around (48)
-
(6 sc, dec) × 6 (42)
35–41. sc around (42) -
(5 sc, dec) × 6 (36)
-
sc around (36)
-
(4 sc, dec) × 6 (30)
-
sc around (30) ← opening for branches
FO, keep trunk firmly stuffed.
Roots (Make 8–10)
With brown yarn:
-
MR, 5 sc (5)
-
(sc, inc) × 2, sc (7)
3–5. sc around (7) -
(2 sc, inc) × 2, sc (9)
7–12. sc around (9) -
(2 sc, dec) × 2, sc (7)
14–18. sc around (7) (adjust length for variety)
FO, stuff lightly.
👉 Sew roots along the BLO ridge from R11 of the trunk, letting them crawl outward.
Branches (Make 7–9)
With brown yarn:
-
MR, 6 sc (6)
-
(sc, inc) × 3 (9)
3–10. sc around (9) – insert wire if using, begin light stuffing -
(2 sc, inc) × 3 (12) [for long branches only]
12–20. sc around until desired length (long = 20–25 cm, medium = 14–16 cm, short = 8–10 cm).
FO, stuff softly.
Side Shoots (optional):
Join yarn ⅔ up a branch, ch 8–12, sc back along chain, sl st to attach. FO.
👉 Sew branches securely around trunk opening (R45), angling upward and outward.
Face Appliqués (Black)
Eyes (Make 2):
-
ch 4, sc in 2nd ch, sc, 3 sc in last ch; continue on other side: sc, 2 sc (7)
-
inc, sc, inc × 3, sc, inc (12)
FO, leave tail.
Mouth:
-
ch 10, sc across (9), 3 sc in last st, sc across other side (20).
-
Work irregular edging with sc, hdc, sl st to create a jagged oval.
FO.
👉 Sew or glue eyes and mouth onto the front of the trunk.
👻 Ghost Pattern (Make 6)
Head
With white yarn:
-
MR, 6 sc (6)
-
inc around (12)
-
(sc, inc) × 6 (18)
4–5. sc around (18) -
(sc, dec) × 6 (12) – stuff lightly
-
sc around (12)
Body (Sheet)
-
FLO: (sc, ch 1) around (12)
-
sc around (12)
-
(sc, inc) × 6 (18)
-
sc around (18)
-
(2 sc, inc) × 6 (24)
-
sc around (24)
-
(3 sc, inc) × 6 (30)
-
sc around (30)
-
(4 sc, inc) × 6 (36)
Ruffled Hem
-
(sc, hdc, 3 dc in next st, hdc) repeat around for wavy edge.
FO.
Face
-
Embroider with black yarn: 2 oval eyes + 1 long oval mouth.
-
OR cut small felt shapes and glue them on.
Hanging Loop
Ch 15–20, sl st to top of head, FO.
🪡 Assembly
-
Sew roots to trunk’s BLO ridge and shape outward.
-
Attach branches securely around top of trunk.
-
Sew or glue face appliqués to front.
-
Hang ghosts from various branches at staggered heights.
-
Bend wired branches slightly for gnarly effect.
🌟 Finishing Touches
Your spooky Haunted Halloween Tree is ready! 🎃👻
With twisting branches, creepy face, and floating ghosts, it makes a perfect handmade centerpiece for October. Display it on your table, mantel, or even as part of a haunted village setup.