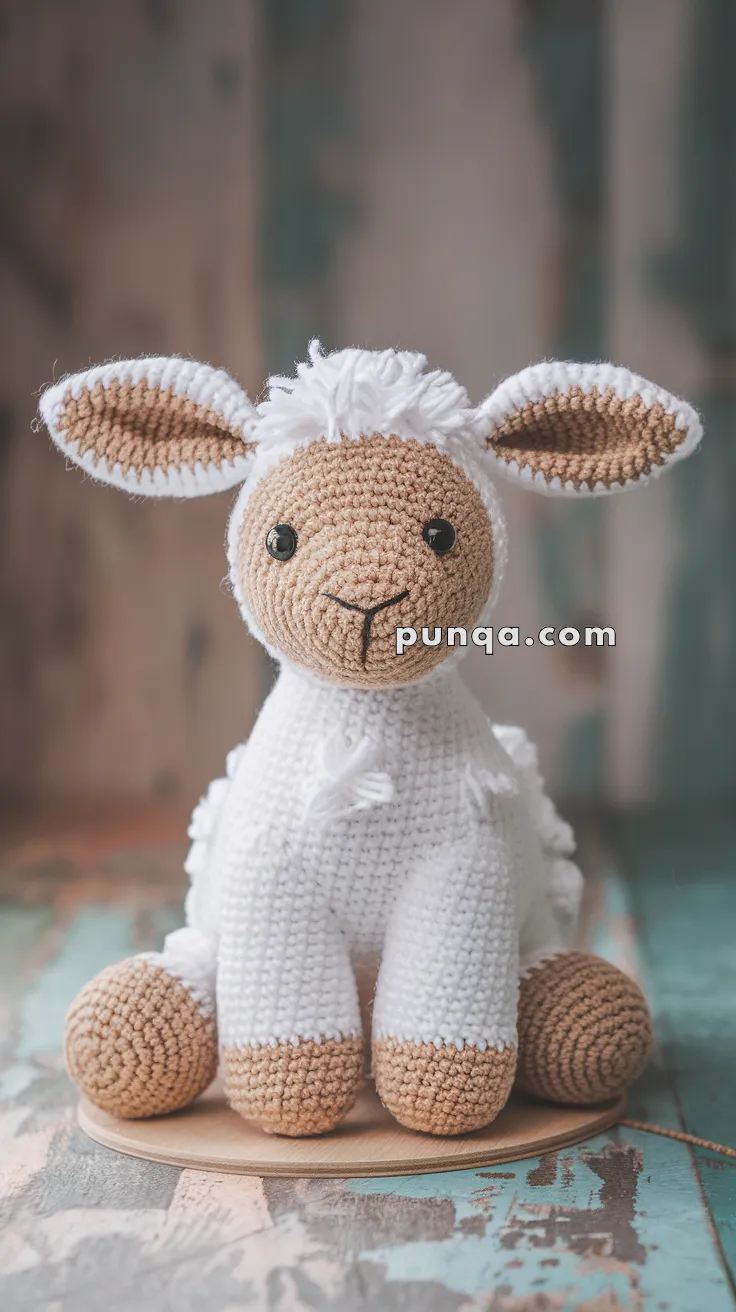
Oh, the joy of crafting an adorable amigurumi Easter lamb! 🌸🐑 If you’re anything like me, the mere thought of making something so cute and cuddly brings a smile to your face. There’s just something magical about transforming a ball of yarn into a soft, huggable creature that captures the spirit of springtime. Amigurumi, with its roots in Japanese culture, offers endless opportunities for creativity, and making a charming Easter lamb is the perfect way to celebrate the season. Whether you’re crafting as a gift or a personal keepsake, the process is as rewarding as the final product itself.
Creating an amigurumi pattern is like embarking on a delightful little adventure. First, I choose the softest yarn with the perfect pastel shades to reflect the freshness of spring. 🧶✨ Then, with a trusty crochet hook in hand, I start by working on the lamb’s body, sculpting it stitch by stitch. The rhythmic motion is almost meditative, and it’s thrilling to see it take shape. I love adding little details like floppy ears and a sweet, embroidered face; it’s these finishing touches that truly bring the lamb to life. Every time I craft a new one, I feel like I’ve made a special friend, and I can’t wait to share the joy it brings with others!
🐑 Amigurumi Easter Lamb Crochet Pattern
Nothing says spring quite like a fluffy little lamb! This sweet Easter lamb, with its soft woolly coat and gentle face, is perfect as a gift, decoration, or keepsake. With a mix of texture and simplicity, it’s a fun and fulfilling project for any crochet lover — especially around Easter time!
✨ Skill Level
Easy to Intermediate – Basic shaping, simple color changes, and a bit of loop stitch or fringe tying for the wool effect.
📏 Finished Size
Approx. 9–10 inches (23–25 cm) tall when using DK or worsted yarn and a 2.5–3.5 mm crochet hook.
🧶 Materials
-
Yarn (DK or Worsted):
-
White (body/wool)
-
Beige or light brown (face, hooves, ears)
-
-
Crochet hook: 2.5 mm or 3.0 mm
-
10–12 mm safety eyes
-
Tapestry needle
-
Stitch marker
-
Polyfill stuffing
-
Black embroidery thread for mouth and nose
🧵 Abbreviations (US Terms)
-
MR – Magic Ring
-
sc – Single Crochet
-
inc – Increase
-
dec – Decrease
-
sl st – Slip Stitch
-
BLO – Back Loop Only
-
FO – Fasten Off
🧠 Head (Beige Yarn)
-
MR, 6 sc
-
inc x6 (12)
-
(1 sc, inc) x6 (18)
-
(2 sc, inc) x6 (24)
-
(3 sc, inc) x6 (30)
6–12. sc around (30) -
(3 sc, dec) x6 (24)
-
(2 sc, dec) x6 (18)
– Insert safety eyes between R8–9, 6–7 sts apart
– Embroider simple smile & nose -
(1 sc, dec) x6 (12)
-
dec x6 (6), FO and close
🐏 Body (White Yarn)
-
MR, 6 sc
-
inc x6 (12)
-
(1 sc, inc) x6 (18)
-
(2 sc, inc) x6 (24)
-
(3 sc, inc) x6 (30)
6–15. sc around (30) -
(3 sc, dec) x6 (24)
-
(2 sc, dec) x6 (18)
-
(1 sc, dec) x6 (12)
-
dec x6 (6), FO and close
🐾 Legs (Make 4, Beige → White)
-
MR, 6 sc
-
inc x6 (12)
-
(1 sc, inc) x6 (18)
4–6. sc (18) -
Switch to white: sc (18)
8–12. sc (18), stuff lightly, FO
🧤 Arms (Make 2, Beige → White)
-
MR, 6 sc
-
inc x6 (12)
-
sc (12)
-
dec x2, sc x8 (10)
-
Switch to white: sc (10)
6–10. sc, stuff lightly, FO
👂 Ears (Make 2 Beige + 2 White)
Outer (Beige)
-
ch 6
-
sc in 2nd ch, sc x3, 3 sc in last, rotate: sc x3, inc in last (12)
-
sc around, sl st, FO
Inner (White)
Repeat above, slightly smaller by skipping final round
Assembly: Sew inner to outer, fold slightly, and attach to sides of head
🎀 Tail
-
MR, 6 sc
-
inc x6 (12)
3–4. sc (12) -
dec x6 (6), FO and sew to back of body
✂️ Finishing Touches
Wool Texture:
-
Use loop stitch OR
-
Cut many strands of white yarn (~2 inches) and tie them around body and head with a latch hook or tapestry needle
-
Trim and fluff to desired shape
Assembly:
-
Sew head to body
-
Attach legs evenly around bottom
-
Sew arms to upper body sides
-
Attach ears
-
Sew tail in back
💡 Optional Add-ons
-
Add a little ribbon bow around the neck
-
Embroider tiny flowers or hearts for Easter flair
-
Use pastel yarns for a springy palette