March into the magic of the holidays with the Amigurumi Nutcracker, a regal crochet creation that brings timeless charm to your festive décor! 🎄🧶 With his bold uniform, tall hat, and classic soldier stance, this handcrafted hero is ready to guard your mantel, perch on your tree, or delight a ballet-loving friend. Whether you’re inspired by the Nutcracker Suite or simply love traditional Christmas icons, this little figure adds a touch of elegance and nostalgia to your handmade collection.
This pattern is a joyful challenge for crocheters who love intricate details and storytelling through stitches. You can customize your Nutcracker with gold accents, rosy cheeks, or even a tiny sword for dramatic flair. Whether he’s part of a holiday display or gifted to someone who cherishes the season, the Amigurumi Nutcracker is a festive way to celebrate tradition—one stately stitch at a time! 🎁✨
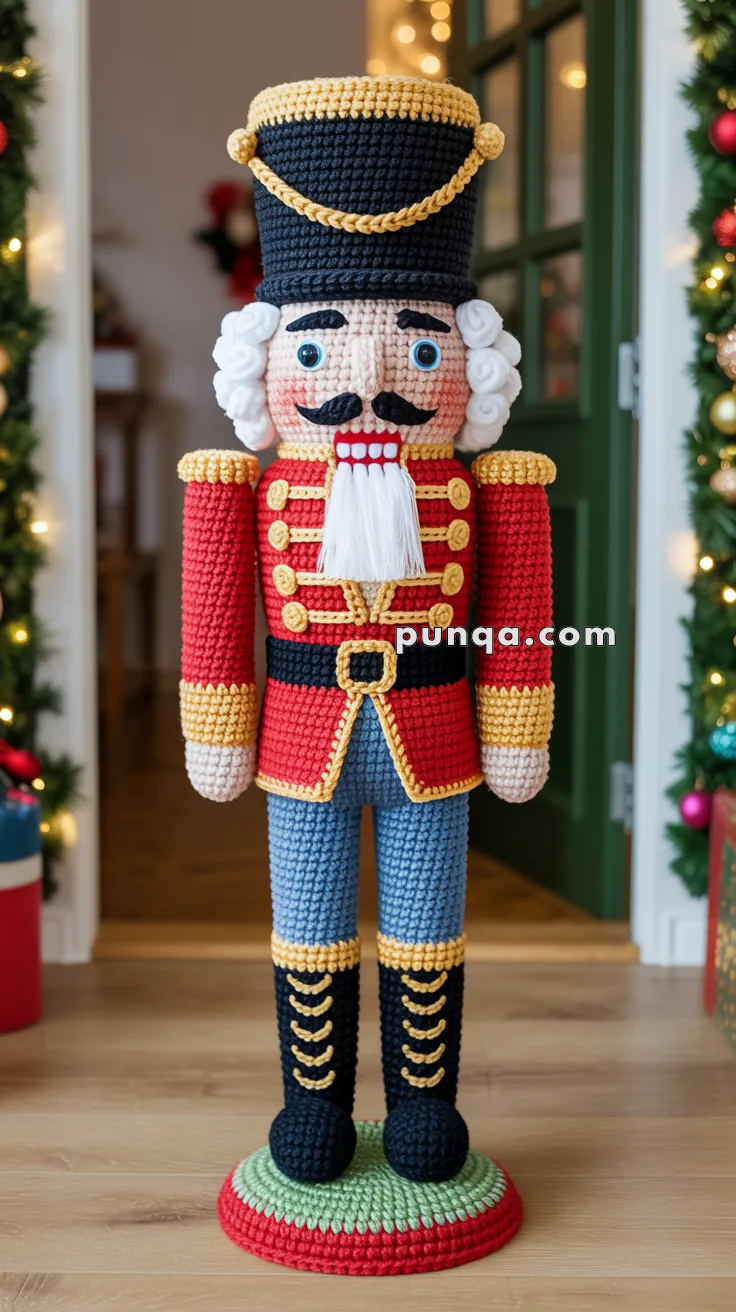
🎄Amigurumi Nutcracker Crochet Pattern
Step into the magic of the holidays with this Amigurumi Nutcracker crochet pattern! Inspired by the timeless Christmas classic, this handmade Nutcracker stands tall in his bold red-and-gold uniform, polished black boots, and grand soldier’s hat. With his charming mustache, curly white hair, and sturdy base, he’s not just a decoration—he’s a showpiece that brings the festive spirit straight to your home. Perfect as a centerpiece, mantle display, or heirloom gift, this crochet Nutcracker will become a holiday treasure for years to come.
✨ Skill Level
Advanced – detailed accessories, shaping, color changes, and embroidery.
📏 Finished Size
~35–40 cm tall (14–16 in) with worsted yarn and 3.0–3.5 mm hook.
🧶 Materials & Yarn Amounts
Worsted weight yarn:
• Beige – 20 g (skin)
• Red – 70–80 g (jacket, base trim)
• Yellow/Gold – 40–50 g (trims, buttons, belt buckle, boot details, hat rim)
• Black – 50 g (hat, belt, boots, mustache, eyebrows)
• White – 35–40 g (hair, beard, teeth, cuffs)
• Light blue – 35 g (pants)
• Green – 25–30 g (base center)
• Pink – a few grams (cheeks)
Other supplies:
• 3.0–3.5 mm crochet hook
• 12–14 mm blue safety eyes
• Yarn needle & embroidery needle
• Polyester stuffing
• Stitch markers
• Optional: cardboard circle for base stability
🧵 Abbreviations (US Terms)
MR = Magic Ring
sc = single crochet
inc = increase
dec = decrease
ch = chain
sl st = slip stitch
🟤 Head (Beige)
R1: MR 6
R2: inc ×6 (12)
R3: (sc, inc) ×6 (18)
R4: (2 sc, inc) ×6 (24)
R5: (3 sc, inc) ×6 (30)
R6: (4 sc, inc) ×6 (36)
R7: (5 sc, inc) ×6 (42)
R8–17: sc around (42)
Insert eyes between rounds 10–11, spaced about 8 stitches apart.
R18: (5 sc, dec) ×6 (36)
R19: (4 sc, dec) ×6 (30)
R20: (3 sc, dec) ×6 (24)
R21: (2 sc, dec) ×6 (18)
R22: (sc, dec) ×6 (12)
R23: dec ×6 (6)
FO and stuff firmly.
Face Details
• Add thick black crocheted or embroidered eyebrows.
• Embroider pink cheeks under the eyes.
• Mustache: shape a curved black mustache and stitch firmly into place.
• Mouth: embroider a red rectangle above the teeth block.
• Teeth block: ch 7, work 2 rows of sc across, sew centrally.
• Beard: attach long straight strands of white yarn beneath the teeth; trim into a clean rectangle.
🎩 Hat (Black with Gold Trim)
Hat Body
R1: MR 6
R2: inc ×6 (12)
R3: (sc, inc) ×6 (18)
R4: (2 sc, inc) ×6 (24)
R5: (3 sc, inc) ×6 (30)
R6: (4 sc, inc) ×6 (36)
R7–28: sc around (36)
FO.
Gold Top Rim
Attach yellow/gold yarn at the very top and crochet 4 rounds of sc to create the wide, raised rim.
Side Ornaments
Make 2 small gold balls:
R1: MR 6
R2–3: sc around (6)
FO and sew to both sides of the hat.
Gold Chain
Ch 28–32, drape across the front and stitch into place slightly below the midpoint.
💇 Hair (White)
Cut 18–20 strands per side, approximately 12–14 cm long.
Twist each strand tightly to form curls.
Attach 9 curls to the left side and 9 curls to the right side, creating full, rounded hair volume beneath the hat.
🎽 Torso (Red Jacket)
R1: MR 6
R2: inc ×6 (12)
R3: (sc, inc) ×6 (18)
R4: (2 sc, inc) ×6 (24)
R5–12: sc around (24)
Switch to red.
R13–42: sc around (24)
FO and stuff firmly.
Jacket Details
• Sew 8 evenly spaced gold buttons down the chest (four rows of two).
• Add 4 horizontal gold straps using surface slip stitch.
• Add a wide gold trim along the jacket front edges and hem.
Belt (Black)
Ch 42, join to form a loop, sc around for 2 rounds.
Sew around the waist.
Belt Buckle (Gold)
Ch 14, work sc around the rectangle, and sew centered on the belt.
Jacket Front Panels
Make 2 panels.
Left Panel
Ch 14
R1: sc 13
R2–5: sc across
R6: dec, sc 9, dec (11)
R7–10: sc across
FO.
Right Panel
Repeat the same instructions.
Sew the panels to form the open jacket front.
White Under-Panel
Ch 12
R1–12: sc across (11)
FO and sew inside the jacket opening.
💪 Arms (Beige → White → Red → Gold)
Make 2 arms.
R1: MR 6
R2: inc ×6 (12)
R3–7: sc around in beige
R8–10: sc around in white (cuffs)
R11–34: sc around in red (long sleeves)
R35–38: sc around in gold (top trim)
FO. Stuff lightly.
Shoulder Pads (Gold)
R1: MR 6
R2: inc ×6 (12)
R3–6: sc around (12)
FO and sew onto the tops of both arms.
👖 Legs (Light Blue Pants)
Make 2 legs.
R1: MR 6
R2: inc ×6 (12)
R3: (sc, inc) ×6 (18)
R4–30: sc around (18)
FO and stuff firmly.
Gold Thigh Trim
Work one round of yellow/gold at the very top of each leg.
👢 Boots (Black with Gold Detail)
Make 2 boots.
R1: MR 6
R2: inc ×6 (12)
R3: (sc, inc) ×6 (18)
R4–7: sc around (18)
R8: (sc, dec) ×6 (12)
R9–18: sc around (12)
FO.
Boot Trim
Crochet 2 rounds in yellow/gold at the tops.
Boot Front Embellishment
Embroider 5 V-shaped gold chains evenly spaced down the front of each boot.
🟢 Base (Green with Red Trim)
R1: MR 6
R2: inc ×6 (12)
R3: (sc, inc) ×6 (18)
R4: (2 sc, inc) ×6 (24)
R5: (3 sc, inc) ×6 (30)
R6: (4 sc, inc) ×6 (36)
R7: (5 sc, inc) ×6 (42)
R8: (6 sc, inc) ×6 (48)
Switch to red.
R9–10: sc around (48)
FO.
Make a second identical circle if you want a stiff base.
Insert cardboard between the two circles and sew together.
🧩 Assembly
- Sew legs onto the base, positioning evenly.
- Attach torso securely on top of the legs.
- Sew both arms at shoulder level; add shoulder pads.
- Attach the head firmly to the torso.
- Stitch the hat onto the head so it stays upright.
- Add hair curls densely under both sides of the hat.
- Attach beard and facial pieces.
- Sew boot details, belt, and jacket trim neatly.
- Ensure the jacket panels drape naturally around the white under-panel.
🌟 Finishing Touches
Lightly brush the beard and hair for fullness.
Shape the mustache and curls neatly.
Adjust the gold chain on the hat so it hangs gently across the front.
Stand your Nutcracker proudly on his festive base and let him guard your holiday home with style.