Oh, the delightful world of amigurumi! It’s a magical journey where strings of colorful yarn transform into adorable miniatures that bring joy to our hearts. Among these charming creations, imagine crafting a tiny Indiana Jones, complete with his iconic hat and trusty whip! 🏺🧢 The appeal of creating an Indiana Jones amigurumi lies in the thrill of capturing the adventurous spirit of the intrepid archaeologist. Each stitch is a step closer to bringing to life the very essence of excitement and exploration that we all admired on the big screen. The process is a treasure hunt in itself, weaving together creativity and skill to build something uniquely joyous.
The journey to crafting an Indiana Jones amigurumi pattern is an adventure worthy of Indy himself. It starts with deciding on the right yarn shades to match his rugged attire, then follows with planning out each detail, from his brimming hat to those adventurous boots. 🧶 The real fun kicks in as I start crocheting, watching each feature emerge with every loop and stitch. It’s a challenge, but that’s where the excitement lies—channeling my inner explorer to navigate through intricate patterns and designs. The end result is a mini masterpiece, a tangible tribute to one of cinema’s most beloved heroes, ready to accompany me on my own daily adventures!
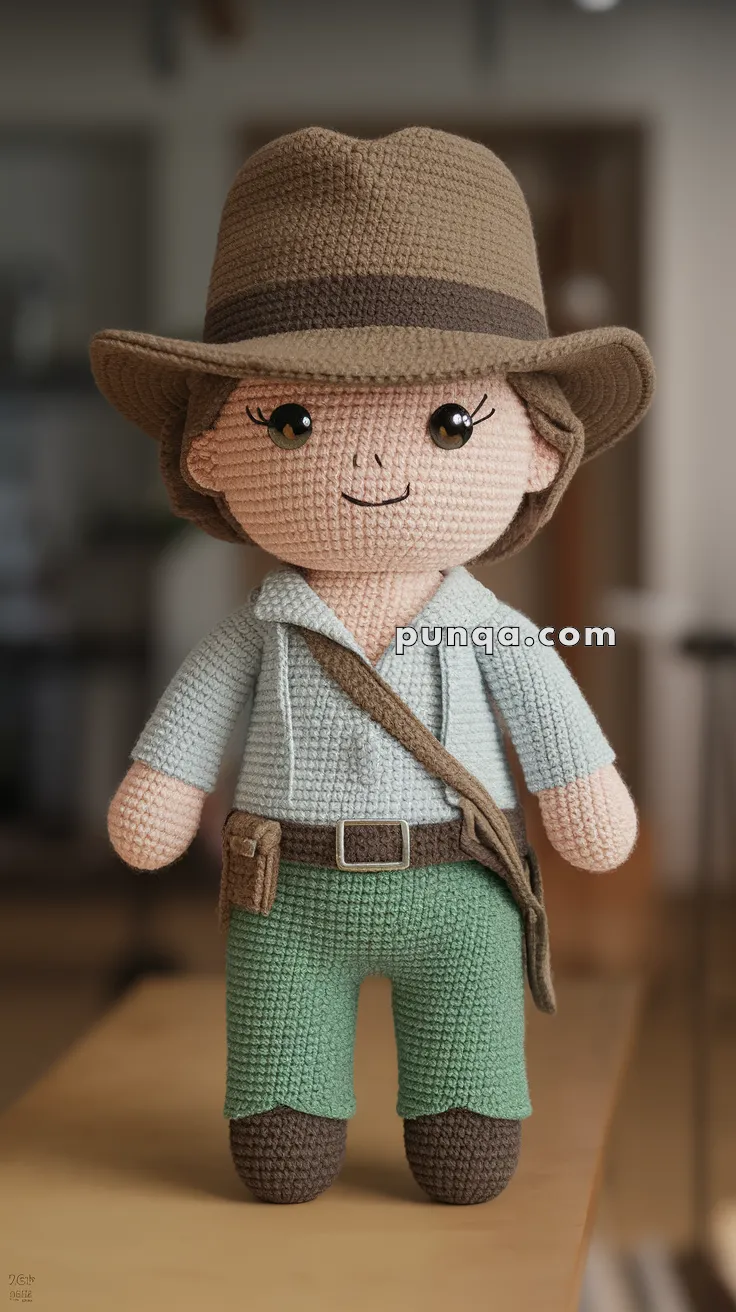
🧢 Amigurumi Indiana Jones Crochet Pattern
Take a step into adventure with this amigurumi version of Indiana Jones! Complete with his iconic fedora, satchel, and rugged explorer outfit, this crochet doll is perfect for movie fans or adventurous hearts.
🧶 Skill Level
Intermediate
Includes shaping, color changes, surface embroidery, and accessories.
📏 Finished Size
Approx. 28–30 cm (11–12 in) tall using DK yarn and a 2.75–3.0 mm hook.
🪡 Materials
Yarn (DK / Light Worsted):
-
Skin tone
-
Light brown (hat)
-
Dark brown (hat band, belt, satchel, boots)
-
Light blue or pale sage (shirt)
-
Green (pants)
Notions:
-
Crochet hook: 2.75–3.0 mm
-
Safety eyes: 9–10 mm
-
Polyester fiberfill
-
Tapestry needle
-
Stitch marker
-
Scissors
🧵 Abbreviations (US Terms)
MR – magic ring
sc – single crochet
inc – increase
dec – invisible decrease
ch – chain
sl st – slip stitch
BLO – back loop only
FO – fasten off
👤 Head (Skin Tone)
-
MR 6
-
inc ×6 (12)
-
(sc, inc) ×6 (18)
-
(2 sc, inc) ×6 (24)
-
(3 sc, inc) ×6 (30)
-
(4 sc, inc) ×6 (36)
7–14. sc around (36)
Insert safety eyes between Rounds 10–11, about 7–8 stitches apart.
Embroider a small vertical nose stitch and a gentle curved smile.
-
(4 sc, dec) ×6 (30)
-
(3 sc, dec) ×6 (24)
-
(2 sc, dec) ×6 (18) – stuff firmly
-
(sc, dec) ×6 (12)
-
dec ×6 (6)
FO, close.
💇 Hair (Dark Brown – Minimal)
The reference shows very minimal hair, mostly hidden by the hat.
-
Attach short yarn strands only along the sides and back of the head
-
Keep hair flat and low-profile
-
Do not crochet a full wig cap
👒 Fedora Hat (Photo-Accurate Shape)
Crown (Light Brown)
-
MR 6
-
inc ×6 (12)
-
(sc, inc) ×6 (18)
-
(2 sc, inc) ×6 (24)
-
(3 sc, inc) ×6 (30)
-
(4 sc, inc) ×6 (36)
7–13. sc around (36)
Hat Band (Subtle)
-
Using dark brown, surface slip stitch one thin band around the crown
-
Do not add extra rounds
Brim
-
sc BLO around (36)
-
(5 sc, inc) ×6 (42)
-
(6 sc, inc) ×6 (48)
-
sc around (48)
-
sc BLO around (48)
FO.
Lightly steam or finger-shape so the brim curves gently downward.
👕 Shirt & Upper Torso (Light Blue / Pale Sage)
Worked from top down.
-
MR 6
-
inc ×6 (12)
-
(sc, inc) ×6 (18)
-
(2 sc, inc) ×6 (24)
-
(3 sc, inc) ×6 (30)
6–12. sc around (30)
Shirt Collar Detail
Using the same shirt yarn, surface embroider a shallow V-shape at the neckline.
Do not crochet a separate collar.
👖 Pants & Legs (Green + Dark Brown Boots)
Legs (Make 2)
Boots – Dark Brown
-
MR 6
-
inc ×6 (12)
-
(sc, inc) ×6 (18)
-
sc BLO around (18)
5–8. sc around (18)
Switch to green.
9–16. sc around (18)
FO first leg only.
Join Legs
-
Join second leg with sc
-
sc around both legs (36)
17–24. sc around (36)
🧍 Body Continuation
Switch to shirt color.
25–29. sc around (36)
Stuff firmly.
FO, leaving a long tail for sewing head.
✋ Arms (Make 2)
Start with skin tone.
-
MR 6
-
(sc, inc) ×3 (9)
3–4. sc around (9)
Switch to shirt color.
5–10. sc around (9)
Lightly stuff, flatten, FO.
🧰 Belt & Pouch (Dark Brown)
Belt
-
ch 26
-
sl st to form a loop
-
Surface embroider a square buckle
Pouch
-
MR 6
2–4. sc around (6)
FO, flatten slightly.
Sew pouch to belt at hip.
🎒 Satchel Strap
-
ch 28–32
-
Sew diagonally from shoulder to opposite hip
-
Secure pouch close to body
🧷 Assembly
-
Sew head to body
-
Attach arms high and slightly forward, between torso Rounds 4–6
-
Fit hat low over eyes and stitch invisibly
-
Attach belt and pouch
-
Sew satchel strap diagonally
-
Lightly blush cheeks if desired
✨ Final Touches
-
Add stitched pockets, collar edge
-
Embroider lashes or rugged eyebrows
-
Customize with a mini whip or treasure map accessory!
Whether displayed proudly or gifted to a fellow adventurer at heart, this handcrafted Explorer amigurumi is a timeless reminder that every great journey begins with curiosity, courage, and a well-worn hat.