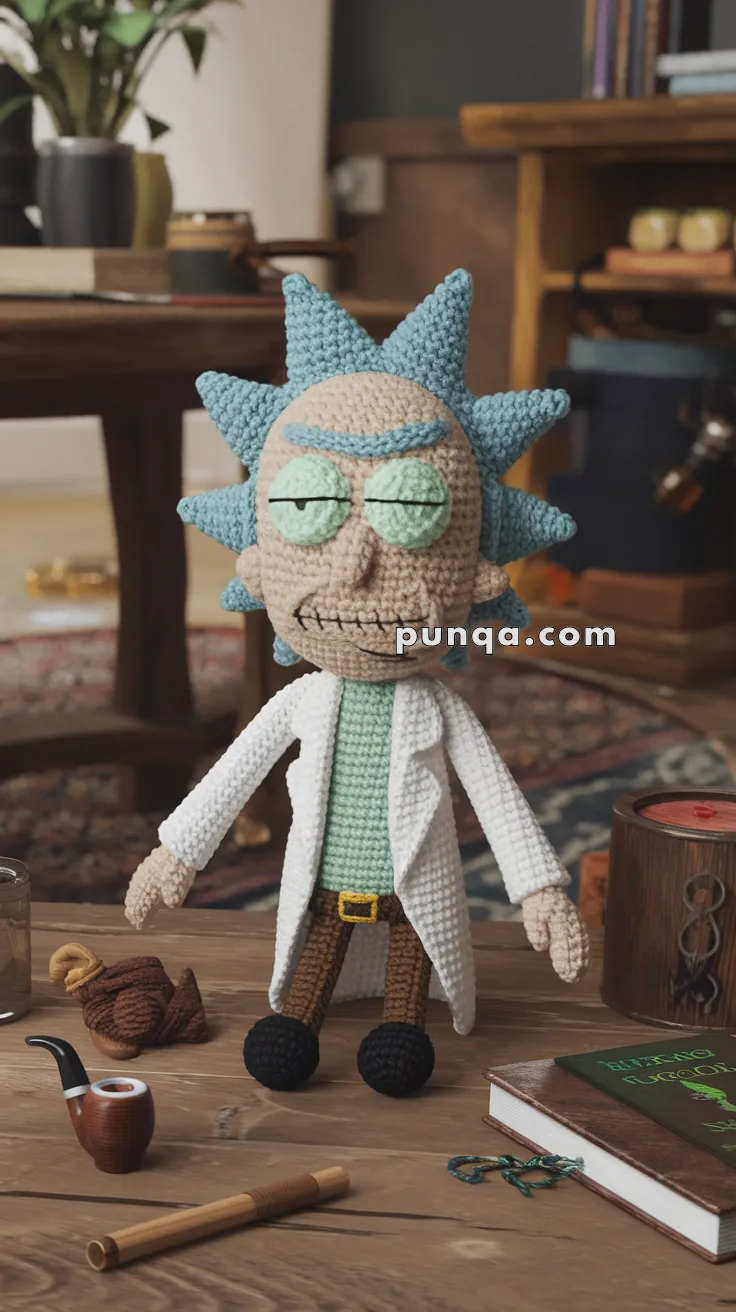
Oh, the joy of creating amigurumi! It’s like bringing a small piece of magic to life with just yarn and a crochet hook. 🧶✨ I’ve always been enchanted by the whimsical world of amigurumi, where every stitch adds character to the adorable creatures that emerge from my hands. When it comes to making a Rick Sanchez amigurumi, the process is nothing short of an exciting adventure through the multiverse! The quirky character from “Rick and Morty” has such a distinct personality, and capturing his essence in yarn form is both a challenge and a delight. From his wild blue hair to his iconic white lab coat, every detail contributes to the charm of the final creation.
Getting started on a Rick Sanchez amigurumi pattern is quite the creative journey. I usually begin by selecting the perfect yarn colors that match Rick’s eccentric style. 🌈 The process involves crafting separate parts, like his head, body, and limbs, and then piecing them together like a whimsical puzzle. I pay special attention to his facial features, ensuring that his signature smirk and expressive eyes convey his mischievous personality. Adding the finishing touches, such as embroidered details and accessories, really brings the character to life. It’s incredibly satisfying to see Rick in his amigurumi form, ready for intergalactic adventures! 🚀
🧪 Rick Sanchez Amigurumi Crochet Pattern
Get ready to craft the smartest (and sassiest) scientist in the multiverse! With spiky blue hair, a lab coat, and a permanent scowl, this Rick Sanchez doll is the perfect project for fans of interdimensional mischief.
🧶 Skill Level
Intermediate – Requires shaping, color changes, and basic embroidery.
📏 Finished Size
Approximately 28 cm (11 inches) tall using worsted-weight yarn and a 3.0 mm crochet hook.
✂️ Materials
-
Worsted weight yarn:
-
Beige (skin)
-
Light mint (shirt)
-
White (lab coat)
-
Brown (pants)
-
Black (shoes)
-
Light blue (hair & unibrow)
-
Yellow (belt buckle)
-
-
3.0 mm crochet hook
-
Black embroidery thread
-
Safety eyes (10 mm)
-
Stuffing
-
Stitch marker
-
Yarn needle
-
Scissors
🧵 Abbreviations (US Terms)
-
MR – Magic Ring
-
sc – single crochet
-
inc – increase
-
dec – decrease
-
ch – chain
-
sl st – slip stitch
-
BLO – back loop only
-
FO – fasten off
🧍♂️ Pattern Instructions
HEAD (Beige)
-
MR, 6 sc (6)
-
inc x6 (12)
-
(sc, inc) x6 (18)
-
(2 sc, inc) x6 (24)
-
(3 sc, inc) x6 (30)
-
(4 sc, inc) x6 (36)
7–14. sc around (36) -
(4 sc, dec) x6 (30)
-
(3 sc, dec) x6 (24)
-
(2 sc, dec) x6 (18)
-
(sc, dec) x6 (12)
-
dec x6 (6)
FO, stuff firmly.
HAIR SPIKES (Light Blue, make 12)
-
MR, 4 sc (4)
2–5. sc around (4)
FO, leave long tail. Stuff lightly and sew around top edge of head.
UNIBROW (Light Blue)
Ch 12, turn, sl st across. FO and sew just above eyes.
EYES & FACE
-
Attach 10 mm safety eyes between Rounds 8–9, 6 stitches apart.
-
Embroider eyelids with light mint yarn.
-
Embroider mouth with black thread in a jagged line.
BODY (Light Mint)
-
MR, 6 sc (6)
-
inc x6 (12)
-
(sc, inc) x6 (18)
-
(2 sc, inc) x6 (24)
5–9. sc around (24) -
Switch to white (coat), sc around (24)
11–16. sc around (24)
FO, stuff.
LEGS (Make 2)
Start with black (shoes):
-
MR, 6 sc (6)
-
inc x6 (12)
-
(sc, inc) x6 (18)
4–5. sc around (18) -
dec x6, 6 sc (12)
Switch to brown (pants)
7–13. sc around (12)
FO, stuff. Sew to bottom of body.
ARMS (Make 2)
Start with beige (hands):
-
MR, 6 sc (6)
-
(sc, inc) x3 (9)
3–5. sc around (9)
Switch to white (sleeves)
6–12. sc around (9)
FO, stuff lightly and sew to sides of body.
LAB COAT FLAPS (White, Make 2)
-
Ch 12, turn
-
sc across (11)
3–5. sc across (11)
FO and sew to front of body to hang like coat tails.
BELT (Brown + Yellow)
-
Ch a strand long enough to wrap around body, sew in place.
-
Use yellow yarn to embroider a small square for a buckle.
🎉 Final Touches
Pose your Rick with a smirk and some sarcastic swagger. You can pair him with a portal gun or tiny flask for extra chaos. 🤯💥
Happy crocheting, and remember: Wubba lubba dub dub! 🧪✨