Get ready to party with yarn and joy with this Amigurumi Pinkie Pie crochet pattern! Inspired by the most exuberant pony from My Little Pony, this bubbly design captures Pinkie Pie’s signature curls, bright pink coat, and infectious smile. Whether you’re crafting for a fan of the show, adding a pop of fun to your collection, or just love turning beloved characters into cuddly creations, this pattern lets you stitch up a cheerful companion that’s full of personality and pizzazz. 🎉🧁🧶
Designed for maximum cuteness, this pattern invites you to play with vibrant yarns, curly mane techniques, and expressive details like big eyes and her iconic balloon cutie mark. Add a little party hat, a cupcake accessory, or even a tiny confetti pouch for extra flair. Whether she’s perched on a shelf, gifted to a fellow pony lover, or made just for the joy of it, this Amigurumi Pinkie Pie is a joyful and satisfying project—perfect for bringing a touch of handmade celebration to every stitch! 💖🌈✨
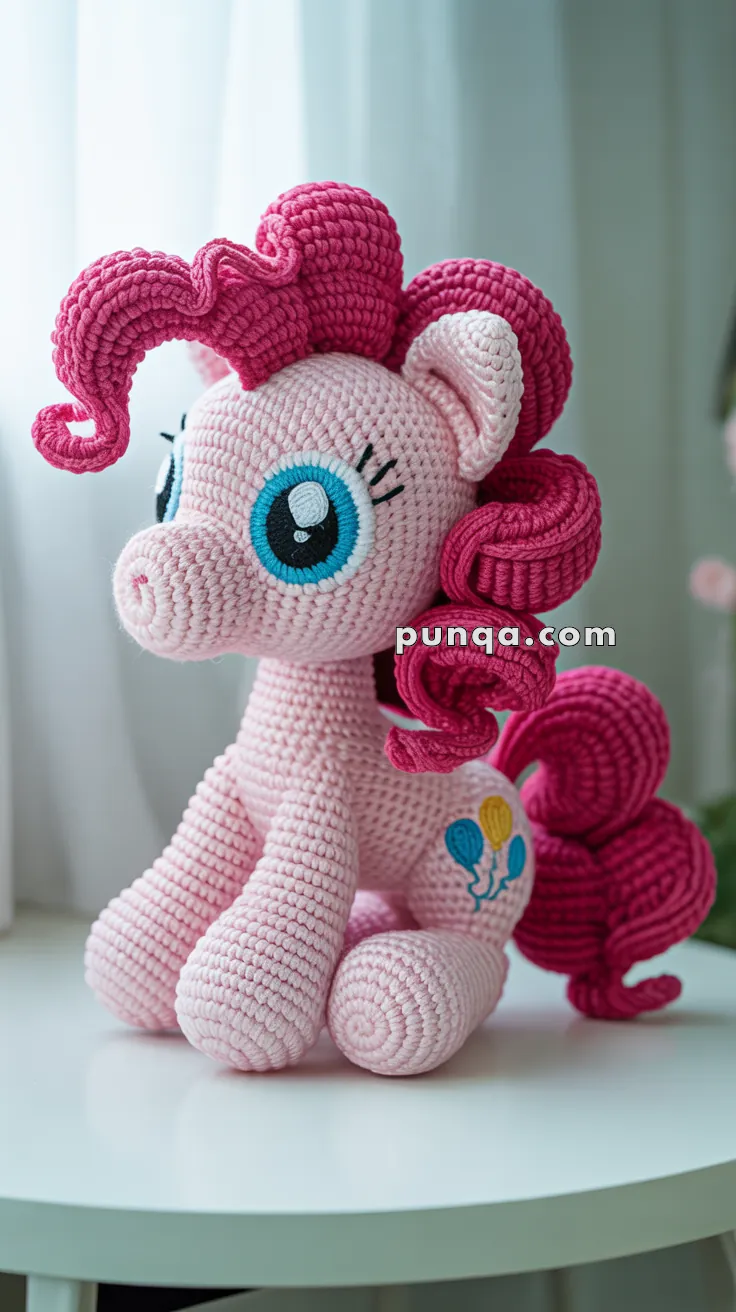
🎀 Amigurumi Pinkie Pie Crochet Pattern Fan Art Version
Bring the bubbly joy of Pinkie Pie to life with this irresistibly detailed amigurumi version of the iconic pony! With her bright blue eyes, curly pink mane and tail, and signature balloon cutie mark, this pattern is perfect for My Little Pony fans and collectors alike.
✨ Skill Level
Intermediate to Advanced – Involves shaping, color changes, assembling multiple parts, and tight curls.
📏 Finished Size
Approx. 10–12 inches (25–30 cm) tall when using DK yarn and a 2.5–3 mm hook.
🧶 Materials
| Item | Details |
|---|---|
| Yarn (DK weight) | |
| • Light Pink (Body) | |
| • Hot Pink (Hair/Tail) | |
| • White, Blue, Black (Eyes) | |
| • Yellow & Blue (Cutie Mark) | |
| Hook | 2.5 mm – 3.0 mm |
| Stuffing | Polyester fiberfill |
| Notions | |
| • Black embroidery thread | |
| • Safety eyes or felt circles | |
| • Yarn needle | |
| • Stitch markers | |
| • Fabric glue or felt backing (optional) |
🧵 Abbreviations (US Terms)
- MR – Magic Ring
- sc – Single Crochet
- inc – Increase (2 sc in one st)
- dec – Decrease (sc 2 together)
- sl st – Slip Stitch
- ch – Chain
- FO – Fasten Off
- BLO – Back Loop Only
🐴 Head (Light Pink)
- MR, 6 sc
- inc x6 → (12)
- (1 sc, inc) x6 → (18)
- (2 sc, inc) x6 → (24)
- (3 sc, inc) x6 → (30)
- (4 sc, inc) x6 → (36)
7–14. sc around (36) - (4 sc, dec) x6 → (30)
- (3 sc, dec) x6 → (24)
- (2 sc, dec) x6 → (18)
- (1 sc, dec) x6 → (12)
Stuff firmly - dec x6 → (6), FO, close
🦄 Muzzle (Light Pink)
- MR, 6 sc
- inc x6 → (12)
3–5. sc around (12)
Stuff lightly, FO and sew to front of head just below eye level
Nose Tip: Embroider small pink oval or vertical line on top center
👁 Eyes (Felt or Crochet)
Option 1: Felt (easier)
- Cut white oval base, light blue iris circle, black pupil
- Sew or glue layers, embroider lashes
Option 2: Crochet Eyes
- White: MR, 6 sc
- inc x6 → (12), FO
- Blue: MR, 6 sc, FO
- Black: MR, 4 sc
Sew layers, embroider lashes above eyes
🦴 Ears (Make 2 – Light Pink)
- MR, 4 sc
- (1 sc, inc) x2 → (6)
- (2 sc, inc) x2 → (8)
- sc around (8)
FO, pinch flat and sew to top of head
🦄 Body (Light Pink)
- MR, 6 sc
- inc x6 → (12)
- (1 sc, inc) x6 → (18)
- (2 sc, inc) x6 → (24)
- (3 sc, inc) x6 → (30)
6–14. sc around (30) - (3 sc, dec) x6 → (24)
16–19. sc around (24) - (2 sc, dec) x6 → (18)
21–22. sc around (18)
FO, stuff, and set aside
🐾 Legs (Make 4 – Light Pink)
- MR, 6 sc
- inc x6 → (12)
- (1 sc, inc) x6 → (18)
4–7. sc around (18) - (2 sc, dec) x4, 2 sc → (14)
9–13. sc around (14)
FO and stuff. Sew 2 front legs close under neck, 2 rear legs wide near base of body.
🎀 Mane Curls (Hot Pink – Make 6–8)
Each curl:
- Ch 21
- Starting in 2nd ch: work 3 sc in each st back to start
→ The piece will spiral naturally
Make various lengths (ch 16–25) for natural style
Sew to top and back of head
🎀 Tail Curls (Hot Pink – Make 4–6)
Same method as mane. Use longer base chains (ch 30–40)
Attach curls near bottom back of the body
🎈 Cutie Mark (Felt or Embroidery)
Option 1: Use yellow and blue yarn to embroider 3 balloons
Option 2: Cut felt shapes and glue/sew
– 2 blue balloons, 1 yellow
– Add curly string lines
🧷 Final Assembly
- Sew head to body (angled slightly downward)
- Attach ears, eyes, snout, and legs
- Arrange mane and tail curls, stitching securely
- Embroider mouth and lashes
💡 Tips & Variations
- Use safety eyes for durability (embroider lashes above)
- Insert pipe cleaners in tail for poseability
- Customize with party hat, cupcake, or tutu!
This adorable Pinkie Pie is ready to spread joy and giggles wherever she goes! 🎉💖