Oh, the joy of creating an amigurumi Tommy Pickles! As a fan of “Rugrats,” there’s nothing quite like bringing the adventurous spirit of this iconic character to life through crochet. The appeal of crafting an amigurumi Tommy lies in the nostalgia and charm he embodies. With his big diaper, small tuft of hair, and ever-curious expression, he’s a delightful project that rekindles childhood memories. Plus, amigurumi allows me to meld creativity with craftsmanship, offering a tangible reward at the end—a mini Tommy to be cherished or gifted. 🧶✨
Creating an amigurumi Tommy Pickles pattern is a delightful adventure in itself. First, I gather my trusty crochet hook and a rainbow of yarn—mostly in Tommy’s signature colors like baby blue and white. Following the pattern, I start crafting his characteristic features, beginning with his round head and recognizable tuft of hair. It’s like painting a canvas, but with yarn! As I stitch, I find myself smiling at the thought of Tommy’s curious antics. The process is like watching magic unfold, stitch by stitch, until the final knot ties everything together, leaving me with a playful and huggable piece of art. 🥰🧸
🍼 Amigurumi Tommy Pickles Crochet Pattern
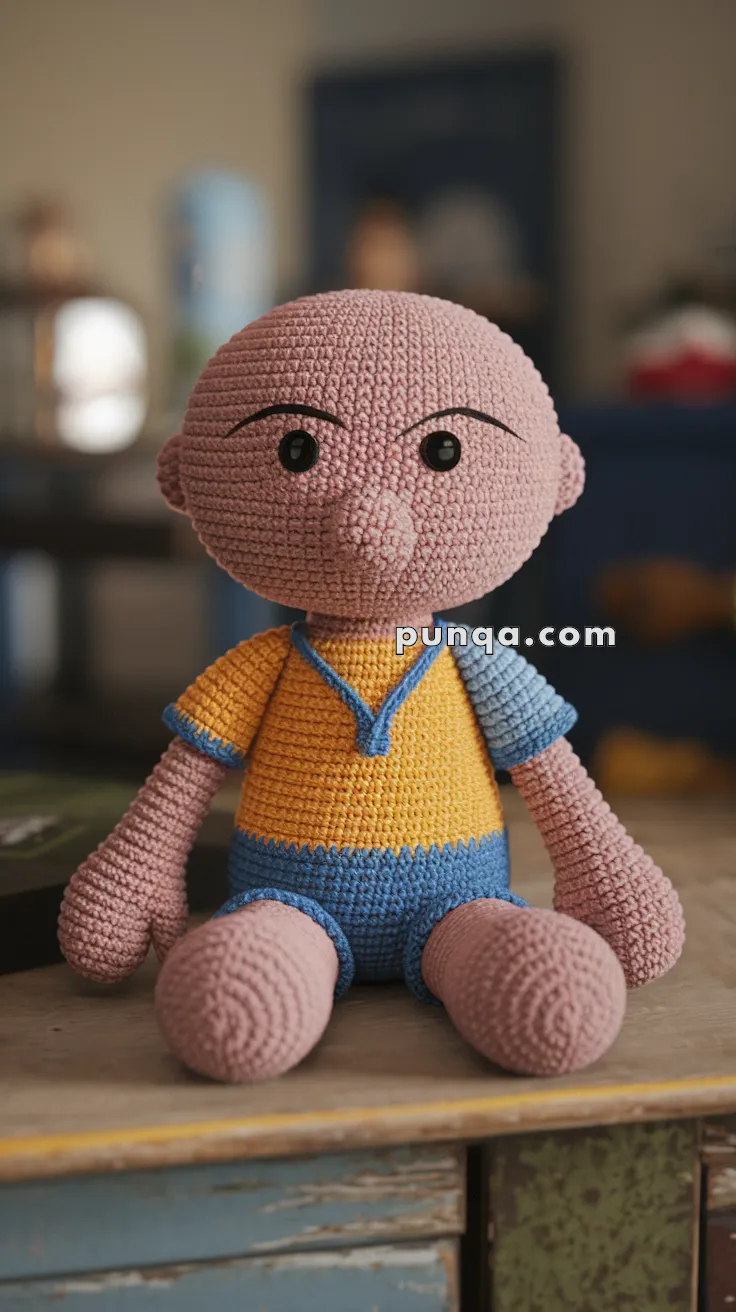
Bring everyone’s favorite brave baby to life with this adorable Amigurumi Tommy Pickles doll! This pattern is inspired by the classic seated pose and simple cartoon features — including a bald rounded head, small ears, protruding nose, expressive embroidered eyebrows, long relaxed arms, short rounded legs, and his signature yellow shirt with blue trim and blue shorts.
The result is a soft, friendly character that looks perfect displayed on a shelf, in a nursery, or as a handmade gift for fans of nostalgic cartoons.
✨ Skill Level
Intermediate – includes shaping, clean color changes, facial embroidery, and assembling multiple parts.
📏 Finished Size
Approx. 25–28 cm (10–11 inches) tall when seated
(using DK or light worsted yarn and a 3.0–3.25 mm hook)
🧶 Materials
Yarn (DK / Light Worsted):
-
Skin tone / light peach – head, arms, legs (≈120 g)
-
Yellow – shirt (≈40 g)
-
Blue – sleeve, waist trim, shorts (≈40 g)
Notions:
-
8–10 mm safety eyes or black yarn for embroidery
-
Polyester fiberfill stuffing
-
Yarn needle
-
Stitch marker
-
Scissors
🧵 Abbreviations (US Terms)
MR – Magic Ring
sc – Single crochet
inc – Increase (2 sc in same stitch)
dec – Decrease (sc2tog)
sl st – Slip stitch
FO – Fasten off
Work in continuous rounds unless stated otherwise.
🙂 Head (Skin Tone)
R1: MR, 6 sc (6)
R2: inc ×6 (12)
R3: (sc, inc) ×6 (18)
R4: (2 sc, inc) ×6 (24)
R5: (3 sc, inc) ×6 (30)
R6: (4 sc, inc) ×6 (36)
R7–13: sc around (36)
Insert eyes between R9–10, about 7–8 stitches apart.
R14: (4 sc, dec) ×6 (30)
R15: (3 sc, dec) ×6 (24)
R16: (2 sc, dec) ×6 (18)
Stuff firmly, shaping cheeks gently outward.
R17: (sc, dec) ×6 (12)
R18: dec ×6 (6)
FO and close.
👃 Nose (Skin Tone – Protruding)
R1: MR, 6 sc (6)
R2: inc ×6 (12)
R3–4: sc around (12)
Stuff lightly.
Sew centered between the eyes, slightly low on the face.
👂 Ears (Make 2 – Skin Tone)
R1: MR, 6 sc (6)
R2: (sc, inc) ×3 (9)
R3: sc around (9)
FO.
Flatten slightly and sew to each side of the head, aligned with the eyes.
🧍 Body (Worked Top Down – Shirt & Shorts Built In)
Start with yellow (shirt).
R1: MR, 6 sc (6)
R2: inc ×6 (12)
R3: (sc, inc) ×6 (18)
R4: (2 sc, inc) ×6 (24)
R5: (3 sc, inc) ×6 (30)
R6–10: sc around (30)
Change to blue for waist trim.
R11: sc around (30)
Continue in blue for shorts.
R12–16: sc around (30)
Stuff firmly.
R17: (3 sc, dec) ×6 (24)
R18: (2 sc, dec) ×6 (18)
R19: (sc, dec) ×6 (12)
FO and close.
Sew head securely onto the body.
💪 Arms (Make 2)
Hand & Arm (Skin Tone)
R1: MR, 6 sc (6)
R2: inc ×6 (12)
R3–10: sc around (12)
Lightly stuff only the upper half so the arm bends naturally.
FO.
Sleeve Detail (One Arm Only)
Attach blue yarn near the top of one arm (to match the single blue sleeve in the image):
Round: sc around once (12)
FO.
Sew both arms high on the sides of the body so they hang down and curve inward naturally.
🦵 Legs (Make 2 – Skin Tone)
R1: MR, 6 sc (6)
R2: inc ×6 (12)
R3: (sc, inc) ×6 (18)
R4–7: sc around (18)
R8: (sc, dec) ×6 (12)
Stuff firmly.
FO leaving a long tail.
Sew legs low and slightly forward on the body to create a seated posture.
😊 Facial Embroidery
With black yarn or embroidery thread:
-
Two curved eyebrows above the eyes
-
A tiny straight mouth line
-
Optional light blush on cheeks
The expression should look calm and curious, just like the character.
🧵 Assembly
-
Sew nose onto the face.
-
Attach ears to the sides of the head.
-
Sew head to body securely.
-
Attach arms high on the body.
-
Attach legs low and forward for sitting pose.
-
Embroider facial features last.
✂️ Finishing Touches
-
Shape arms and legs gently by hand
-
Slightly flatten the feet so the doll sits steadily
-
Light steam if needed (avoid touching yarn directly)
🌟 Final Thoughts
Your Amigurumi Tommy Pickles is now complete — featuring his bald round head, cute nose, expressive eyebrows, yellow shirt with blue trim, single blue sleeve, blue shorts, and relaxed seated pose.
This little doll captures the playful spirit of a curious baby adventurer and makes a charming handmade keepsake for cartoon lovers of all ages.
Stitched with care, he’s ready for big adventures in a very small world 🍼🧶💛💙