Hey there, fellow crafters! 😊 Let me tell you about my latest crochet obsession: creating an amigurumi Winter Soldier pattern! There’s something incredibly rewarding about bringing a beloved character to life through yarn and a bit of imagination. The appeal of amigurumi, for me, lies in its ability to combine creativity and craftsmanship with a sprinkle of geeky passion. As a fan of the Winter Soldier, I couldn’t resist the challenge of capturing his essence in the soft and squishy form of amigurumi. It’s a fantastic way to express my love for the character while honing my crochet skills.
The process of making an amigurumi Winter Soldier is like embarking on a mini adventure. 🧶 First, I gather my supplies: cozy yarn in shades of gray, black, and a hint of metal-inspired silver for his iconic arm. I select a trusty crochet hook, ready to be my crafting partner in crime. Then, I dive into designing his features — from his mysterious mask to his brooding expression. Each stitch brings him closer to life, and it’s exciting to see him take shape under my fingers. The sense of accomplishment when I finally finish is unbeatable. Plus, I can’t wait to show him off to friends and fellow fans! 🎉
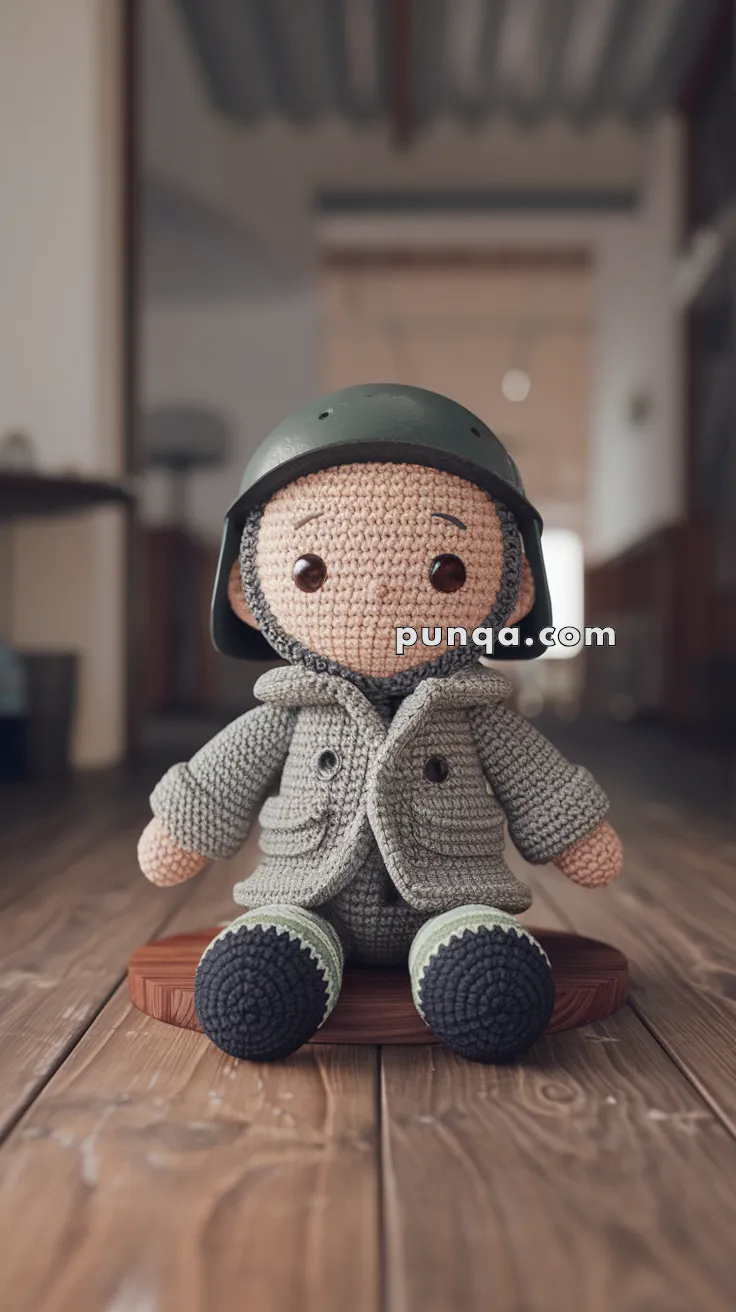
🪖 Amigurumi Winter Soldier Crochet Pattern
March into coziness with this charming Amigurumi Winter Soldier doll! Dressed in a double-breasted coat, military-style boots, and a removable helmet, this doll brings a soft twist to a rugged look—perfect for collectors, gifts, or storytelling play!
✨ Skill Level
Intermediate – Includes layered clothing, simple shaping, and color changes.
📏 Finished Size
Approximately 10–12 inches (25–30 cm) tall when made with worsted yarn and a 2.5–3.5 mm crochet hook.
🧶 Materials
-
Yarn (Worsted Weight):
-
Beige (Skin)
-
Gray (Coat, gloves, helmet strap)
-
Black (Boot soles)
-
Olive Green (Pant cuffs)
-
Dark Gray (Inner body, pants)
-
-
Crochet Hook: 2.5–3.5 mm
-
Safety Eyes: 10 mm black
-
Polyfill Stuffing
-
Tapestry Needle
-
Black Embroidery Thread (brows, mouth)
-
Plastic or metal toy helmet (optional accessory)
🧵 Abbreviations (US Terms)
MR – Magic Ring
sc – Single Crochet
inc – Increase (2 sc in one stitch)
dec – Decrease (sc two stitches together)
ch – Chain
sl st – Slip Stitch
BLO – Back Loops Only
FO – Fasten Off
🧑✈️ Head (Beige)
-
MR, 6 sc
-
inc x6 (12)
-
(1 sc, inc) x6 (18)
-
(2 sc, inc) x6 (24)
-
(3 sc, inc) x6 (30)
-
(4 sc, inc) x6 (36)
7–13. sc around (36)
– Insert safety eyes between R9–10, 6 sts apart
– Embroider eyebrows and blush -
(4 sc, dec) x6 (30)
-
(3 sc, dec) x6 (24)
-
(2 sc, dec) x6 (18)
-
(1 sc, dec) x6 (12)
-
dec x6 (6), FO and close
🎽 Body (Dark Gray → Coat Gray)
-
MR, 6 sc
-
inc x6 (12)
-
(1 sc, inc) x6 (18)
-
(2 sc, inc) x6 (24)
-
(3 sc, inc) x6 (30)
6–10. sc around (30) -
Switch to gray, BLO, sc around (30)
12–14. sc (30) -
(3 sc, dec) x6 (24)
-
(2 sc, dec) x6 (18)
– Stuff firmly -
(1 sc, dec) x6 (12)
-
dec x6 (6), FO
🧤 Arms (Make 2 – Beige → Gray Coat Sleeves)
-
MR, 6 sc in beige
-
inc x6 (12)
-
sc (12)
-
Switch to gray, sc (12)
5–9. sc (12)
– Stuff lightly -
(1 sc, dec) x4 (8), FO
– Sew to body sides
👖 Legs (Make 2 – Black → Green → Dark Gray)
-
MR, 6 sc in black
-
inc x6 (12)
-
sc (12)
-
Switch to olive, sc (12)
-
Switch to dark gray, sc (12)
6–9. sc (12) -
(1 sc, dec) x4 (8), FO
– Sew to bottom of body
🧥 Jacket Front Panels (Make 2 – Gray)
-
Ch 6
-
Row 1–6: sc across, ch 1, turn
-
FO and stitch buttons to outer edges
-
Sew diagonally on body as overlapping flaps
🎩 Helmet Strap (Optional – Gray)
-
Ch 30
-
Row 1: sc in each ch (30), FO
– Sew ends to sides of head near ears
– Top with toy helmet or crochet half dome if desired
✂️ Assembly Instructions
-
Attach head to body
-
Sew arms slightly angled forward
-
Attach legs flat to body bottom
-
Sew jacket panels with slight overlap
-
Embroider simple smile
-
Add helmet strap and place helmet on top
🪖 Optional Add-ons
-
Add scarf or canteen strap
-
Stitch military patch on the coat
-
Make a winter buddy or snowball accessory
The Amigurumi Winter Soldier doll is ready to stand guard under your Christmas tree, on your bookshelf, or as a heartfelt handmade gift. With his detailed coat and sturdy boots, he’s both brave and cuddly! ❄️🧤