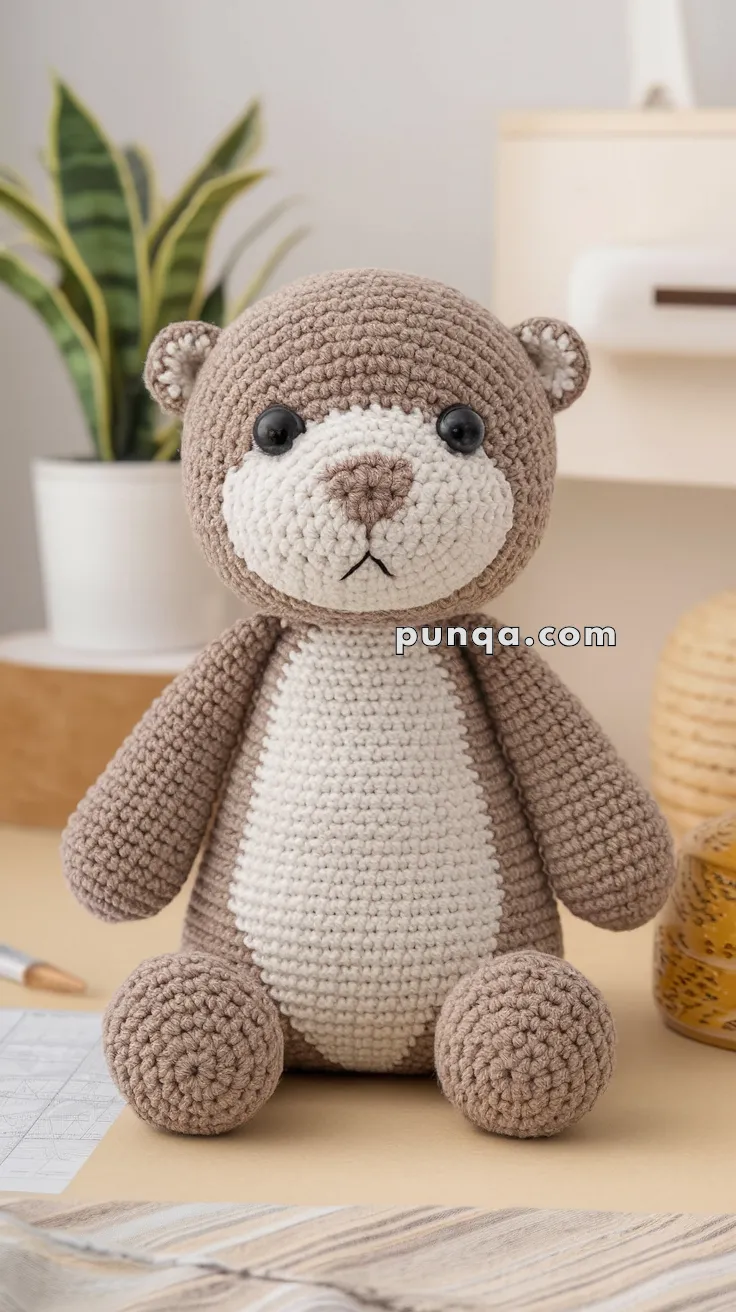
Dive into cuteness with the Amigurumi Otter Baby, a heart-melting crochet project that’s perfect for animal lovers and soft toy enthusiasts alike! 🦦🧶 With its round little belly, sweet stitched smile, and tiny paws just waiting for a cuddle, this baby otter is ready to float into your heart. Whether you’re crafting a nursery companion, a pocket-sized gift, or a playful desk buddy, this otter brings cozy charm and gentle whimsy to every stitch.
Perfect for crocheters who enjoy quick, lovable makes, this pattern invites you to personalize your otter with accessories like a seashell, scarf, or even a mini fish friend. Try earthy tones for a natural look or pastel shades for a dreamy twist. Whether you make one or a whole raft of otters, the Amigurumi Otter Baby is a delightful way to stitch up smiles—one adorable loop at a time! 🌊💙
🦦 Amigurumi Baby Otter Crochet Pattern
This sweet baby otter amigurumi features a large rounded head, a plump oval body with a cream belly, short floppy arms, chunky seated legs, and a gentle embroidered expression. With its soft proportions and calm posture, this otter is designed to sit securely and look irresistibly cuddly—perfect for nursery décor, gifting, or a cozy handmade companion.
✨ Skill Level
Beginner to Intermediate – simple shaping, color changes, appliqué, and basic embroidery.
📏 Finished Size
Approx. 22–25 cm (9–10 inches) tall when seated, using worsted-weight yarn and a 3.5 mm hook.
🧶 Materials
Yarn (Worsted Weight):
- Light Brown – ~70 g (head, body, arms, legs, ears)
- Cream – ~35 g (snout, belly patch, inner ears)
- Dark Brown – small amount (nose and mouth embroidery)
Notions:
- 3.0–3.5 mm crochet hook
- 8–10 mm black safety eyes
- Polyester fiberfill stuffing
- Tapestry needle
- Stitch marker
- Scissors
- Optional blush or pastel for cheeks
🧵 Abbreviations (US Terms)
MR – Magic Ring
sc – single crochet
inc – increase (2 sc in one stitch)
dec – decrease (sc2tog)
sl st – slip stitch
FO – fasten off
Work in continuous rounds unless stated otherwise.
🧠 Head (Light Brown)
R1: MR, 6 sc (6)
R2: inc ×6 (12)
R3: (sc, inc) ×6 (18)
R4: (2 sc, inc) ×6 (24)
R5: (3 sc, inc) ×6 (30)
R6: (4 sc, inc) ×6 (36)
R7–R14: sc around (36)
Insert safety eyes between R10–R11, spaced 6–7 stitches apart.
R15: (4 sc, dec) ×6 (30)
R16: (3 sc, dec) ×6 (24)
Begin stuffing firmly.
R17: (2 sc, dec) ×6 (18)
R18: (sc, dec) ×6 (12)
R19: dec ×6 (6)
FO, close, and shape into a smooth round head.
🐚 Snout / Muzzle (Cream – Flat Oval Appliqué)
Ch 12
R1: sc in 2nd ch from hook, sc 10, 3 sc in last ch; rotate, sc 10, inc (26)
R2: inc, sc 10, inc ×3, sc 10, inc ×2 (32)
R3–R5: sc around (32)
FO, do not stuff.
Stretch gently into a horizontal oval.
Sew flat to the lower face so:
- The eyes sit just above the top edge
- The bottom edge reaches the chin
Embroidery:
- Nose: small vertical oval in dark brown, centered
- Mouth: short vertical stitch below nose, splitting into a soft “Y”
🧸 Body (Light Brown)
R1: MR, 6 sc (6)
R2: inc ×6 (12)
R3: (sc, inc) ×6 (18)
R4: (2 sc, inc) ×6 (24)
R5: (3 sc, inc) ×6 (30)
R6–R18: sc around (30)
R19: (4 sc, dec) ×5 (25)
R20: sc around (25)
FO. Stuff firmly to keep the body plump and stable.
🤍 Belly Patch (Cream – Elongated Oval)
R1: MR, 6 sc (6)
R2: inc ×6 (12)
R3: (sc, inc) ×6 (18)
R4: (2 sc, inc) ×6 (24)
R5: (3 sc, inc) ×6 (30)
R6–R12: sc around (30)
FO, flatten gently.
Sew vertically to the front of the body, centered and aligned with the snout once the head is attached.
🐾 Arms (Make 2 – Light Brown)
R1: MR, 6 sc (6)
R2: (sc, inc) ×3 (9)
R3–R10: sc around (9)
Stuff lightly (top only).
FO and sew to the sides of the body at mid-height, angled slightly forward so they rest naturally.
🦶 Legs (Make 2 – Light Brown)
R1: MR, 6 sc (6)
R2: inc ×6 (12)
R3: (sc, inc) ×6 (18)
R4: (2 sc, inc) ×6 (24)
R5–R7: sc around (24)
R8: (2 sc, dec) ×6 (18)
R9–R10: sc around (18)
Stuff very firmly to create a round, ball-like shape.
FO and sew flat to the bottom front of the body so the otter sits upright.
👂 Ears (Make 2 – Light Brown)
R1: MR, 6 sc (6)
R2: inc ×6 (12)
R3: sc around (12)
FO, flatten slightly, and sew to each side of the head just above the eye line, keeping them small and subtle.
🧷 Assembly Order
- Sew belly patch to body
- Attach head to body securely
- Sew snout appliqué and embroider face
- Attach arms at mid-body
- Sew legs flat to the front base
- Attach ears symmetrically
- Add optional blush to cheeks
🌟 Final Touch
Your baby otter is complete 🦦
With its rounded silhouette, flat cream muzzle, and gentle expression, this little otter sits calmly and looks wonderfully huggable. A timeless amigurumi design that feels soft, peaceful, and full of heart—perfect for gifting or keeping close as a handmade treasure.