Welcome to the enchanting and woodland-inspired world of amigurumi! 🦌✨ Today, I’m excited to share my free crochet pattern for an Amigurumi Fawn—a delicate and whimsical creation perfect for nature lovers, forest-themed décor enthusiasts, or anyone who enjoys crafting adorable and expressive plush designs! 🧶 Whether you love stitching up gentle creatures, experimenting with soft textures, or simply want to add a charming fawn to your handmade lineup, this pattern will guide you through crafting a beautifully sculpted plush with tiny spots, graceful legs, and a touch of woodland magic! 🍃
This design embraces warm browns, creamy whites, and intricate shaping to bring a cozy and playful presence to your crochet projects! 🧶✨ I’ve carefully outlined each step to ensure your Amigurumi Fawn turns out just right—ready to brighten up your collection or become a treasured handmade gift! 🎁 So grab your hooks, pick out earthy hues, and let’s stitch up a fantastic fawn! 🦌
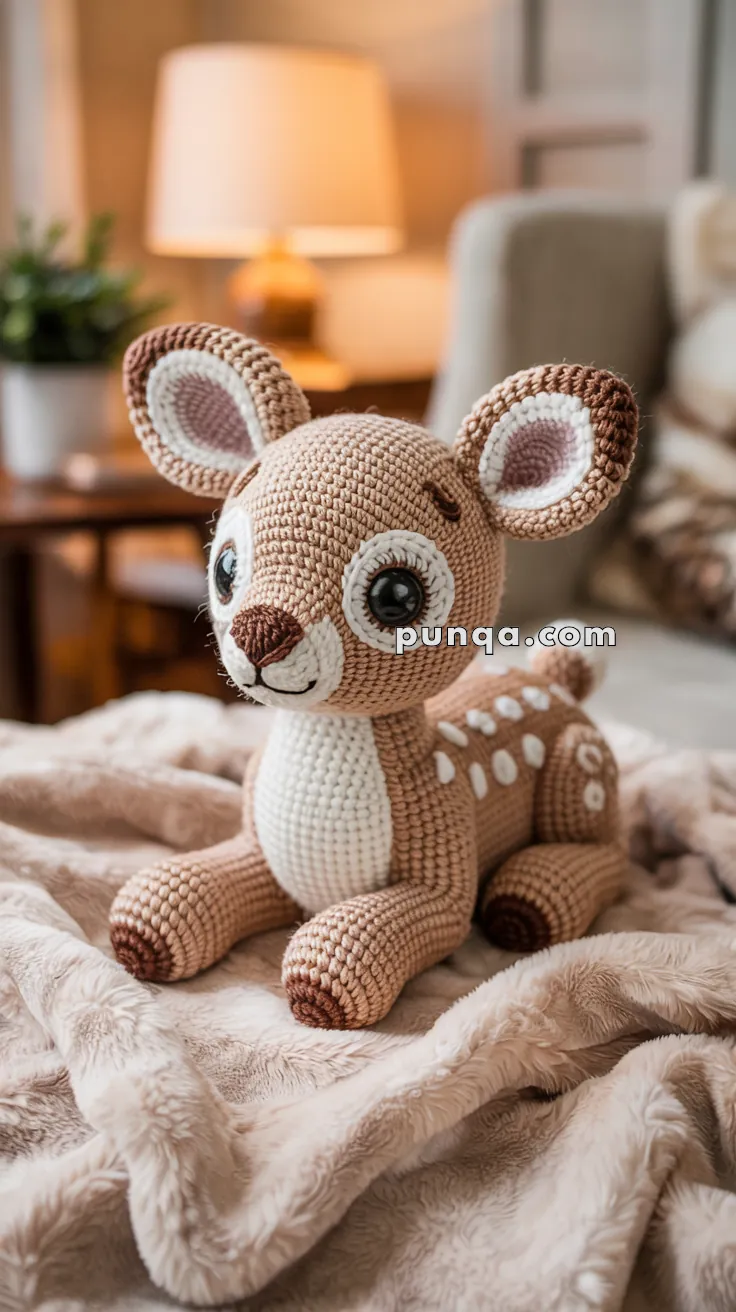
🦌 Amigurumi Fawn Crochet Pattern
Soft, gentle, and irresistibly sweet — this amigurumi fawn perfectly captures the spirit of a woodland baby deer! With its big expressive eyes, wide cream muzzle, pink-tinged ears, and delicate white spots, this cozy companion brings handmade forest charm to any room.
✨ Skill Level
Intermediate – shaping, leg construction, and appliqué placement.
📏 Finished Size
Approx. 11–12 in (28–30 cm) long, seated
(using worsted-weight yarn and a 3.0–3.5 mm hook)
🧶 Materials
Yarn (Worsted Weight):
- Light Brown – body, head, ears, legs
- Cream – muzzle, belly, eye patches, tail, inner ears
- Dark Brown – hooves, nose
- White – spots
Notions:
- 12 mm safety eyes
- 3.0–3.5 mm crochet hook
- Polyfill stuffing
- Black embroidery thread (smile & lashes)
- Tapestry needle, scissors, stitch marker
🧵 Abbreviations (US Terms)
MR – Magic Ring
sc – Single Crochet
inc – Increase (2 sc in one stitch)
dec – Decrease (sc 2 together)
sl st – Slip Stitch
ch – Chain
FO – Fasten Off
🐾 Front Legs (Make 2 – Slim & Extended)
Dark Brown (Hoof):
R1 – MR, 6 sc (6)
R2 – inc ×6 (12)
R3 – sc around (12)
Switch to Light Brown:
R4–13 – sc around (12)
Lightly stuff the lower half only.
Flatten very slightly.
Do not FO the second leg.
On the second leg, ch 4 and join to the first leg.
🦌 Body (Light Brown – Compact Oval)
Continue from joined legs:
R1 – sc around leg 1 (12), sc 4 across chain, sc around leg 2 (12), sc 4 on other side of chain (32)
R2–6 – sc around (32)
R7 – (3 sc, inc) ×8 (40)
R8–14 – sc around (40)
R15 – (4 sc, dec) ×6 (34)
R16 – sc around (34)
R17 – (3 sc, dec) ×6 (28)
R18 – (2 sc, dec) ×6 (24)
Stuff firmly, shaping into a rounded oval.
R19 – (1 sc, dec) ×6 (18)
FO and close.
🦵 Back Legs (Make 2 – Bent Sitting Legs)
These legs support the upright seated pose.
Dark Brown (Hoof):
R1 – MR, 6 sc (6)
R2 – inc ×6 (12)
R3 – sc around (12)
Switch to Light Brown:
R4 – (1 sc, dec) ×4 (8)
R5–9 – sc around (8)
Lightly stuff hoof and lower leg only.
Top should remain soft so the leg can bend naturally.
FO, leaving a long tail for sewing.
Attachment:
Sew legs under the body, angled slightly forward and outward.
The body should rest gently on them to create a stable seated posture.
🧠 Head (Light Brown – Baby Proportions)
R1 – MR, 6 sc (6)
R2 – inc ×6 (12)
R3 – (1 sc, inc) ×6 (18)
R4 – (2 sc, inc) ×6 (24)
R5 – (3 sc, inc) ×6 (30)
R6 – (4 sc, inc) ×6 (36)
R7–14 – sc around (36)
Insert 12 mm safety eyes between R9–10, approx. 9 sts apart.
R15 – (4 sc, dec) ×6 (30)
R16 – (3 sc, dec) ×6 (24)
Stuff firmly, shaping full cheeks.
R17 – (2 sc, dec) ×6 (18)
R18 – (1 sc, dec) ×6 (12)
R19 – dec ×6 (6)
FO and close.
🐽 Muzzle (Cream – Rounded Oval)
Ch 10
R1 – sc in 2nd ch, sc 7, 3 sc in last ch; rotate, sc 7, inc (22)
R2 – inc, sc 7, inc ×3, sc 7, inc ×2 (28)
R3–4 – sc around (28)
FO.
Sew low on face, centered beneath the eyes.
Embroider a small dark brown oval nose and a short vertical line with a gentle curved smile.
👀 Eye Patches (Cream – Tall Ovals, Make 2)
Ch 9
R1 – sc in 2nd ch, hdc, dc ×3, hdc, sc, 3 sc in last ch
Rotate: sc, hdc, dc ×3, hdc, sc (20)
R2 – sc around, adding 2 sc at both ends (24)
R3 – sc around (26)
FO.
Eyes pass through the patches and head.
Optional: embroider subtle upper lashes.
🤍 Belly Patch (Cream – Narrow Vertical Panel)
R1 – MR, 6 sc (6)
R2 – inc ×6 (12)
R3 – (1 sc, inc) ×6 (18)
R4 – (2 sc, inc) ×4 (22)
R5–10 – sc around (22)
FO.
Flatten and sew centered on the chest and belly.
👂 Ears (Make 2 – Tall & Softly Cupped)
Outer Ear (Light Brown):
R1 – MR, 6 sc (6)
R2 – (1 sc, inc) ×3 (9)
R3 – (2 sc, inc) ×3 (12)
R4–9 – sc around (12)
FO.
Inner Ear (Cream):
Repeat to R7 only.
Sew inner ear inside outer ear.
Fold base slightly and attach high on the head, angled outward.
🐕 Tail (Cream – Small Nub)
R1 – MR, 6 sc (6)
R2 – (1 sc, inc) ×3 (9)
R3 – sc around (9)
FO.
Flatten and sew low on the back.
🤍 Spots (White – Make 6)
Ch 4
R1 – sc in 2nd ch, hdc, 3 sc in last ch; rotate, hdc, sc (9)
FO.
Sew 6 spots across the rear half of the body.
Start low near the base, allowing one or two spots to rise slightly toward mid-body.
Do not place spots near the shoulders or neck.
✂️ Assembly Order
1️⃣ Sew belly patch to body
2️⃣ Attach back legs underneath the body
3️⃣ Attach head close to body with minimal neck
4️⃣ Sew muzzle
5️⃣ Attach eye patches and insert eyes
6️⃣ Sew ears
7️⃣ Position and sew front legs stretched forward
8️⃣ Sew tail and spots
🌲 Finished Fawn
Your woodland fawn is complete 🦌
With its gentle seated pose, soft baby proportions, expressive eyes, and subtle spotted back, this sweet deer brings warmth, calm, and forest charm to any handmade collection.