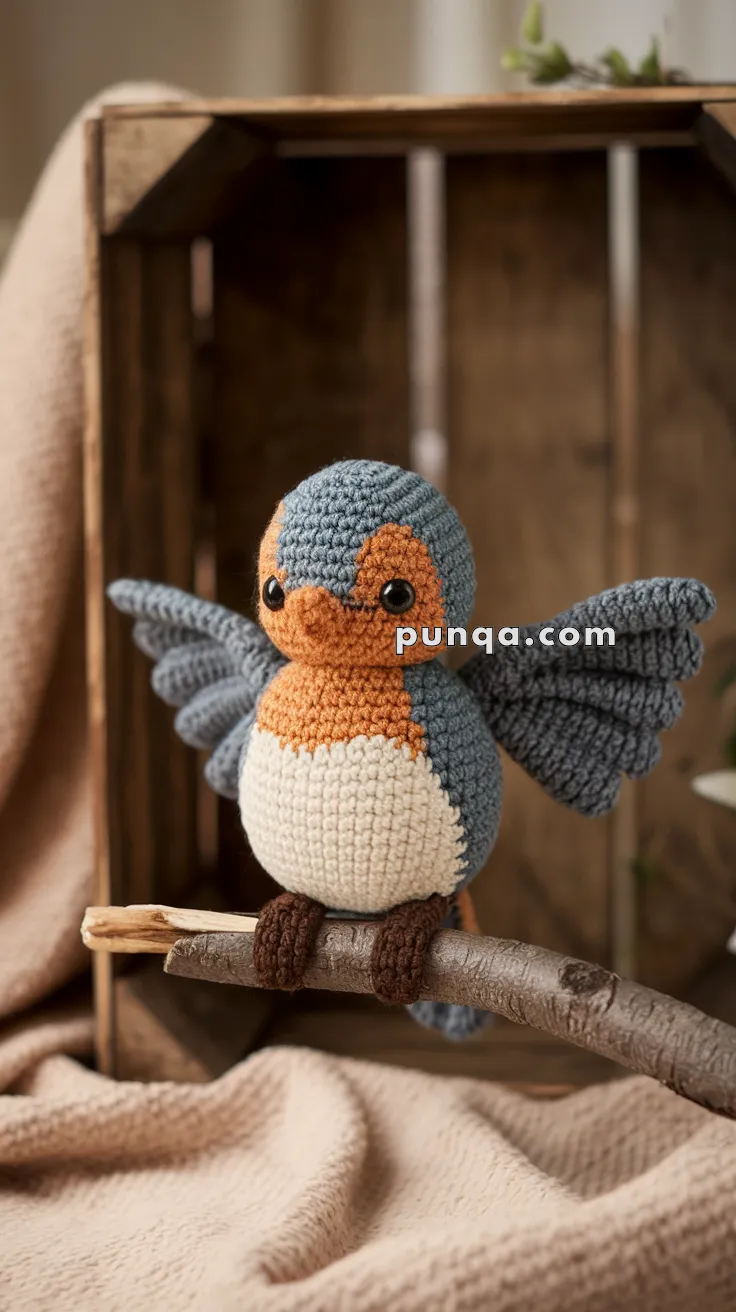
Bring the charm of a Robin Baby to life with this Amigurumi Robin Baby crochet pattern! 🐦✨ With its round, fluffy body, bright red chest, and tiny wings, this design captures the essence of a beloved garden bird in yarn form. Whether you’re crafting for a nature-inspired décor piece, a heartfelt gift, or simply love bird-themed amigurumi, this FREE pattern is a delightful addition to your collection.
Designed for intermediate crocheters, this pattern allows for customization in feather textures, beak details, and even tiny accessories like a miniature nest or cozy scarf to enhance its personality. Choose classic russet reds and browns for a realistic look or experiment with pastel hues for a whimsical twist! Whether displayed as part of a woodland setup or gifted to a fellow crochet enthusiast, this amigurumi robin baby is sure to bring smiles. Grab your hook, select your favorite yarn, and let’s bring this adorable little bird to life—one stitch at a time! 🧶✨
🐦 Amigurumi Robin Baby Crochet Pattern
This charming robin baby is ready to perch and spread its wings! With its bright burnt-orange chest, slate-blue wings, and tiny gripping toes, this little bird makes a wonderful spring or holiday decoration.
✨ Skill Level
Intermediate – requires shaping, tapestry-style color changes, layered wing construction, and toe assembly.
📏 Finished Size
Approx. 20–22 cm (8–9″) tall when using worsted-weight yarn and a 2.5–3 mm hook.
🧶 Materials
-
Worsted weight yarn in:
-
Burnt orange (face and chest)
-
Cream or soft white (belly)
-
Slate blue or dark grey (head, wings, back)
-
Dark brown (feet)
-
Small amount of black (beak embroidery)
-
-
Crochet hook: 2.5–3.0 mm
-
10 mm safety eyes
-
Fiberfill stuffing
-
Stitch markers
-
Tapestry needle & scissors
🧵 Abbreviations (US Terms)
-
MR = Magic Ring
-
SC = Single Crochet
-
INC = Increase (2 SC in same stitch)
-
DEC = Decrease (sc2tog)
-
CH = Chain
-
SL ST = Slip Stitch
-
BLO = Back Loop Only
-
FLO = Front Loop Only
-
FO = Fasten Off
🟠 Head & Body (worked bottom-up in one piece)
Start with burnt orange yarn:
-
MR, 6 SC [6]
-
INC x6 [12]
-
(SC, INC) x6 [18]
-
(2 SC, INC) x6 [24]
-
(3 SC, INC) x6 [30]
-
(4 SC, INC) x6 [36]
7–9. SC around [36]
➡️ Switch to split colors: use cream (belly) for the front half and slate blue (back/head) for the back half. Carry yarn inside using tapestry crochet.
10–16. SC around [36] with half-and-half color change.
17. (4 SC, DEC) x6 [30]
18. (3 SC, DEC) x6 [24]
19. (2 SC, DEC) x6 [18]
20. (SC, DEC) x6 [12] – stuff firmly.
21. DEC x6 [6], FO, close.
👁 Eyes & Beak
-
Insert safety eyes between rounds 7–8, about 10–11 stitches apart, placed within the orange mask.
-
Embroider a small black triangular beak between the eyes.
🪽 Wings (Make 2 – Slate Blue)
Each wing has a feathered look with layered shaping.
-
CH 12
-
SC in 2nd CH from hook, SC across [11]
-
CH 1, turn, DEC, SC 7, DEC [9]
-
CH 1, turn, DEC, SC 5, DEC [7]
-
CH 1, turn, DEC, SC 3, DEC [5]
-
CH 1, turn, DEC, SC 1, DEC [3]
-
CH 1, turn, DEC, SC [2]
FO, leave long tail.
➡️ Make two panels per wing, then sew/overlap them for a layered effect. Attach both wings at shoulder height, angled slightly outward.
🦶 Feet (Make 2 – Dark Brown)
Each foot has 3 long toes that grip a perch.
Toes (make 3 per foot):
-
MR, 4 SC [4]
2–6. SC around [4] – creates a narrow tube.
FO, leave tail.
Sew three toes side by side.
Then create a small base:
-
CH 5, SC across, forming a pad.
-
Attach toes to pad.
-
Sew securely to underside of body.
➡️ Position around a stick or perch so the robin can “grip.”
✨ Tail (Optional – Slate Blue)
-
MR, 6 SC [6]
-
INC x6 [12]
3–4. SC around [12]
FO, sew low at back.
🧷 Assembly
-
Sew wings securely to the body.
-
Attach feet so the toes wrap naturally around a branch or perch.
-
Sew on optional tail stub.
-
Embroider a soft feather edge between orange chest and cream belly for a natural transition.
🎉 Final Touch
Your robin baby is complete! With its wide wings, plump belly, and perched toes, it’s ready to brighten your home. Perch it on a wooden stick, display it in a cozy corner, or gift it to a bird-lover in your life. 🪶