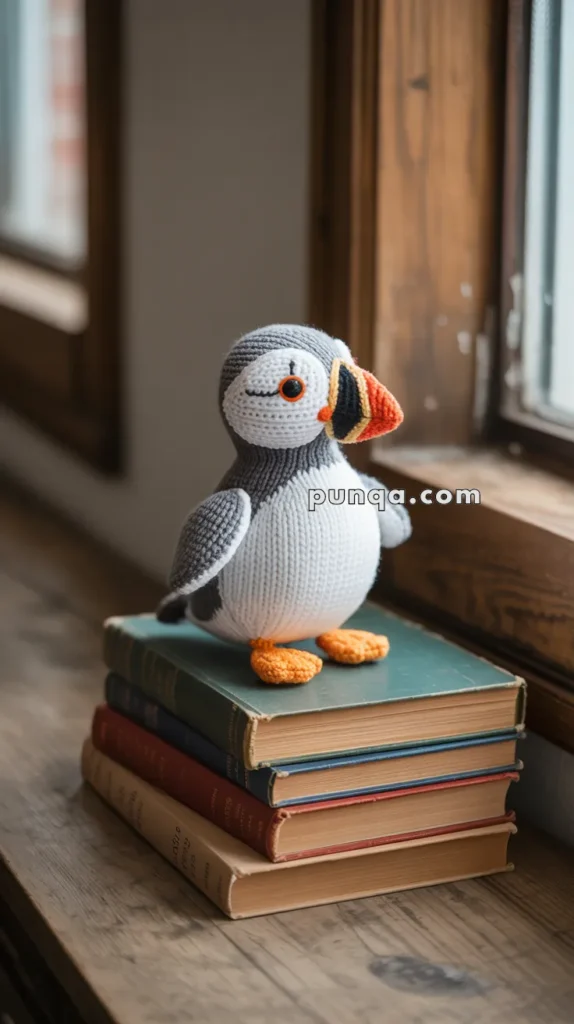
Bring the charming personality of a Puffin to life with this Amigurumi Puffin (Adult) crochet pattern! 🐦✨ With its distinctive beak, bold black-and-white plumage, and adorable stance, this design captures the essence of this beloved seabird in yarn form. Whether you’re crafting for a coastal-inspired décor piece, a heartfelt gift, or simply love bird-themed amigurumi, this FREE pattern is a fantastic addition to your collection.
Designed for intermediate crocheters, this pattern allows for customization in beak colors, wing textures, and even tiny accessories like embroidered details or a miniature fish to enhance its personality. Choose classic black, white, and orange for a realistic look or experiment with pastel hues for a whimsical twist! Whether displayed as part of a marine setup or gifted to a fellow crochet enthusiast, this amigurumi puffin is sure to impress.
Grab your hook, select your favorite yarn, and let’s bring this adorable seabird to life—one stitch at a time! 🧶✨
🐧 Amigurumi Puffin Crochet Pattern
Create your own adorable seabird with this amigurumi puffin pattern! Known for their charming faces and colorful beaks, puffins make a delightful project for bird lovers and coastal décor fans alike. This crochet version captures all the cuteness with bold colors and easy construction.
✨ Skill Level
Intermediate – Includes color changes, shaping, and detailed parts assembly.
📏 Finished Size
Approx. 8–9 inches (20–23 cm) tall using worsted weight yarn and a 2.75 mm hook.
🧶 Materials
- Worsted weight yarn:
- White (body front, face)
- Dark grey or black (back, head, wings, tail)
- Orange (beak and feet)
- Yellow and red (beak accents)
- 2.75 mm crochet hook
- 12 mm safety eyes
- Polyfill stuffing
- Tapestry needle
- Stitch marker
- Scissors
🧵 Abbreviations (US Terms)
MR – Magic Ring
sc – Single Crochet
inc – Increase
dec – Decrease
sl st – Slip Stitch
ch – Chain
st(s) – Stitch(es)
FO – Fasten Off
⚪ Body (Work from bottom up, start with white, then switch to grey)
- MR, 6 sc (6)
- inc x6 (12)
- (1 sc, inc) x6 (18)
- (2 sc, inc) x6 (24)
- (3 sc, inc) x6 (30)
- (4 sc, inc) x6 (36)
7–14. sc around (36) - Switch to dark grey, sc around (36)
16–23. sc around (36) - (4 sc, dec) x6 (30)
- (3 sc, dec) x6 (24)
- (2 sc, dec) x6 (18) – Stuff firmly
- (1 sc, dec) x6 (12)
- dec x6 (6), FO and close with needle.
🔴 Beak (worked flat in color segments)
Start with orange:
- ch 5, turn, sc in 2nd ch and across (4)
2–3. sc across (4)
Switch to yellow:
4–5. sc across (4)
Switch to red:
6–8. sc across (4)
FO and fold into a wedge, stitch the curve closed, and sew to the front of the face.
⚪ Head (Begin with white, switch to dark grey)
- MR, 6 sc (6)
- inc x6 (12)
- (1 sc, inc) x6 (18)
- (2 sc, inc) x6 (24)
- (3 sc, inc) x6 (30)
- (4 sc, inc) x6 (36)
7–9. sc around (36)
Switch to dark grey:
10–13. sc around (36) - (4 sc, dec) x6 (30)
- (3 sc, dec) x6 (24)
- (2 sc, dec) x6 (18) – Stuff firmly
- (1 sc, dec) x6 (12)
- dec x6 (6), FO and close.
Insert safety eyes between rounds 7–8 of the head (white area), approx. 8 stitches apart.
🟤 Wings (Make 2 in dark grey)
- MR, 6 sc (6)
- inc x6 (12)
- (1 sc, inc) x6 (18)
4–8. sc around (18) - (1 sc, dec) x6 (12)
10–12. sc around (12)
FO and flatten. Attach to sides of the body just below the neck line.
🟤 Tail (Dark grey)
- MR, 6 sc (6)
- inc x6 (12)
3–5. sc around (12), FO
Flatten and sew to the back of the body near the base.
🟠 Feet (Make 2 in orange)
- MR, 6 sc
- inc x6 (12)
- sc around (12)
- (2 sc, dec) x3 (9)
- sc around (9), FO
Shape into flat triangles and sew to the underside of the puffin.
🧵 Assembly
- Sew the head onto the body.
- Attach the beak centered between the eyes.
- Sew the wings to the sides of the body.
- Attach the feet for stability.
- Add a small black smile using embroidery if desired.
💡 Customization Ideas
- Use velvet yarn for a fluffy puffin look
- Add a felt fish accessory to its beak
- Make a tiny sailor hat for a nautical twist
This puffin will brighten up any shelf, windowsill, or nursery with its coastal flair and charming personality! 🐧🌊