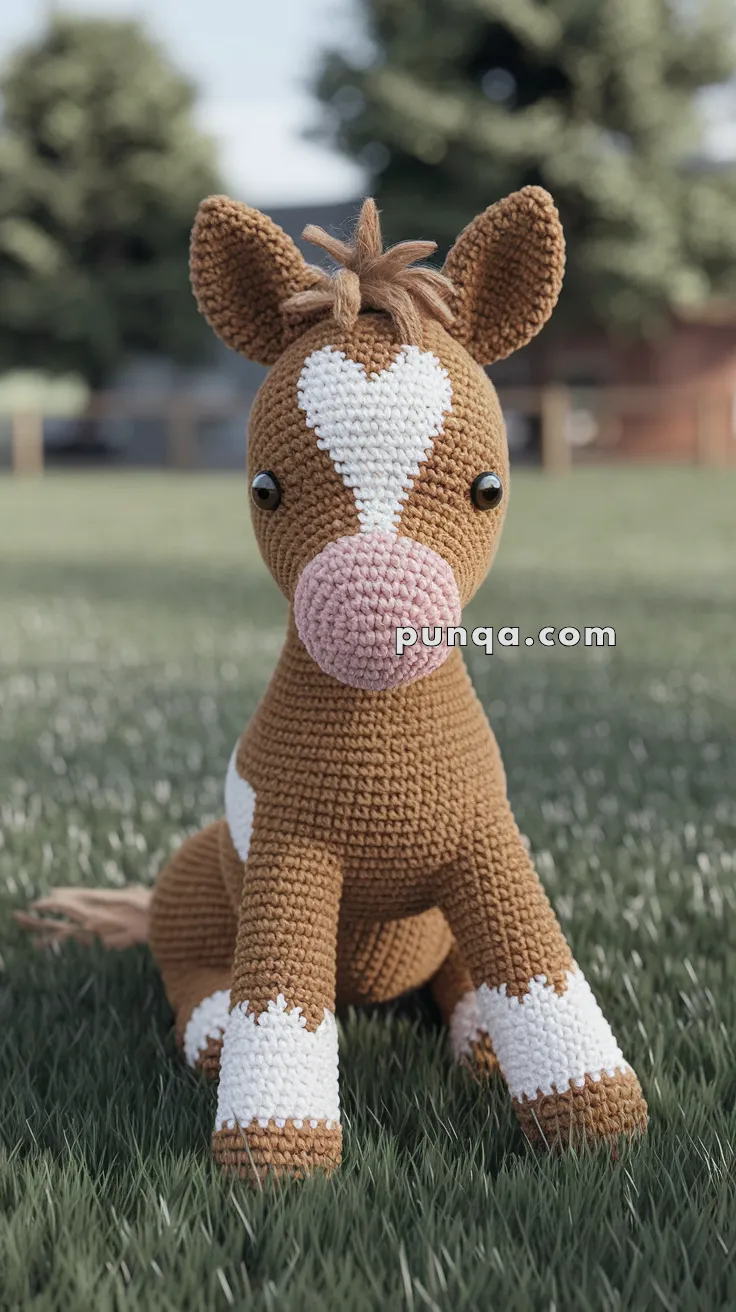
Bring a touch of countryside charm to your crochet collection with the Amigurumi Horse Foal, a project that’s as sweet as it is realistic! 🐴🧶 Designed to closely match the photo, this slim, sitting foal features long legs, upright ears, a rounded pink muzzle, and a delicate white facial blaze. With its soft sock markings and a small fluffy mane tuft, this little foal captures the gentle beauty of a young horse in crochet form.
Perfect for gifting to animal lovers, displaying as nursery décor, or adding to your handmade menagerie, this foal radiates warmth and personality. Easy to stitch yet full of detail, the Amigurumi Horse Foal is a joyful way to crochet coziness, character, and a sprinkle of handmade magic—one loop at a time! 🌿✨🧵
🐴 Amigurumi Horse Foal Crochet Pattern
Bring a touch of gentle countryside charm to your crochet collection with this sweet amigurumi horse foal. Designed with soft curves, delicate proportions, and a calm seated pose, this little foal captures the innocence and elegance of a young horse in yarn form. From the subtle white socks and heart-shaped blaze to the tiny mane tuft and rounded muzzle, every detail comes together to create a timeless handmade companion.
Perfect as a nursery keepsake, a thoughtful gift for horse lovers, or a peaceful decorative piece, this foal is a joy to crochet and even more delightful to display. Whether you’re expanding your amigurumi animal collection or crafting something truly special, this pattern offers a rewarding and relaxing project with a beautiful result.
✨ Skill Level
Intermediate
Requires color changes, clean shaping, precise placement of appliqués, and careful assembly for the seated pose.
📏 Finished Size
Approx. 23–26 cm (9–10 in) tall when seated, using DK or light worsted yarn and a 3.0–3.25 mm hook.
🧶 Materials
Yarn (DK / light worsted):
-
Warm brown – main body, head, ears, legs
-
White – facial blaze, leg socks
-
Soft pink – muzzle
-
Light brown or tan – mane & tail tuft
Other:
-
Crochet hook: 3.0–3.25 mm
-
Safety eyes: 8–10 mm (black)
-
Fiberfill stuffing
-
Tapestry needle
-
Stitch marker
-
Scissors
🧵 Abbreviations (US Terms)
MR – Magic Ring
sc – Single crochet
inc – Increase (2 sc in one stitch)
dec – Decrease (sc2tog)
sl st – Slip stitch
FO – Fasten off
🧠 Head (Brown)
MR, 6 sc (6)
inc x6 (12)
(1 sc, inc) x6 (18)
(2 sc, inc) x6 (24)
(3 sc, inc) x6 (30)
(4 sc, inc) x6 (36)
7–14. sc around (36)
➡ Insert safety eyes between Rounds 10–11, about 7–8 sts apart.
(4 sc, dec) x6 (30)
(3 sc, dec) x6 (24)
(2 sc, dec) x6 (18)
Stuff firmly
(1 sc, dec) x6 (12)
dec x6 (6)
FO and close.
🐽 Muzzle (Pink – Separate Piece)
MR, 6 sc (6)
inc x6 (12)
(1 sc, inc) x6 (18)
(2 sc, inc) x6 (24)
5–7. sc around (24)
Lightly stuff, flatten slightly.
FO, leave long tail.
Sew centered low on the head, forming a rounded snout like the photo.
🤍 Facial Blaze (White Appliqué)
Ch 7
Row 1: sc in 2nd ch from hook, sc 5 (6)
Row 2: inc, sc 4, inc (8)
Row 3: inc, sc 6, inc (10)
FO.
Shape into a soft heart-like blaze, tapering upward.
Sew from forehead down to just above the muzzle, matching the photo exactly.
👂 Ears (Make 2 – Brown)
MR, 6 sc (6)
(1 sc, inc) x3 (9)
(2 sc, inc) x3 (12)
4–6. sc around (12)
(2 sc, dec) x3 (9)
Flatten slightly at base.
FO, leave tail.
Attach high on head, angled slightly outward.
🧶 Mane Tuft (Top of Head)
Cut 6–8 strands, about 6–7 cm long.
Latch-hook them at the crown between the ears.
Trim unevenly for a fluffy, natural foal look (not a long mane).
🐾 Legs (Make 4)
Lower Leg & Sock (White → Brown)
With white:
MR, 6 sc (6)
inc x6 (12)
3–5. sc around (12)
Switch to brown:
6–14. sc around (12)
Lightly stuff the lower half only.
FO, leave tail.
➡ Socks should sit mid-leg, not just at the hooves.
🐴 Body (Brown)
MR, 6 sc (6)
inc x6 (12)
(1 sc, inc) x6 (18)
(2 sc, inc) x6 (24)
(3 sc, inc) x6 (30)
6–12. sc around (30)
(3 sc, dec) x6 (24)
(2 sc, dec) x6 (18)
Stuff firmly, shaping into a slightly forward-leaning oval.
FO, leave opening for sewing head.
🪡 Tail
Ch 10
sc in 2nd ch from hook and across (9)
FO.
Add 4–6 short yarn strands at the tip and trim.
Sew low at the back, angled downward as in the photo.
✂️ Assembly (Critical for Photo Accuracy)
-
Sew head to body, tilting slightly forward.
-
Attach front legs closer together, angled forward for the seated pose.
-
Attach back legs wider apart, angled outward for balance.
-
Ensure the foal sits naturally without support.
-
Check that the blaze, muzzle, and eyes are perfectly centered.
🌟 Finishing Touches
-
Lightly shape the muzzle with your fingers for softness.
-
Do not embroider nostrils or mouth (photo shows a clean face).
-
Keep stitching tight and uniform for a smooth, realistic finish.
💛 Final Notes
This amigurumi horse foal is designed to look truly hand-crocheted, with realistic proportions and gentle details that make it feel alive and expressive. Whether you’re creating it as a nursery keepsake, a gift, or part of a farm animal collection, this foal is sure to steal hearts.
Happy crocheting 🧵🐴