Bring the vibrant charm of a Peacock Chick to life with this Amigurumi Peacock Chick crochet pattern! 🦚✨ With its fluffy body, expressive eyes, and tiny tail feathers, this design captures the essence of this dazzling bird in yarn form. Whether you’re crafting for a nature-inspired décor piece, a heartfelt gift, or simply love bird-themed amigurumi, this FREE pattern is a fantastic addition to your collection.
Designed for intermediate to advanced crocheters, this pattern allows for customization in feather textures, color gradients, and even tiny accessories like embroidered details or a miniature perch to enhance its charm. Choose classic blues and greens for a realistic look or experiment with pastel hues for a whimsical twist! Whether displayed as part of a wildlife setup or gifted to a fellow crochet enthusiast, this amigurumi peacock chick is sure to impress.
Grab your hook, select your favorite yarn, and let’s bring this dazzling bird to life—one stitch at a time! 🧶✨
🦚 Amigurumi Peacock Chick Crochet Pattern
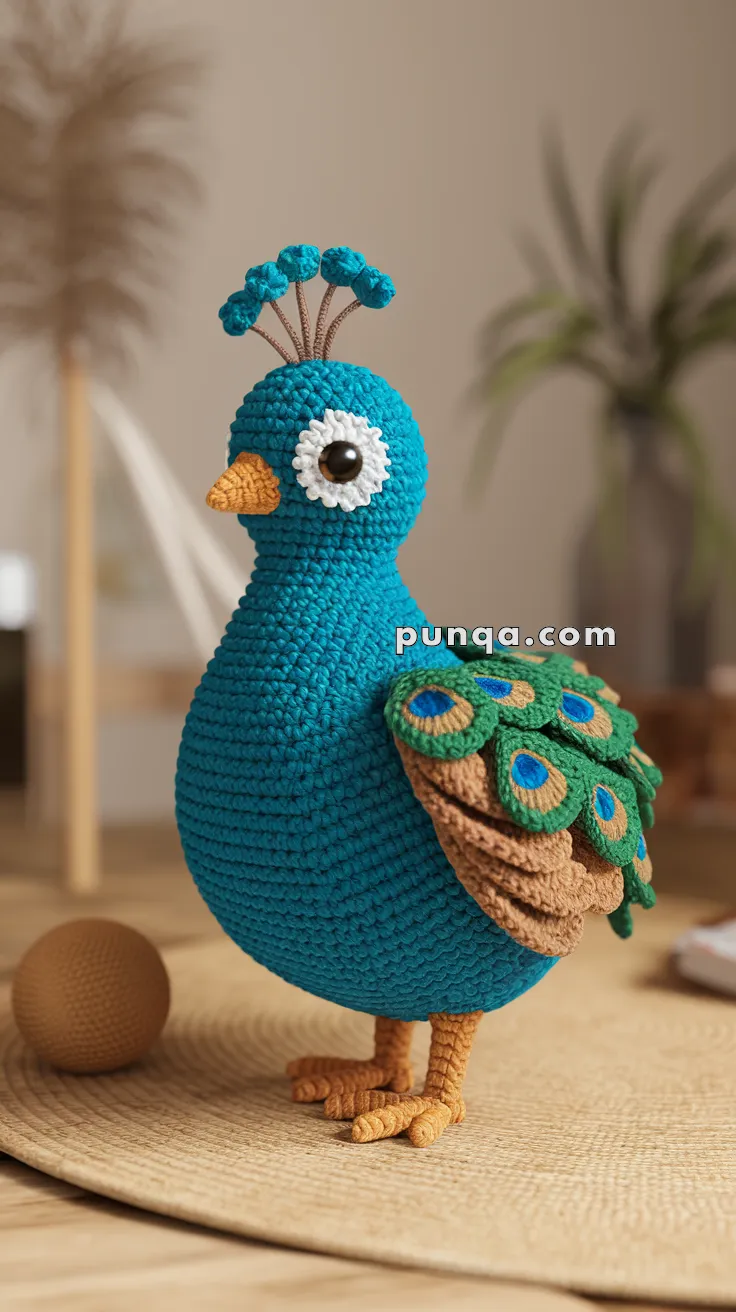
Bring the magic of the peacock into your crochet collection with this charming amigurumi peacock chick! With its teal body, layered feather tail, bright beak, and fluffy crest, this design is both majestic and cute. Perfect for display, gifts, or nursery decor.
✨ Skill Level
Intermediate to Advanced – Requires shaping, layering feathers, color changes, and structured feet.
📏 Finished Size
Approx. 9–10 inches (23–25 cm) tall when using worsted-weight yarn and a 3.5 mm hook.
🧶 Materials
-
Worsted-weight yarn in:
-
Teal (body, head)
-
Orange (feet, beak)
-
White (eye base)
-
Black (pupil/eyes if embroidered)
-
Brown, green, blue, and gold (tail feathers)
-
-
3.5 mm crochet hook
-
Safety eyes (10–12 mm) or black yarn for embroidery
-
Fiberfill stuffing
-
Craft wire (for crest and toes – required)
-
Stitch marker, tapestry needle, scissors
-
Optional: hot glue/fabric glue for securing feathers
🧵 Abbreviations (US Terms)
-
MR – Magic Ring
-
sc – Single Crochet
-
inc – Increase (2 sc in one stitch)
-
dec – Decrease (sc 2 together)
-
sl st – Slip Stitch
-
ch – Chain
-
FO – Fasten Off
-
(…) – Stitch count at end of round
🔹 Body & Head (worked as one piece)
With teal yarn:
-
MR, 6 sc (6)
-
inc x6 (12)
-
(1 sc, inc) x6 (18)
-
(2 sc, inc) x6 (24)
-
(3 sc, inc) x6 (30)
-
(4 sc, inc) x6 (36)
-
(5 sc, inc) x6 (42)
8–24. sc around (42) → this adds fullness like in the photo -
(5 sc, dec) x6 (36)
-
(4 sc, dec) x6 (30)
-
(3 sc, dec) x6 (24)
-
(2 sc, dec) x6 (18)
-
(1 sc, dec) x6 (12)
-
dec x6 (6), FO and close.
Stuff firmly, shaping the body into a rounded base with a narrower neck.
🔹 Beak
With orange yarn:
-
MR, 4 sc (4)
-
(1 sc, inc) x2 (6)
-
sc around (6)
-
dec x3 (3), FO leaving tail.
Stuff lightly and sew to the center front of face.
🔹 Eyes (Make 2)
With white yarn:
-
MR, 6 sc (6)
-
inc x6 (12)
FO, leaving tail. Attach safety eyes in the middle of each white circle. Sew both eye bases on either side of beak.
🔹 Crest (3–5 stalks)
-
Cut 3–5 pieces of craft wire, ~6–7 cm each.
-
Wrap teal yarn tightly around each wire, securing ends.
-
On one end of each wire, crochet a puff: MR, 5 sc, sl st to close, FO.
-
Attach the wire stalks to the top of the head.
🔹 Feet (Make 2)
Each foot has 3 toes worked as tubes, joined together:
Toe (make 3 per foot):
-
MR, 5 sc (5)
2–4. sc around (5)
FO, leaving tail.
Join the 3 toes side by side with yarn, then crochet around all 15 sts for 2 rounds to form the foot pad. Continue up ~6 rows for the ankle/leg. Insert craft wire inside each toe and leg for firmness. Sew both feet to the base of the body.
🔹 Wings (Make 2)
With teal yarn:
-
MR, 6 sc (6)
-
(1 sc, inc) x3 (9)
-
(2 sc, inc) x3 (12)
4–7. sc around (12)
Flatten and FO. Sew to each side of body.
🔹 Tail Feathers (Make 6–8)
Each feather is made in layered colors:
Base (brown):
-
MR, 6 sc (6)
-
(sc, inc) x3 (9)
-
(2 sc, inc) x3 (12)
Switch to green:
4. sc around (12)
Switch to blue:
5. (2 sc, inc) x4 (16)
Gold highlight:
Use surface slip stitch or embroidery to add the golden ring inside the feather.
Make 6–8 feathers. Arrange them in overlapping rows and sew securely to the lower back of the peacock.
🪡 Assembly
-
Sew beak and eyes to face.
-
Attach wings slightly behind body midline.
-
Secure feet to bottom so the peacock stands firmly.
-
Insert crest wires at the top of the head.
-
Arrange tail feathers in 2–3 staggered rows for fullness.
🌟 Finishing Touches
-
Add optional embroidery around the eyes for detail.
-
Lightly steam block feathers to keep them flat and fanned.
-
Adjust crest wires until evenly spaced.
🎉 Final Thoughts
Your amigurumi peacock chick is complete! With its round teal body, bold tail feathers, and elegant crest, this little bird is ready to shine. A beautiful project for anyone who loves exotic animals and colorful crochet creations.