Channel the quiet strength and beauty of the mountains with the Amigurumi Snow Leopard, a majestic crochet project that’s as striking as it is snuggly! 🐾🧶 With its soft spotted coat, long tail, and gentle expression, this elusive feline brings a touch of wild wonder to your handmade collection. Whether you’re crafting for a nature lover, decorating a cozy nook, or adding to your amigurumi menagerie, the snow leopard is sure to leave a lasting impression.
Perfect for crocheters who enjoy detailed shaping and expressive features, this pattern invites you to explore subtle colorwork, textured stitches, and a dash of alpine magic. Customize your snow leopard with icy hues, add a scarf for winter flair, or pair it with other mountain creatures for a full handmade habitat. The Amigurumi Snow Leopard is a beautiful way to stitch up elegance, adventure, and a whisper of the wild—one loop at a time! 🧵❄️

🐆 Amigurumi Snow Leopard Crochet Pattern
Bring the elegance of the wild into your crochet collection with this detailed Snow Leopard amigurumi! With its expressive face, long tail, and iconic spotted coat, this handmade leopard makes the perfect cuddly companion or display piece.
✨ Skill Level
Intermediate
Includes shaping for seated posture, appliqué spot placement, and multi-part assembly.
📏 Finished Size
Approximately 25–28 cm (10–11 inches) tall in seated position
Using DK yarn and a 3.0 mm hook.
🧶 Materials & Yarn Amount
DK / Light Worsted Yarn
• Creamy White – 150 g (head, body, legs, tail, ears, muzzle)
• Dark Chocolate Brown – 35–40 g (spots, ear edging, tail rings, whisker dots)
• Soft Peach – small amount (nose)
Notions
• 14 mm glossy safety eyes
• 3.0 mm crochet hook
• Polyester fiberfill
• Tapestry needle
• Stitch markers
• Scissors
🧵 Abbreviations (US Terms)
MR – magic ring
sc – single crochet
inc – increase
dec – invisible decrease
sl st – slip stitch
FO – fasten off
Work in continuous rounds unless noted.
🐆 Head
R1: MR 6 (6)
R2: inc x6 (12)
R3: (1 sc, inc) x6 (18)
R4: (2 sc, inc) x6 (24)
R5: (3 sc, inc) x6 (30)
R6: (4 sc, inc) x6 (36)
R7: (5 sc, inc) x6 (42)
R8–14: sc around (42)
Insert safety eyes between R10–11, spaced 9 stitches apart.
R15: (5 sc, dec) x6 (36)
R16: (4 sc, dec) x6 (30)
R17: (3 sc, dec) x6 (24)
R18: (2 sc, dec) x6 (18)
Stuff firmly.
R19: (1 sc, dec) x6 (12)
R20: dec x6 (6)
FO and close.
🐾 Muzzle
R1: MR 6
R2: inc x6 (12)
R3: (1 sc, inc) x6 (18)
R4–6: sc around (18)
Lightly stuff and sew centered below eyes.
Embroider a small rounded triangle nose in soft peach.
Stitch a short vertical line down and gently curve the mouth slightly upward on both sides.
Add three tiny whisker dots on each side using brown thread.
👂 Ears (Make 2)
Outer Ear
R1: MR 6
R2: inc x6 (12)
R3–4: sc around (12)
Inner Ear
R1: MR 5
R2: (1 sc, inc) x2, 1 sc (7)
R3: sc around (7)
Place inner ear inside outer ear.
Using dark brown yarn, work a slip stitch edging along the outer rim to create a thin contrast border.
Flatten slightly and sew to head, angled outward and positioned slightly back from the muzzle.
🐆 Body (Seated Shape)
R1: MR 6 (6)
R2: inc x6 (12)
R3: (1 sc, inc) x6 (18)
R4: (2 sc, inc) x6 (24)
R5: (3 sc, inc) x6 (30)
R6: (4 sc, inc) x6 (36)
R7–13: sc around (36)
R14: (4 sc, dec) x6 (30)
R15: sc around (30)
R16: (3 sc, dec) x6 (24)
R17: sc around (24)
R18: (2 sc, dec) x6 (18)
R19: sc around (18)
Stuff firmly, shaping the lower back slightly fuller for natural seated posture.
FO leaving long tail for attaching head.
🐾 Front Legs (Make 2)
R1: MR 6
R2: inc x6 (12)
R3: (1 sc, inc) x6 (18)
R4–7: sc around (18)
R8: (1 sc, dec) x6 (12)
R9–15: sc around (12)
Stuff firmly in paw area, lightly in upper section.
FO.
Attach straight under the chest so the paws rest flat on the surface.
🐾 Back Legs (Make 2)
R1: MR 6
R2: inc x6 (12)
R3: (1 sc, inc) x6 (18)
R4–9: sc around (18)
R10: (1 sc, dec) x6 (12)
R11–14: sc around (12)
Stuff firmly.
Sew to sides of body to form rounded haunches that support the seated pose.
🐆 Tail (Long and Ringed)
R1: MR 6
R2: inc x6 (12)
R3–26: sc around (12)
Create ring pattern near tip:
R27–28: brown
R29–30: white
R31–32: brown
R33–34: white
R35–36: brown
Lightly stuff for flexibility.
FO and sew low on back. Curve slightly forward or to the side.
🟤 Spots (Appliqué Pieces)
Create small and medium spots in dark brown.
Small Spot
MR 6 sc (6)
Medium Spot
MR 6 sc, inc x6 (12)
Make approximately 18–22 spots.
Distribute naturally across:
• Top and sides of head
• Back
• Sides of body
• Outer legs
• Base of tail
Keep muzzle, chest center, inner legs, and paws clean white.
Sew spots securely with small hidden stitches.
🧩 Assembly
• Sew head securely to body
• Attach front legs symmetrically beneath chest
• Position back legs slightly outward
• Attach tail low and slightly angled
• Sew ears
• Add and balance spots evenly
Shape gently by hand after stuffing to refine posture.
🌟 Final Thoughts
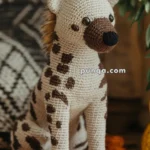
With its creamy coat, scattered chocolate spots, rounded paws, and ringed tail, this snow leopard captures a calm and gentle wild-cat charm. The upright seated pose and soft facial shaping give it both elegance and sweetness.
Take extra care when positioning the spots and shaping the haunches — those details bring the personality forward and make this snow leopard truly lifelike. 🐆✨