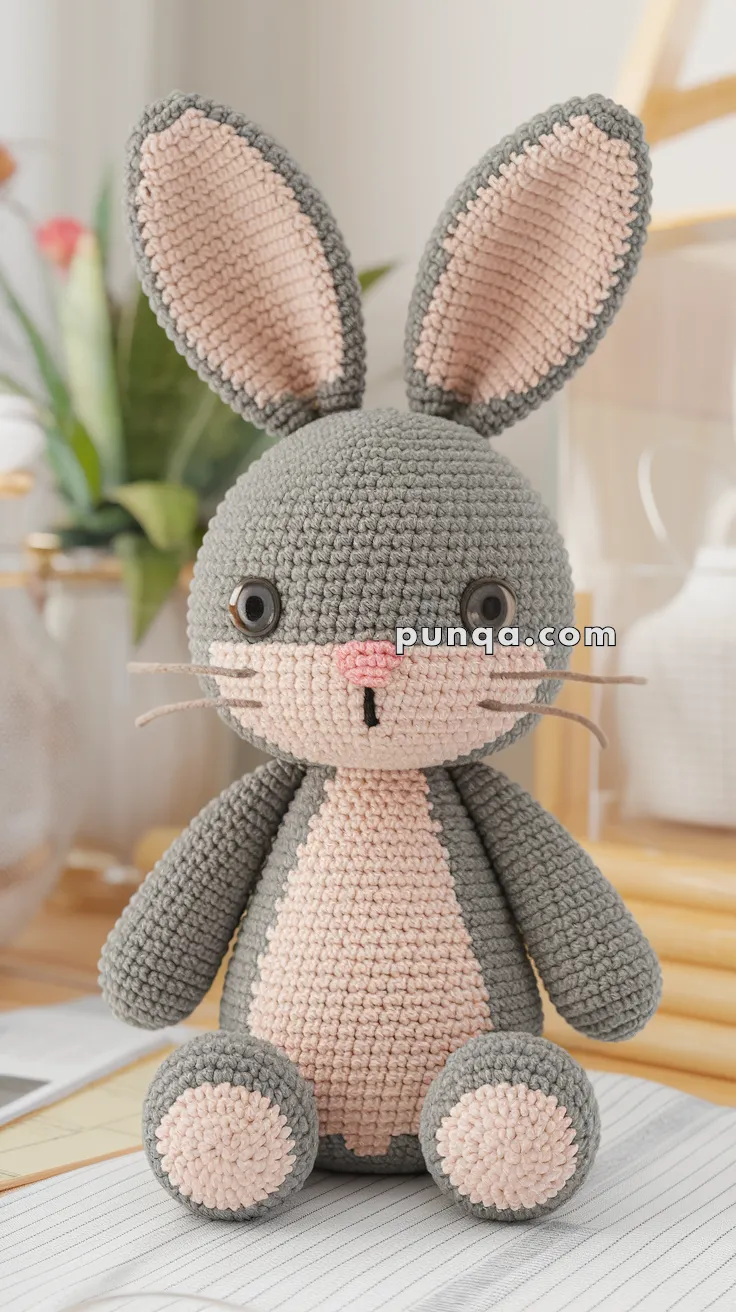
🐰 Amigurumi Rabbit Crochet Pattern
Soft, sweet, and perfectly cuddly — this Amigurumi Rabbit is a classic bunny friend with big floppy ears, adorable paws, and a sweet expression that melts hearts. Ideal for baby gifts, Easter baskets, or simply as a lovable handmade companion.
✨ Skill Level
Easy to Intermediate – basic amigurumi shapes, color changes, and light sewing.
📏 Finished Size
Approx. 11–12 in (28–30 cm) tall including ears (using worsted or velvet yarn and a 3.5 mm hook).
🧶 Materials
-
Yarn (Worsted or Plush Velvet):
-
Gray – main color (head, body, limbs, outer ears)
-
Light pink – snout, belly panel, inner ears, paw pads, nose
-
10–12 mm black safety eyes
-
Black embroidery thread – mouth
-
Light pink thread or thin yarn – whiskers (optional)
-
Polyfill stuffing
-
Crochet hook: 3.5 mm
-
Tapestry needle, scissors, stitch marker
-
Optional: thin craft wire for upright ear support
🧵 Abbreviations (US Terms)
MR – Magic Ring
sc – Single Crochet
inc – Increase (2 sc in same stitch)
dec – Decrease (sc 2 together)
sl st – Slip Stitch
ch – Chain
FO – Fasten Off
🧠 Head (Gray + Pink Face Panel)
1️⃣ MR, 6 sc (6)
2️⃣ inc ×6 (12)
3️⃣ (1 sc, inc) ×6 (18)
4️⃣ (2 sc, inc) ×6 (24)
5️⃣ (3 sc, inc) ×6 (30)
6️⃣ (4 sc, inc) ×6 (36)
7–11️⃣ sc around (36)
12–16️⃣ Switch to light pink, sc around (36) — extends the pink face panel lower as in the photo.
👉 Insert safety eyes between R10–R11, spaced about 8 stitches apart (just above the pink section).
17️⃣ Switch back to gray, (4 sc, dec) ×6 (30)
18️⃣ (3 sc, dec) ×6 (24)
19️⃣ (2 sc, dec) ×6 (18)
20️⃣ (1 sc, dec) ×6 (12)
21️⃣ dec ×6 (6), FO and close.
Stuff firmly into a round sphere shape.
🐽 3D Nose (Pink)
1️⃣ MR, 6 sc (6)
2️⃣ inc ×6 (12)
3️⃣ sc around (12), FO.
Lightly stuff and sew centered onto the pink snout band (slightly raised).
Embroider a short black vertical line below the nose with a tiny split “Y” for the mouth.
Optional: Add thin pink whiskers using embroidery thread.
🧸 Body (Gray with Wide Pink Belly)
1️⃣ MR, 6 sc (6)
2️⃣ inc ×6 (12)
3️⃣ (1 sc, inc) ×6 (18)
4️⃣ (2 sc, inc) ×6 (24)
5️⃣ (3 sc, inc) ×6 (30)
6–15️⃣ sc around (30) → keeps the full, round belly.
16️⃣ Switch to light pink for belly panel: sc 12 in pink (front center), switch to gray for remaining 18 sc.
Repeat for 6–8 rounds, maintaining alignment to create a wide oval patch that covers most of the torso.
17️⃣ Switch fully to gray. (4 sc, dec) ×5 (25)
18–19️⃣ sc around (25) → minimal taper for the natural neck join.
FO and stuff very firmly to keep the spherical, plush shape.
🐾 Legs (Make 2 – Gray + Pink Paw Pads)
1️⃣ With pink, MR, 6 sc (6)
2️⃣ inc ×6 (12)
3️⃣ (1 sc, inc) ×6 (18)
4️⃣ Switch to gray, sc around (18)
5–7️⃣ sc around (18)
Stuff lightly — feet should stay soft and slightly flat.
FO. Sew to bottom front of body so they face forward and help balance the bunny.
👉 For accuracy, sew or glue a separate pink crochet circle (MR, 6 → inc ×6 → sc around 18 sts) to the sole for a clear paw pad effect.
✋ Arms (Make 2 – Gray)
1️⃣ MR, 6 sc (6)
2️⃣ inc ×6 (12)
3–10️⃣ sc around (12)
Stuff lightly.
FO and sew evenly on both sides just below the head.
👂 Ears (Make 2 – Outer Gray + Inner Pink)
Outer Ear (Gray):
1️⃣ Ch 20, sc in 2nd ch from hook and across (19), 3 sc in last ch; rotate, sc 19, inc (42).
2️⃣ inc, sc 17, inc ×3, sc 17, inc ×2 (48).
3–7️⃣ sc evenly around (48), FO.
Inner Ear (Pink):
Ch 18, work same as outer but one round shorter (for a smaller fit).
Sew pink inner section centered to gray ear.
Assembly Tip:
Pinch the base of each ear flat, fold slightly inward to form a natural ear cup, and sew across the folded base before attaching to the top of the head.
(Optional: Insert thin wire for structure.)
🧷 Assembly Order
1️⃣ Sew head to body, aligning the pink snout directly above the belly patch.
2️⃣ Attach arms and legs symmetrically.
3️⃣ Attach ears upright with a gentle inward curve.
4️⃣ Add nose, mouth, and whiskers if desired.
5️⃣ Shape the bunny by gently rolling it in your hands to even out stuffing.
🎀 Final Look
Your bunny should now have:
✅ A perfectly round body with a large pink belly panel
✅ A broad pink snout extending across the lower face
✅ Chubby, flat feet with pink paw pads
✅ Tall oval ears nearly the height of the head
✅ A slightly upturned, plush face full of personality
Your little bunny is ready to hop into hugs! 🐇 Whether for springtime joy or year-round cuteness, this amigurumi rabbit is sure to be a treasured handmade friend.