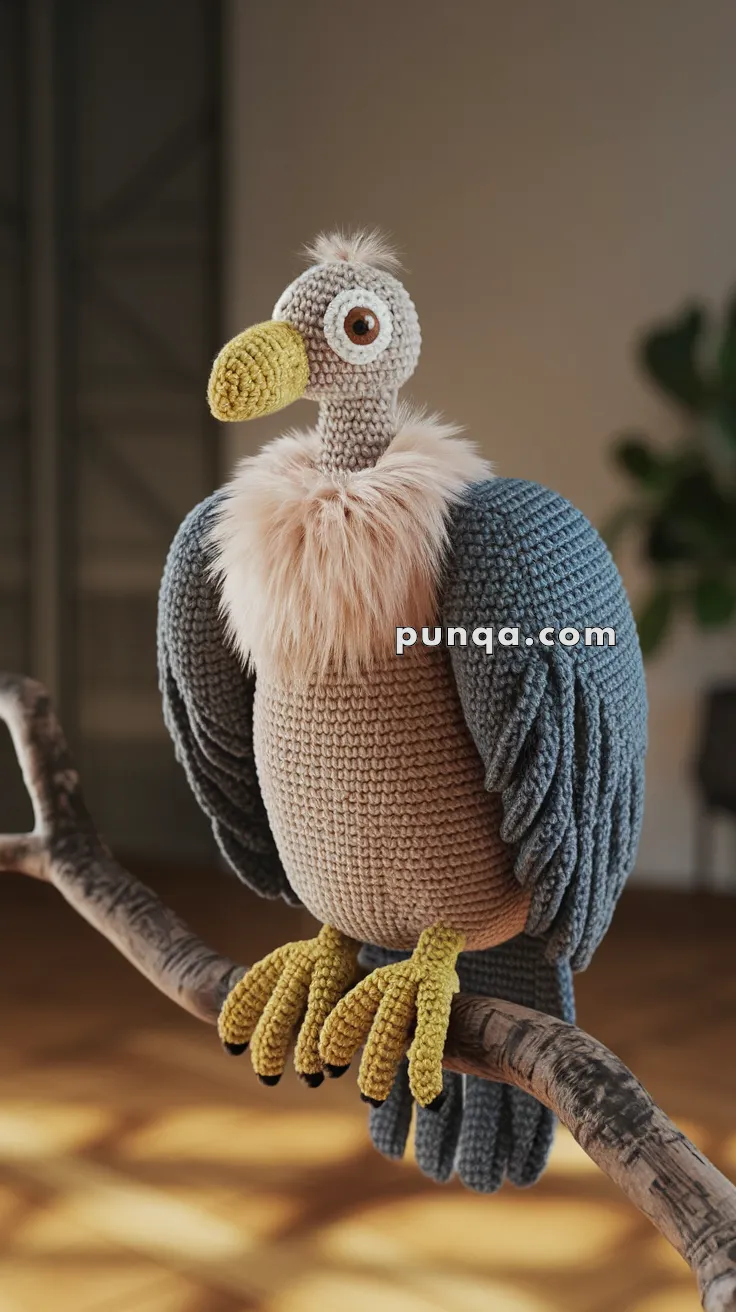
Oh, let me tell you about the joy of creating amigurumi vultures! 🧶 If you’re not familiar with amigurumi, it’s the Japanese art of knitting or crocheting small stuffed animals and creatures, and vultures are such a unique and quirky subject to tackle. Their distinctive features, like bald heads and broad wings, offer an exciting challenge that also lets your creativity soar. Crafting an amigurumi vulture brings this often misunderstood bird to life in an endearing and delightful way. I mean, who would have thought that a creature known for its scavenging could be so cute and cuddly in yarn form? 🦅
The process of creating an amigurumi vulture pattern involves a wonderful blend of imagination and technique. 🧵 First, I brainstorm the design, sketching out ideas to capture the vulture’s charmingly odd appearance. Then comes the fun part: choosing the perfect yarn colors. I love playing with shades of grey, black, and white to mimic the natural plumage, while perhaps adding a splash of color for the beak or eyes for that extra touch of whimsy. Once I’ve gathered my materials, it’s all about crocheting, stuffing, and stitching those adorable little details that make each vulture unique. Whether I’m working on tiny talons or a fluffy tail, every stitch brings me closer to a finished piece that’s ready to perch on a shelf or be gifted to a friend. 🪡

🦅 Amigurumi Vulture Crochet Pattern
Meet the quirky and charming Amigurumi Vulture! With its oversized beak, textured talons, layered wings, and soft faux-fur neck ruff, this clever bird brings personality and fun to your handmade animal collection. A perfect piece for wildlife enthusiasts or Halloween decor!
✨ Skill Level
Advanced – Includes color changes, detailed limb shaping, faux fur integration, and wing layering.
📏 Finished Size
Approx. 12–14 inches (30–35 cm) tall using worsted yarn and a 3.5–4.0 mm crochet hook.
🧶 Materials
-
Yarn (Worsted Weight):
-
Beige or taupe (Body and neck)
-
Gray-blue (Wings and tail feathers)
-
Yellow (Feet and beak)
-
White and brown (Eyes)
-
Black (Talons and details)
-
-
Faux fur yarn or fabric (Neck ruff)
-
Crochet hook: 3.5 mm or 4.0 mm
-
12 mm safety eyes
-
Tapestry needle
-
Polyfill stuffing
-
Scissors
-
Stitch marker
🧵 Abbreviations (US Terms)
-
MR – Magic Ring
-
sc – Single Crochet
-
inc – Increase
-
dec – Decrease
-
sl st – Slip Stitch
-
ch – Chain
-
FO – Fasten Off
🧠 Head & Neck (Taupe/Beige)
-
MR, 6 sc
-
inc x6 (12)
-
(1 sc, inc) x6 (18)
-
(2 sc, inc) x6 (24)
-
R5–10: sc (24)
-
R11: (2 sc, dec) x6 (18)
-
R12–16: sc (18) (this is the neck tube)
-
FO and stuff, leave long tail for sewing to body later
🪶 Body (Taupe)
-
MR, 6 sc
-
inc x6 (12)
-
(1 sc, inc) x6 (18)
-
(2 sc, inc) x6 (24)
-
(3 sc, inc) x6 (30)
-
(4 sc, inc) x6 (36)
-
R7–18: sc (36)
-
R19: (4 sc, dec) x6 (30)
-
R20: (3 sc, dec) x6 (24)
-
R21: (2 sc, dec) x6 (18)
-
FO and stuff firmly
🪶 Neck Ruff (Faux Fur)
-
Cut a strip of faux fur fabric or use faux fur yarn
-
Wrap around base of neck, sew or glue into place
🐤 Beak (Yellow)
-
MR, 6 sc
-
inc x6 (12)
-
R3–5: sc (12)
-
(2 sc, dec) x3 (9)
-
R7: dec x3, sc 3 (6)
-
FO and sew to center of head just below eye level
👁 Eyes
-
Make 2 white circles:
-
MR, 6 sc, sl st to close
-
-
Attach safety eye to center or embroider pupil with brown/black
-
Sew onto head with a slight bulge for character
🐾 Legs & Feet (Make 2 – Yellow & Black)
-
Leg Base (Yellow):
-
MR, 6 sc
-
inc x6 (12)
-
R3–6: sc (12)
-
-
Toes (Make 3 per foot):
-
Ch 5, sc 4 back down
-
Attach to base
-
-
Claw Tips:
-
Use black yarn to embroider or wrap ends of toes
-
-
FO and sew legs to bottom of body
🪽 Wings (Make 2 – Gray Blue)
-
ch 20
-
R1: sc back (19)
-
R2–6: sc rows, each shorter by 1 stitch to form tapered curve
-
Optional: Add layers or surface stitch feather pattern
-
FO and sew to body along sides
🪶 Tail Feathers (Optional – Gray Blue)
-
Make 2–3 narrow curved rectangles or feather shapes
-
Sew to base of body behind legs
✂️ Finishing Touches
-
Attach head to neck, then neck to body securely
-
Add blush or eyebrow details for expression
-
Shape wings with light wire (optional)
💡 Optional Add-ons
-
A perch or faux tree branch base
-
Embroider wrinkles or feather texture
-
Add a little backpack or monocle for quirky charm
Your delightful vulture is complete! 🦅 Whether sitting on a shelf or perched dramatically on a branch, this feathery friend will soar in uniqueness and handmade character.


